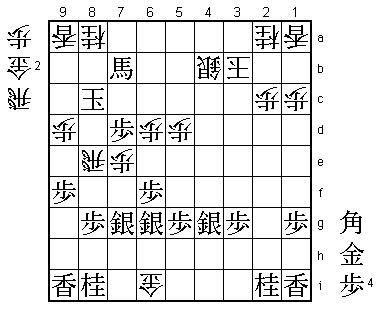
65th Meijin Match Game 5
[Black "Goda Masataka, Challenger"]
[White "Moriuchi Toshiyuki, Meijin"]
[Event "65th Meijin-sen, Game 5"]
[Date "May 30th and 31st 2007"]
1.P2g-2f     00:00:00  00:00:00
2.P8c-8d     00:00:00  00:00:00
3.P2f-2e     00:02:00  00:00:00
4.P8d-8e     00:02:00  00:00:00
5.G6i-7h     00:02:00  00:00:00
6.G4a-3b     00:02:00  00:00:00
7.P2e-2d     00:02:00  00:00:00
8.P2cx2d     00:02:00  00:01:00
9.R2hx2d     00:02:00  00:01:00
10.P*2c      00:02:00  00:01:00
11.R2d-2h    00:03:00  00:01:00

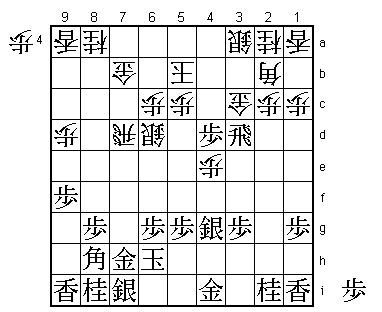
These days, the top professionals prefer to start the fight with the
king in a safe position. The Aigakari opening, in which both kings are
vulnerable is therefore not a very popular opening. Actually, it has been
11 years since this opening was played in the Meijin match. Pulling the rook
back to 2h instead of 2f is a popular way of playing these days and is usually
followed by Bogin attack.

12.P8e-8f    00:03:00  00:06:00
13.P8gx8f    00:03:00  00:06:00
14.R8bx8f    00:03:00  00:06:00
15.P*8g      00:03:00  00:06:00
16.R8f-8d    00:03:00  00:06:00
17.S3i-3h    00:03:00  00:06:00
18.P3c-3d    00:03:00  00:06:00
19.P7g-7f    00:34:00  00:06:00
20.P9c-9d    00:34:00  00:33:00
21.P9g-9f    00:34:00  00:33:00
22.S7a-7b    00:34:00  00:33:00
23.K5i-6h    00:54:00  00:33:00

Goda doesn't play the Climbing Silver here, but a different plan that was
introduced by former Oza title holder Tsukada. The idea behind 23.K6h is to
see what white will play next. If white plays 24.P6d or 24.P7d, then black
will start the attack with 25.P*2d Px2d Rx2d, threatening to take the side pawn
on 3d next. About 20 years ago, Tsukada had a lot of success with the same plan
after pulling the rook back to 2f instead of 2h, called the "Tsukada special".
Therefore this new way of playing is called the "New Tsukada special". Unlike the
old "Tsukada special", this new way of playing has not caught on and only Tsukada
and Goda have played this in official games before this one.

24.K5a-5b    00:54:00  01:11:00
25.P4g-4f    01:52:00  01:11:00
26.P7c-7d    01:52:00  01:33:00
27.S3h-4g    02:02:00  01:33:00
28.S7b-7c    02:02:00  02:09:00
29.P4f-4e    03:01:00  02:09:00

This is the other idea behind the "New Tsukada special". If the white king stays
in the center, the 4th file pawn is pushed up early to put pressure on the king,
usually sacrificing this pawn on 4d. It was interesting that Tsukada was actually
a referee for this game. This of course meant that he had to be neutral about the
outcome of this game, but his comment was clear: "Whoever wins, I hope that black
will get a good position after the opening".

30.P7d-7e    03:01:00  02:51:00
31.P7fx7e    03:05:00  02:51:00
32.S7c-6d    03:05:00  02:51:00
33.P7e-7d    03:31:00  02:51:00
34.G6a-7b    03:31:00  03:14:00
35.P4e-4d    04:13:00  03:14:00
36.P4cx4d    04:13:00  03:29:00
37.P*2d      04:24:00  03:29:00
38.P2cx2d    04:24:00  03:31:00
39.R2hx2d    04:24:00  03:31:00
40.R8dx7d    04:24:00  04:20:00
41.P*4e      04:29:00  04:20:00
42.P4dx4e    04:29:00  04:50:00
43.P*4d      04:31:00  04:50:00
44.P*2c      04:31:00  05:24:00
45.R2dx3d    04:31:00  05:24:00
46.G3b-3c!   04:31:00  05:24:00

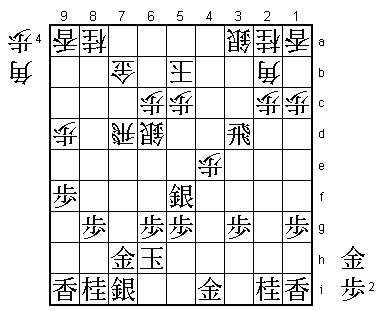
Just like in the third game, Moriuchi doesn't hesitate to use his defending gold
to put pressure on the opponent. However, here it is even more risky, because the
white king position is so vulnerable. There is still no way of telling who his
better in this position.

47.R3d-3f    04:55:00  05:24:00
48.P*3d      04:55:00  05:38:00
49.S4g-5f    05:32:00  05:38:00
50.G3cx4d    05:32:00  06:09:00

No choice. If black is allowed to play Sx4e, the white position will collapse.

51.B8hx4d    05:32:00  06:09:00
52.B2bx4d    05:32:00  06:09:00
53.R3fx3d    05:32:00  06:09:00
54.B4d-2b!   05:32:00  07:02:00

Strong move. 54.B3c or 54.B*3c look stronger, because these moves take away the
threat of sacrificing the rook for the silver on 3a, but this would make the bishop
into a hostage piece that can be taken at any time with the rook.

55.P6g-6f?   06:08:00  07:02:00

Here Goda misses his best chance. Analysis during and after the game showed that
after 55.P*4d the position is perhaps even a little better for black. White has
many replies like 56.P*3b, 56.P4f or 56.S7c (which may be particularly good) and
after the game Goda admitted that he should have played 55.P*4d here. The reason
he didn't play this was that he didn't like 56.P*3c. This was not a move that was
analyzed in the press room, but indeed one of the best replies that white has.
The position seems unclear after 57.R3f S3b R2f P3d G*4c K6b Gx3b Bx4d, but there
is still a lot of room for further study in this position. After 55.P6f, white gets
the upper hand and this is all Moriuchi needs in this game.

56.P4e-4f    06:08:00  07:27:00
57.G4i-4h    07:24:00  07:27:00
58.P*8h      07:24:00  07:50:00
59.S7ix8h    07:24:00  07:50:00
60.P4f-4g+   07:24:00  07:50:00
61.G4hx4g    07:24:00  07:50:00
62.B*5i      07:24:00  07:59:00
63.K6h-6g    07:28:00  07:59:00
64.R7dx7h+!  07:28:00  08:13:00

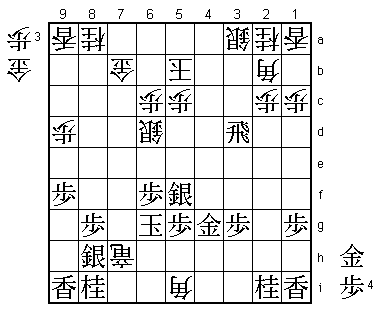
Despite having a weak king position, Moriuchi is going all out on attack here.
This move was of course analyzed in the press room, but it seemed that black
could always escape by making use of the infamous rule that mating with a pawn
drop is not allowed. It seems very unlikely that Moriuchi has calculated everything
until the end, so playing such a risky endgame in such an important game required
a lot of courage. For example, here he could have played the more quiet 64.P*4f
Gx4f B4h+ which probably is also good for white.

65.K6gx7h    07:28:00  08:13:00
66.G*6h      07:28:00  08:13:00
67.K7h-7g    07:28:00  08:13:00
68.G6h-6i!   07:28:00  08:15:00

Putting the gold on the back rank is bad shape, but it is very important to play
this here instead of 68.G5h, as will become clear soon.

69.K7g-7f    07:31:00  08:15:00
70.P*7e      07:31:00  08:15:00
71.K7f-8e    07:31:00  08:15:00
72.P*8d      07:31:00  08:17:00
73.K8ex8d    07:31:00  08:17:00
74.B5i-6h+   07:31:00  08:18:00

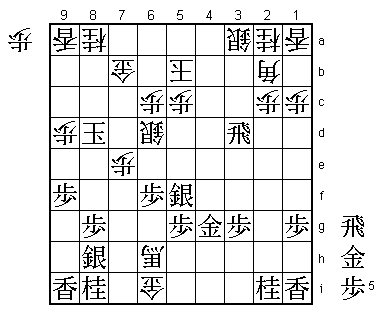
The first important point of this endgame. If black plays 75.P*7d here, white
wins after 76.P*8c K8e N*9c Kx9d +B5h because black has no good piece to interpose.
For example R*6g +Bx6g Sx6g N8e G*9c Lx9c Kx9c R*9a and white wins. Here we see
the importance of keeping the square 5h free for the promoted bishop, which would
not have been possible after 68.G5h instead of 68.G6i. Also, if black defends
against +B5h by 75.G4h, white wins after 76.P*8c K8e N7c K7d +B7h which threatens
both +Bx5f Px5f S*8e mate and +Bx8i followed by N*8b mate, which cannot be defended.
Some very difficult variations where the white knight either goes to 9c or 7c and
the white promoted bishop goes to either 5h or 7h. It is already amazing to imagine
that Moriuchi saw all this when he played 64.Rx7h+, but there is actually another
good black defense that had to be calculated in advance.

75.S8h-7g    08:11:00  08:18:00
76.+B6h-5h   08:11:00  08:21:00
77.P*7d      08:19:00  08:21:00

Here is the final devilish defense. Black sets himself up for being mated with
a pawn drop by closing the only escape of the king to 7d.

78.B2b-3c!   08:19:00  08:46:00

Brilliant. This threatens mate with B5a and black has no proper defense. It seems
like white is also winning after 78.P*8b, but after 79.R*3b S4b Rx6d Px6d S*6g
+Bx4g Kx7e the position is unclear, maybe even winning for black.

79.P*4b      08:46:00  08:46:00
80.B3cx4b?   08:46:00  08:51:00

Hard to put a question mark here, as this move is also winning. However, the game
would have been over quicker had white played P*8b here.

81.R3dx6d    08:46:00  08:51:00
82.P6cx6d    08:46:00  08:53:00
83.S*6g      08:46:00  08:53:00
84.+B5hx4g   08:46:00  08:53:00
85.S5fx4g    08:47:00  08:53:00
86.P5c-5d    08:47:00  08:55:00
87.G*4c      08:57:00  08:55:00
88.K5bx4c    08:57:00  08:55:00
89.B*6a      08:57:00  08:55:00
90.K4c-3c    08:57:00  08:55:00
91.R*4c      08:57:00  08:55:00
92.K3c-3b    08:57:00  08:55:00
93.R4cx4b+   08:57:00  08:55:00
94.S3ax4b    08:57:00  08:55:00
95.B6ax7b+   08:57:00  08:55:00
96.P*8c      08:57:00  08:57:00
97.K8dx8c    08:57:00  08:57:00
98.R*8e      08:57:00  08:57:00
Resigns      08:57:00  08:57:00

There is no mate after 99.G*8d or 99.B*8d (100.G*9b Kx9d), but these moves can be
answered by 100.G*9c K8b Rx8d and white takes all the black pieces with check, so
there is no way for black to win this game. Moriuchi wins his third game in a row
with some brilliant endgame tactics that "even Tanigawa wouldn't dare to play"
(Sato Yasumitsu). He is now only one win away from becoming the 18th Lifetime Meijin
and has the black pieces in the next game. Things suddenly look bleak for Goda after
a fast start.
