65th Meijin Match Game 4
[Black "Moriuchi Toshiyuki, Meijin"]
[White "Goda Masataka, Challenger"]
[Event "65th Meijin-sen, Game 4"]
[Date "May 17th and 18th 2007"]
1.P7g-7f     00:00:00  00:00:00
2.P8c-8d     00:00:00  00:06:00
3.S7i-6h     00:00:00  00:06:00
4.P3c-3d     00:00:00  00:06:00
5.P6g-6f     00:00:00  00:06:00
6.S7a-6b     00:00:00  00:06:00
7.P5g-5f     00:00:00  00:06:00
8.P5c-5d     00:00:00  00:15:00
9.S3i-4h     00:00:00  00:15:00
10.S3a-4b    00:00:00  00:15:00
11.G4i-5h    00:08:00  00:15:00
12.G4a-3b    00:08:00  00:15:00
13.G6i-7h    00:11:00  00:15:00
14.K5a-4a    00:11:00  00:20:00
15.K5i-6i    00:14:00  00:20:00
16.G6a-5b    00:14:00  00:21:00
17.S6h-7g    00:14:00  00:21:00
18.S4b-3c    00:14:00  00:22:00
19.B8h-7i    00:15:00  00:22:00
20.B2b-3a    00:15:00  00:22:00
21.P3g-3f    00:18:00  00:22:00
22.P4c-4d    00:18:00  00:22:00
23.G5h-6g    00:19:00  00:22:00
24.P7c-7d    00:19:00  00:24:00
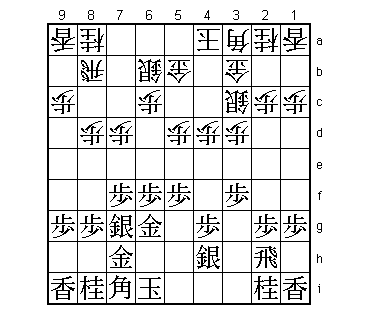
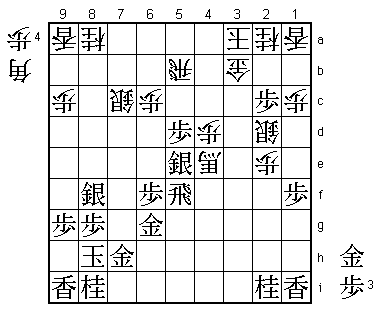
A classic Yagura position with which both players are of course very familiar.
If we look at the data of past games, we see that especially for Moriuchi this
position could be considered more than familiar. Up to this point, Moriuchi played
1056 official games. This position appeared in no less than 112 of them. This means
Moriuchi was looking at this position once in every 9 games. With black he played it
49 times, winning 36. This is a winning percentage of 73.5%, so it is clear that
Moriuchi is very hard to beat in this position. Still, Goda managed to do exactly
that in game 2 and is looking to do it twice in a row in this game.
25.S4h-3g 00:19:00 00:24:00
In the second game Moriuchi played 25.B6h here.
26.B3a-6d 00:19:00 00:36:00
27.B7i-6h 00:34:00 00:36:00
28.G5b-4c 00:34:00 00:45:00
29.K6i-7i 00:35:00 00:45:00
30.K4a-3a 00:35:00 00:45:00
31.K7i-8h 00:37:00 00:45:00
32.K3a-2b 00:37:00 00:51:00
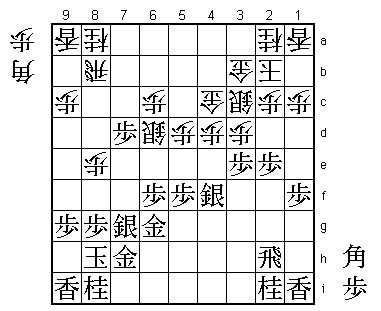
33.P1g-1f 00:43:00 00:51:00
Here 34.S4f is slightly more often played, but this way of playing (often called "Kato
style") is always played in many games and the difference seems to be one of taste.
34.P8d-8e 00:43:00 01:33:00
35.P2g-2f 00:48:00 01:33:00
36.S6b-7c 00:48:00 02:06:00
37.S3g-4f 00:49:00 02:06:00
38.P7d-7e 00:49:00 02:16:00
39.P7fx7e 00:59:00 02:16:00
40.P4d-4e 00:59:00 02:37:00
41.S4f-3g 01:01:00 02:37:00
42.B6dx7e 01:01:00 02:37:00
43.P*7f 01:06:00 02:37:00
44.B7e-6d 01:06:00 02:38:00
45.P2f-2e 01:08:00 02:38:00
46.S7c-6b 01:08:00 02:40:00
47.P4g-4f 01:13:00 02:40:00
48.P4ex4f 01:13:00 02:40:00
49.B6hx4f 01:13:00 02:40:00
50.S6b-5c 01:13:00 02:40:00
51.P7f-7e 02:25:00 02:40:00
52.P*4d 02:25:00 03:12:00
53.P7e-7d 03:52:00 03:12:00
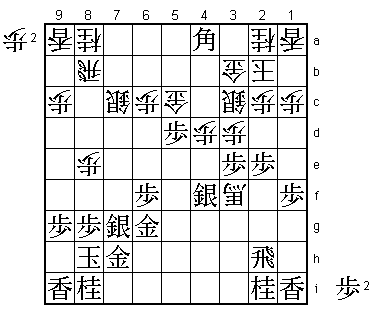
This was the sealed move. A full day of play, but we are still in known territory.
54.B6dx4f 03:52:00 03:32:00
55.S3gx4f 03:52:00 03:32:00
56.S5c-6d 03:52:00 03:32:00
57.P3f-3e 03:55:00 03:32:00
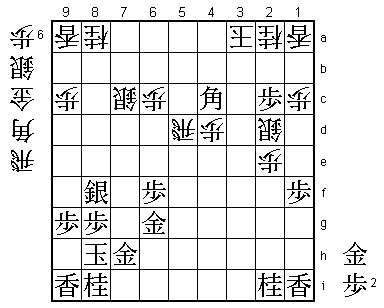
58.B*4g?! 03:55:00 05:42:00
This is a new move by Goda. The same position was also played in the third game of
last year's Meijin match between Tanigawa and Moriuchi. There Moriuchi played 58.B*6i
and after 59.B*4a R6b Px3d Sx3d P*3e G3b-4b Px3d Gx4a S3e G3b white won a bishop for a
silver, but Tanigawa later dropped back the silver on 5h to win the bishop on 6i. Goda's
idea is to promote the bishop, but not allow the counter drop of the silver on 5h. However,
dropping the bishop on 4g looks far less threatening than dropping the bishop on 6i.
Actually, this position with the bishop on 4g has been played before once, even though
there the black pawn was on 9f and the white pawn on 1d. It was another game between Moriuchi
and Goda, played in the first qualification group of the Ryu-O tournament in 2003.
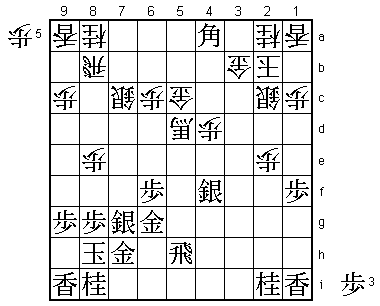
59.B*4a! 04:53:00 05:42:00
Moriuchi takes 58 minutes to assess the difference between having a pawn on 9g instead
of on 9f like in the 2003 Ryu-O game. His judgment is that the black defense is stronger
with the pawn on 9g and that a mutual attack is the right way to play.
60.G4c-5c 04:53:00 06:46:00
61.P7d-7c+ 04:58:00 06:46:00
62.S6dx7c 04:58:00 06:46:00
63.P5f-5e 04:59:00 06:46:00
64.B4g-3f+ 04:59:00 06:51:00
65.P5ex5d 05:52:00 06:51:00
66.+B3fx5d   05:52:00  07:30:00

A change of plan by Goda. He originally intended to play 66.G5c-4c here, but realized that
after 67.S5e +B4e Bx3b+ Kx3b G*4f black has not only managed to weaken the white castle
formation, but also wins back the bishop. For example, +Bx5e Gx5e B*4f B*3g Bx3g+ Nx3g B*4f
Px3d Sx3d P2d Px2d B*7a is good for black. Goda felt his position was bad after 66.+Bx5d,
because he intended to use this promoted bishop in attack. However, Moriuchi was not convinced
and never felt like the position was good for him. An interesting difference of opinion. In
Goda's case, his failure to realize that this change of plan was not disastrous, leads to a
quick loss in this game.

67.P3ex3d    05:56:00  07:30:00
68.S3cx3d    05:56:00  07:30:00
69.P2e-2d    05:56:00  07:30:00
70.P2cx2d    05:56:00  07:30:00
71.R2hx2d    05:56:00  07:30:00
72.S3d-2c    05:56:00  07:33:00
73.R2d-2h    05:56:00  07:33:00
74.P*2d      05:56:00  07:33:00
75.P*2e      05:58:00  07:33:00
76.P2dx2e    05:58:00  07:33:00
77.R2h-5h    05:58:00  07:33:00
78.P8e-8f?   05:58:00  07:33:00

Goda thinks he is desperately fighting for survival and overplays his attack. If he would
have seen the position as only slightly better for black (like Moriuchi did), he would
have played moves like 78.P*5b or 78.P*5e, which are far from clear.

79.S7gx8f    06:00:00  07:33:00
80.P*5f      06:00:00  07:33:00
81.P*2d      06:13:00  07:33:00
82.S2cx2d    06:13:00  07:33:00
83.R5hx5f    06:13:00  07:33:00
84.P*5e      06:13:00  07:33:00
85.P*2c!     06:40:00  07:33:00

Strong move. Taking this pawn with the king puts the king in the diagonal of the bishop
and taking the pawn with the gold ruins the defensive formation.

86.K2b-3a    06:40:00  07:48:00

Still, this attacks the bishop on 4a, so most professionals in the press room thought that
this was far from easy...

87.S4fx5e    06:56:00  07:48:00
88.+B5d-4e   06:56:00  07:55:00
89.P*5d      06:56:00  07:55:00
90.G5c-5b    06:56:00  07:55:00
91.B4ax5b+   06:59:00  07:55:00
92.R8bx5b    06:59:00  07:56:00
93.P*4c!     07:07:00  07:56:00

A light, but very strong move, punching the last bit of fighting spirit out of Goda. For
example, after 94.S3c P*3d +Bx3d P5c+ Rx5c black has the nice silver sacrifice S6d! because
white cannot afford to exchange rooks in this position.

94.G3bx4c    07:07:00  08:05:00
95.G*5c      07:34:00  08:05:00
96.G4cx5c    07:34:00  08:14:00
97.P5dx5c+   07:34:00  08:14:00
98.R5bx5c    07:34:00  08:14:00
99.S5e-5d!   07:37:00  08:14:00

The same problem as above. Because of the black pawn on 2c, white cannot exchange rooks
again, but this cannot be avoided anymore.

100.+B4ex5d  07:37:00  08:15:00
101.R5fx5d   07:37:00  08:15:00
102.R5cx5d   07:37:00  08:15:00
103.B*4c     07:37:00  08:15:00
Resigns      07:37:00  08:19:00
This of course threatens mate with G*3b and attacks the rook at the same time. The only way
to escape this double threat is 104.S*7i Gx7i R*3h P*7h R5i+, but then Bx2a+ K4b P*5d P*3b
+Bx1a leaves white without hope, so Goda resigned. Moriuchi wins his service game with
black to level the match, but after the game he was clearly not happy with how this game
developed. He felt that he was in real danger of losing twice with black in a position he
thought it was almost impossible to beat him. The flow of the match seems to have changed
to Moriuchi, but this match is still far from over.