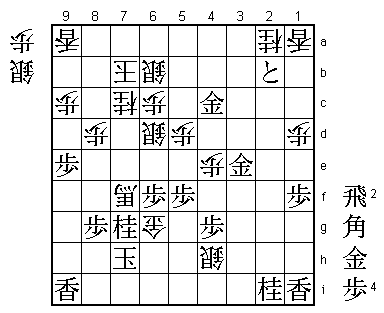
65th Meijin Match Game 3
[Black "Goda Masataka, Challenger"]
[White "Moriuchi Toshiyuki, Meijin"]
[Event "65th Meijin-sen, Game 3"]
[Date "May 7th and 8th 2007"]
1.P7g-7f     00:00:00  00:00:00
2.P3c-3d     00:00:00  00:00:00
3.P7f-7e     00:07:00  00:00:00

In the pre-game interview on the night before the game, Goda insinuated that
he had prepared something special (of course without explaining what that was),
but nobody was prepared for this kind of surprise. Goda is known for stubbornly
sticking to his own favorite opening strategies. Ibisha players of all levels have
used the Furibisha on occasions, but Goda isn't one of them. In his professional
career he played 190 games with black that started with P7f P3d and in only 3 of
them he didn't follow with P2f (against Fujii and Kubo he played K6h once and against
Takahashi he played P6f once). Furthermore, Goda has played more than 460 official
games with black and only twice he chose to play Sankenbisha. Once in 2001 was when
Iizuka played G3b and in 1997 he played it against Kato Hifumi, knowing that Kato
always plays quick attacks against Furibisha and would never play an Anaguma castle,
which is generally considered to be very strong against the Sankenbisha. Playing 3.P7e,
indicating that he is prepared to unconditionally enter an opening he has never played
before, requires a lot of guts, but being 2-0 up seemed to have given Goda a lot of
confidence.

4.P5c-5d     00:07:00  00:07:00
5.P6g-6f     00:19:00  00:07:00
6.S3a-4b     00:19:00  00:09:00
7.S7i-7h     00:20:00  00:09:00
8.S4b-5c     00:20:00  00:36:00
9.S7h-6g     00:20:00  00:36:00
10.B2b-3c    00:20:00  00:47:00
11.R2h-7h    00:24:00  00:47:00
12.R8b-2b    00:24:00  01:02:00

Just being surprised clearly is not enough for Moriuchi. By playing Furibisha himself,
he returns the favor. Until now, Moriuchi has only played Furibisha against Furibisha
specialists like Kubo or Fujii. Having Moriuchi and Goda play a double Furibisha opening
is really weird. Maybe they just did it to please assistant referee Sugimoto, who has
written a number of books on Ai-Furibisha and is considered to be the initiator of the
small Ai-Furibisha boom among top professionals in recent years.

13.S6g-5f    00:59:00  01:02:00
14.P4c-4d    00:59:00  01:15:00
15.S3i-3h    01:01:00  01:15:00

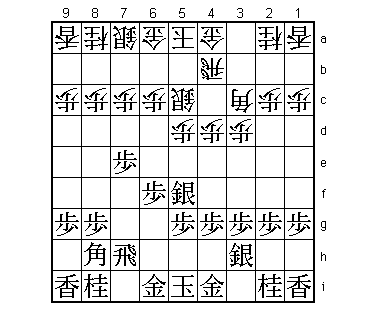
We are already in unknown territory here. In the only other game with this position, Kubo
played 15.P3f against Habu in 2005, and the game continued 16.P2d S3h. This may have been
better than 15.S3h, as will become clear next.

16.R2b-4b    01:01:00  01:33:00

A move that surprised the press room, because the rook takes two moves to get to 4b instead
of one, which is a loss of tempo with white at a very early stage of the game. However,
more important than loss of tempo is that white desperately wants to open the bishop diagonal
with P4e. After this, if white can follow this with P5e S6g, the black silver will have lost
two moves, so white is actually going to be better off.

17.K5i-4h    01:18:00  01:33:00
18.P4d-4e    01:18:00  02:23:00
19.K4h-3i    01:23:00  02:23:00
20.G6a-7b    01:23:00  02:23:00
21.P7e-7d    01:29:00  02:23:00
22.P7cx7d    01:29:00  02:38:00
23.R7hx7d    01:29:00  02:38:00
24.K5a-6a    01:29:00  02:38:00
25.G6i-5h    01:30:00  02:38:00
26.S7a-6b    01:30:00  02:52:00
27.P9g-9f    01:44:00  02:52:00
28.G4a-5b    01:44:00  02:56:00
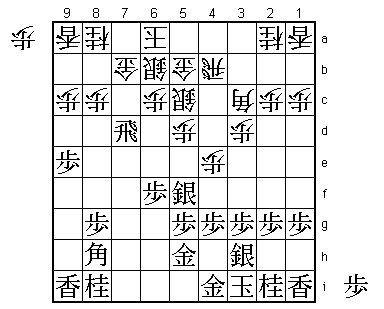
29.P9f-9e?   03:24:00  02:56:00

Long thinking often invites a mistake. Goda took 1 hour and 40 minutes for this move, but
regretted it afterwards. At first glance, it looks like a good move, extending the edge for
a future attack while keeping the option of either retreating the rook to 7f or 7h.
Furthermore, there was general agreement among the professionals following this game
that white's next move would be 30.P6d...

30.P2c-2d!   03:24:00  03:49:00

Great vision by Moriuchi, although it has to be added that it was shared by Goda. This was
the sealed move and referee Kobayashi Kenji was so surprised that it wasn't P6d, that he
immediately opened the second envelope (used for confirmation or if something happens to
the first envelope) to check if the sealed move was really 30.P2d. Giving this position a
little more thought, it is clear that 30.P2d is better than 30.P6d. Even though P6d gives
white the opportunity to finish his castle, it also gives black the strong attack R7h
followed by P6e. Moriuchi said after the game that he didn't feel at all like giving
his opponent that attacking target. Instead, he extends the pawn on the second file to
2e, where there is always the threat of a strong counter attack with P2f. If black would
have played the same attacking formation as in the game without pushing the edge pawn
on 9e, the white pawn would not have been on 2e and the white counter attacking options
would have been severely limited.

31.R7d-7f    03:39:00  03:49:00
32.P2d-2e    03:39:00  04:15:00
33.B8h-9g    03:43:00  04:15:00
34.S5c-6d    03:43:00  04:52:00
35.N8i-7g?   04:17:00  04:52:00

Goda considered this to be losing move already. This may be a bit harsh, but he said
after the game that he intended to go for an all out attack in this game and after
35.N7g black is pushed back and the attack never really gets off the ground. If black
wants to play positively, the only way is to play 35.P6e here. For example, after
36.P7e R9f S6d-5c Bx7e B8h+ B6f +Bx6f Rx6f B*8h R9f black has a satisfying position.

36.P*7e      04:17:00  04:58:00
37.R7f-9f    04:17:00  04:58:00

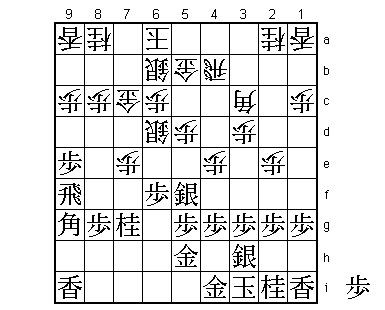
It now becomes clear how big the difference is between having the white pawn on 2e or
not. Without it, black could have safely played 37.Rx7e Sx7e Bx7e, but with the white
counter attack on 2f, this is too dangerous.

38.G7b-7c!   04:17:00  05:14:00

This could be considered vintage Moriuchi play. He is moving his generals out of the
castle formation to put pressure on the black position. With any other player, this
would lead to too many weaknesses and the white position would collapse, but Moriuchi
manages to keep his position together.

39.S5f-6g    06:03:00  05:14:00

Goda will not have seen 38.G7c, but after seeing it he immediately realized he was in
big trouble, taking 1 hour and 46 minutes for his reply (considering that this included
the lunch break, he will probably have thought about this while eating as well). Moving
the silver back is more or less admitting defeat, but the desperate attack 39.S6e is
also good for white after 40.Sx6e Px6e Bx7g+ Bx7e S*5c B6f +Bx6f Rx6f G7b.

40.G7c-8d    06:03:00  05:43:00

This gold is defending the pawn on 7e and at the same time threatening P9d Px9d Lx9d,
attacking both rook and bishop.

41.R9f-8f    06:04:00  05:43:00
42.K6a-7b    06:04:00  05:54:00
43.B9g-7i    06:08:00  05:54:00

Moving back again, but black has no choice, because white threatened to win the rook
after Gx9e next.

44.R4b-2b    06:08:00  06:11:00
45.B7i-6h    06:15:00  06:11:00
46.N8a-7c    06:15:00  06:13:00
47.B6h-5i    06:23:00  06:13:00
48.P3d-3e    06:23:00  06:25:00
49.P1g-1f    06:26:00  06:25:00
50.P1c-1d    06:26:00  06:25:00
51.B5i-6h    06:39:00  06:25:00

Goda is trying to set up a counter attack by strengthening his position. For example,
with the bishop here, black can answer P2f Px2f Rx2f with P6e to try and make use of
the weakened white castle after exchanging rooks. Black has to be careful, because if
white gets only a single pawn in hand, the black position collapses after P7f Rx7f Sx7e
R8f P*7f (the pawn white needs) Sx7f Sx6f.

52.G5b-4c    06:39:00  06:38:00

Moving a second general out of the castle to put pressure on the side where the black
king is.

53.P5g-5f    06:54:00  06:38:00
54.G4c-3d    06:54:00  07:02:00
55.R8fx8d    07:35:00  07:02:00

This rook sacrifice took Moriuchi completely by surprise, but he was not impressed:
"I didn't look at it, so I was very surprised, but it had to be good for white".

56.P8cx8d    07:35:00  07:02:00
57.G*4c      07:35:00  07:02:00

Or 57,P*7d R*8i G*4c Rx9i+, which is also good for white.

58.B3c-2d    07:35:00  07:21:00
59.P3g-3f    07:36:00  07:21:00
60.P2e-2f    07:36:00  07:27:00
61.P2gx2f    07:38:00  07:27:00
62.R*2c!     07:38:00  07:30:00

Another move that probably only Moriuchi would play. 62.R*8i is the reflex move here
and certainly not bad, but putting pressure on the opponent's pieces is Moriuchi's
playing style. Not only that, Moriuchi had done thorough analysis to back this up here.
After the game he showed that after 62.R*8i P*7d Rx9i+ P6e things are not so easy.
For example, Nx6e Nx6e Sx6e fails to the fork B7g.

63.P3fx3e    07:47:00  07:30:00
64.G3dx3e    07:47:00  07:30:00
65.B6hx3e    08:00:00  07:30:00

After the rook, Goda also sacrifices the bishop. Moriuchi again was surprised, but
he has more than enough time to keep his composure and look at the position with a
clear head.

66.B2dx3e    08:00:00  07:31:00
67.G*3d      08:00:00  07:31:00
68.P7e-7f!   08:00:00  08:26:00

An important move. It is tempting to play 68.B*5g immediately here, but after 69.G4i-4h
Rx2f P*2g Rx2g+ P*2c Bx4h+ Kx4h G*5g K4i the gold on 5h is still defended by both silver
and king and the white attack fails. First pushing the pawn to 7f, forcing the silver to
leave the defense of the gold of 5h, makes this attack work, because at the end of the
variation white can play Gx5h.

69.S6gx7f    08:20:00  08:26:00
70.B*5g      08:20:00  08:27:00
71.G5hx5g?   08:23:00  08:27:00

Here things would have not been completely clear after 71.K2h P*2g Sx2g Rx2f P*2d!
(a focal point covered by all four major pieces). Moriuchi expected that he still
needed to play well to win from there. For example, R2fx2d Gx2d P*2f Sx2f Rx2d is
still a complicated endgame.

72.B3ex5g+   08:23:00  08:27:00
73.B*4h      08:23:00  08:27:00
74.R2cx2f    08:23:00  08:35:00
75.B4hx5g    08:39:00  08:35:00
76.R2f-2h+   08:39:00  08:35:00
77.K3i-4h    08:39:00  08:35:00
78.P*3g      08:39:00  08:35:00
79.P*2c      08:46:00  08:35:00
80.P3gx3h+   08:46:00  08:51:00
81.G4ix3h    08:46:00  08:51:00
82.S*3i      08:46:00  08:51:00
83.K4h-4i    08:46:00  08:51:00
84.G*5h      08:46:00  08:51:00
85.K4ix5h    08:46:00  08:51:00
86.+R2hx3h   08:46:00  08:51:00
87.K5h-6g    08:46:00  08:51:00
88.S3i-4h=   08:46:00  08:51:00
89.B5g-3e    08:47:00  08:51:00
90.+R3hx3e   08:47:00  08:54:00
91.G3dx3e    08:47:00  08:54:00
92.B*4i      08:47:00  08:54:00
93.K6g-7h    08:52:00  08:54:00
94.B4ix7f+   08:52:00  08:54:00
95.P2cx2b+   08:54:00  08:54:00
96.G*6g      08:54:00  08:55:00
Resigns      08:54:00  08:55:00

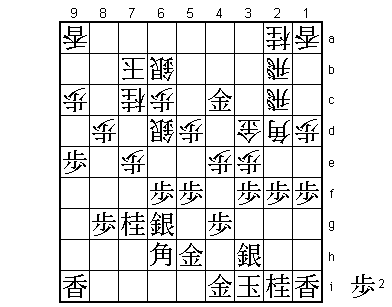
Simple mate after 97.K8i S*7h K9h +Bx8g or 97.K8h Gx7g. Moriuchi manages to stay clear
of a 0-3 hole, which would almost certainly have meant the loss of his Meijin title.
Not only that, because he won with the white pieces, he now has a chance to even the
match with black in the fourth game. Chalking up his 700th win as a professional will
have meant little to him, but it was timed perfectly.
