65th Meijin Match Game 2
[Black "Moriuchi Toshiyuki, Meijin"]
[White "Goda Masataka, Challenger"]
[Event "65th Meijin-sen, Game 2"]
[Date "April 24th and 25th 2007"]
1.P7g-7f     00:00:00  00:00:00
2.P8c-8d     00:00:00  00:00:00

If we look at the data of the Meijin games in which Moriuchi was the black
player, we see that the opening was Yokofudori 6 times, Furibisha 4 times,
Kakugawari with tempo loss 2 times and Yagura 3 times. The reason why Yagura
was only played three times is that even the Meijin class players don't like
to play Yagura with the white pieces against Moriuchi. He is considered almost
unbeatable with black in this opening, especially in long games. However, already
on the second move, Goda is saying that he doesn't care about all that. "Play
whatever you like, with black and with white my first move will be to push the
pawn in front of my rook". Definitely a sign of courage, but with a psychological
twist because Goda has already won the first game, so there is now extra pressure
on Moriuchi to deliver in his favorite opening.

3.S7i-6h     00:02:00  00:00:00
4.P3c-3d     00:02:00  00:00:00
5.P6g-6f     00:02:00  00:00:00
6.S7a-6b     00:02:00  00:02:00
7.P5g-5f     00:03:00  00:02:00
8.P5c-5d     00:03:00  00:02:00
9.S3i-4h     00:03:00  00:02:00
10.S3a-4b    00:03:00  00:23:00
11.G4i-5h    00:04:00  00:23:00
12.G4a-3b    00:04:00  00:23:00
13.G6i-7h    00:10:00  00:23:00
14.K5a-4a    00:10:00  00:23:00
15.K5i-6i    00:12:00  00:23:00
16.G6a-5b    00:12:00  00:24:00
17.S6h-7g    00:13:00  00:24:00
18.S4b-3c    00:13:00  00:26:00
19.B8h-7i    00:15:00  00:26:00
20.B2b-3a    00:15:00  00:26:00
21.P3g-3f    00:15:00  00:26:00
22.P4c-4d    00:15:00  00:26:00
23.G5h-6g    00:20:00  00:26:00
24.P7c-7d    00:20:00  00:45:00
25.B7i-6h    00:21:00  00:45:00
26.G5b-4c    00:21:00  01:00:00
27.K6i-7i    00:30:00  01:00:00
28.S6b-7c    00:30:00  01:08:00
29.K7i-8h    00:43:00  01:08:00
30.P7d-7e    00:43:00  01:20:00
31.P7fx7e    00:58:00  01:20:00
32.B3ax7e    00:58:00  01:20:00
33.P6f-6e    00:58:00  01:20:00
34.B7e-4b    00:58:00  01:22:00
35.B6h-4f    01:04:00  01:22:00
36.R8b-9b    01:04:00  01:22:00
37.S4h-5g    01:51:00  01:22:00
38.K4a-3a    01:51:00  01:35:00
39.S5g-6f    01:51:00  01:35:00
40.K3a-2b    01:51:00  02:12:00
41.P*7e      02:37:00  02:12:00
42.P9c-9d    02:37:00  02:51:00
43.S7g-7f    02:38:00  02:51:00
44.P9d-9e    02:38:00  03:04:00
45.P1g-1f    03:03:00  03:04:00
46.P1c-1d    03:03:00  03:06:00

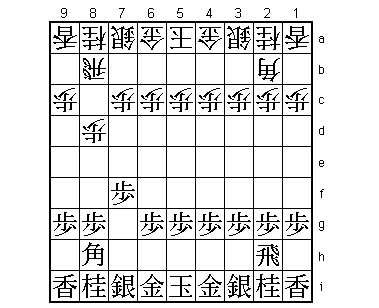
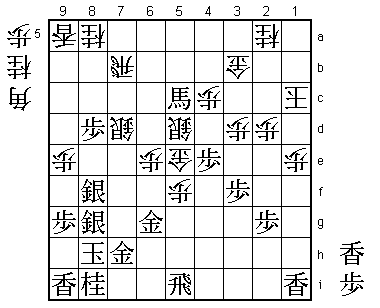
This doesn't look like a special position, because many of the piece configurations
are very common in the Yagura, but this exact same position has been played only
once. This was 18 years ago in a position between Senzaki and Seki. In this game
it followed 47.P8f P4e B6h P6d R1h S4d Px6d Sx6d P*6e and after 107 moves Senzaki won.

47.R2h-5h    03:38:00  03:06:00

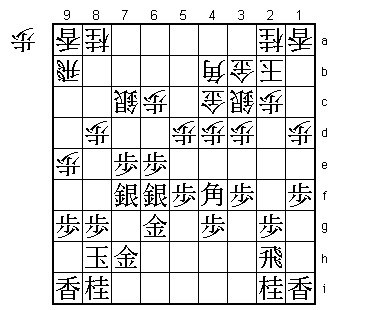
Moriuchi tries a different approach, although it seems very unlikely that he was
following this rather obscure game from a long time ago. There is a reason why there
are not so many games with this formation. The two silvers on 7f and 6f are very
strong and the general opinion among professionals is that this position is very
difficult to win for white. Of course Goda knew this perfectly well, but he played
it anyway and this game may be the start of a new theoretical debate about this position.

48.P4d-4e    03:38:00  03:41:00
49.B4f-3g    04:18:00  03:41:00
50.S3c-4d    04:18:00  03:57:00
51.P8g-8f    04:23:00  03:57:00
52.P6c-6d    04:23:00  04:02:00
53.P6ex6d    04:35:00  04:02:00
54.S7cx6d    04:35:00  04:02:00
55.P*6e      04:42:00  04:02:00
56.S6d-7c    04:42:00  04:02:00
57.R5h-5i    04:42:00  04:02:00
58.P*7d      04:42:00  04:31:00
59.P7ex7d    04:48:00  04:31:00
60.S7cx7d    04:48:00  04:31:00
61.P6e-6d    04:48:00  04:31:00
62.P4e-4f    04:48:00  05:39:00
63.P4gx4f    04:54:00  05:39:00
64.B4bx6d    04:54:00  05:58:00
65.P1f-1e    05:59:00  05:58:00
66.P1dx1e    05:59:00  06:19:00
67.P*1c      06:01:00  06:19:00
68.L1ax1c    06:01:00  06:21:00
69.P4f-4e    06:10:00  06:21:00
70.S4d-5c    06:10:00  06:29:00
71.P5f-5e    06:43:00  06:29:00
72.P*6e      06:43:00  06:37:00
73.P5ex5d!?  06:49:00  06:37:00

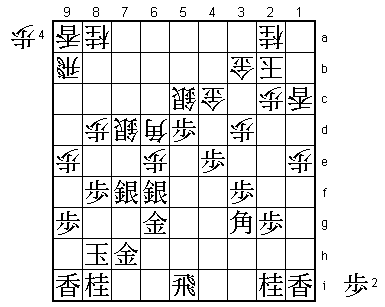
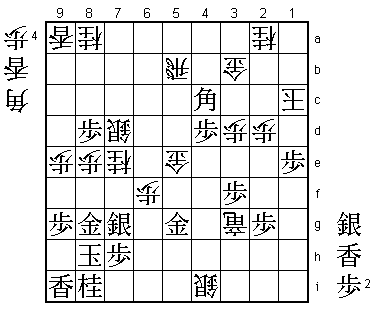
The professionals in the press room couldn't believe this move. It looks very
suicidal, because black just seems to lose a silver. The straightforward variation
seems to be 74.Bx3g+ Nx3g Px6f Px5c+ Px6g+ Sx6g G4c-3c N2e P*6f and white seems to
have a big advantage after both Sx6f B*4h or P*1d Lx1d P*1c Px6g+. On top of this,
Goda likes this type of "going-for-broke" variation, so it was considered likely
that this variation would actually be played. However, Goda took more than an hour
to reply here.  When shown the variation above after the game, he pointed out that
instead of N2e, black has a much stronger move: B*6f!. This takes away P*6f from
white and white doesn't have a good alternative. For example, S6e is answered by
Bx3c+ Nx3c S*4a and black wins. By the way, Moriuchi didn't play 73.Px5d because
he thought it was good, but because he thought that his opening strategy had failed
and that he had to act quickly to avoid being overrun without getting the chance of
a attacking himself. On the other hand, Goda admitted after the game that he had
secretly hoped black would play the simple 73.S7fx6e. Both players agreed in the
post-mortem that this move would have lead to a very good position for white.

74.B6dx3g+   06:49:00  07:45:00
75.N2ix3g    06:49:00  07:45:00
76.S5cx5d    06:49:00  07:45:00
77.P4e-4d    07:00:00  07:45:00
78.G4cx4d    07:00:00  07:45:00
79.S6f-7g    07:02:00  07:45:00
80.P*7e      07:02:00  07:45:00
81.S7f-8g    07:04:00  07:45:00
82.P*5f      07:04:00  07:45:00
83.B*5c      07:15:00  07:45:00
84.P*4c      07:15:00  07:45:00
85.P*4e      07:29:00  07:45:00
86.G4d-5e    07:29:00  07:45:00
87.N3g-2e    07:34:00  07:45:00
88.P8d-8e    07:34:00  07:45:00

89.B5c-6d+?  07:48:00  07:45:00

The reasons for playing this bishop promotion are clear: black wants to strengthen
the top of the king from behind the enemy lines. However, if we go a little further
in the game, it becomes clear that this was a useless move. The best way to play
here was 89.Gx5f. For example 90.Px8f S7gx8f B*3g Gx5e Sx5e B2f+ and there is still
a long fight ahead.

90.P8ex8f    07:48:00  07:48:00
91.S7gx8f    07:49:00  07:48:00
92.S7d-6c    07:49:00  07:50:00
93.+B6dx7e   07:50:00  07:50:00
94.P2c-2d    07:50:00  07:50:00
95.N2ex1c+   08:03:00  07:50:00
96.K2bx1c    08:03:00  07:50:00
97.P*8d      08:04:00  07:50:00
98.R9b-7b    08:04:00  08:02:00
99.P*7d      08:27:00  08:02:00
100.S6cx7d   08:27:00  08:05:00
101.+B7e-5c  08:27:00  08:05:00

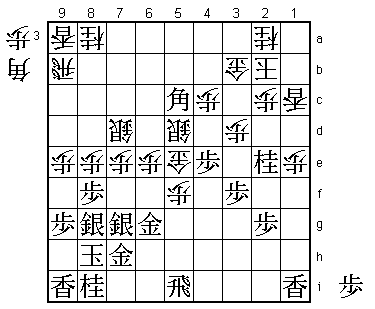
Now it is very clear why the black bishop promotion on move 89 was meaningless.
The bishop on 5c has only changed into a promoted one, but white has made some
important progress. First, white has managed to involve the rook in attack. Second,
the white knight on 2e is no longer there. Especially because of the improvement of
the position of the rook Goda felt that he was getting the upper hand here.

102.B*3g!    08:27:00  08:10:00

This move attacks both the rook and defends the pawn on 1e. From now on, it is Goda
all the way.

103.R5i-4i   08:29:00  08:10:00
104.P6e-6f   08:29:00  08:12:00
105.G6g-6h   08:29:00  08:12:00
106.P*8e     08:29:00  08:15:00
107.S8f-7g   08:29:00  08:15:00
108.N*7e     08:29:00  08:15:00
109.P4e-4d   08:44:00  08:15:00
110.P5f-5g+  08:44:00  08:22:00
111.G6hx5g   08:45:00  08:22:00
112.N7ex8g+  08:45:00  08:22:00
113.G7hx8g   08:45:00  08:22:00
114.S*4h     08:45:00  08:23:00
115.N*2i     08:54:00  08:23:00
116.S4hx4i=  08:54:00  08:36:00
117.N2ix3g   08:54:00  08:36:00
118.R*3h     08:54:00  08:36:00
119.P*7h     08:54:00  08:36:00
120.R3hx3g+  08:54:00  08:36:00
121.P4dx4c+  08:55:00  08:36:00
122.S5dx4c   08:55:00  08:36:00
123.L1ix1e   08:57:00  08:36:00
124.P*1d     08:57:00  08:36:00
125.L1ex1d   08:57:00  08:36:00
126.K1cx1d   08:57:00  08:37:00
127.P*1e     08:57:00  08:37:00
128.K1d-1c   08:57:00  08:39:00
129.P*4d     08:58:00  08:39:00
130.S4c-5b   08:58:00  08:41:00
131.+B5cx5b  08:59:00  08:41:00
132.R7bx5b   08:59:00  08:41:00
133.B*4c     08:59:00  08:41:00
134.N*7e     08:59:00  08:43:00
Resigns      08:59:00  08:43:00

For black, the only way to make a strong mating threat is 135.Bx5b+, but then
136.Nx8g+ Kx8g L*8g is an easy mate. Goda must be very happy with himself after
this game. Not only has a taken a completely unexpected 2-0 lead, he also beat
Moriuchi with the white pieces in a position in which he was considered unbeatable.
It is still too early to write off Moriuchi, but some speculated that the pressure
of becoming the 18th Lifetime Meijin before archrival Habu could be weighing even
more on Moriuchi than the pressure of his challenger in this match. Whatever the
reason, Moriuchi now needs to win the third game with the white pieces to avoid a
3-0 deficit, which virtually would decide this match.
