65th Meijin Match Game 1
[Black "Goda Masataka, Challenger"]
[White "Moriuchi Toshiyuki, Meijin"]
[Event "65th Meijin-sen, Game 1"]
[Date "April 10th and 11th 2007"]
1.P2g-2f     00:00:00  00:00:00

Four tokins give Goda the black pieces in his first Meijin match. Moriuchi
has more experience in the Meijin, but Goda is definitely not new to the big
stage, winning the Oi title in 1992 and the Kisei title in 1998 and 2001.
This is the first time Moriuchi and Goda meet in a title match game, so there
was quite a lot of speculation about which opening would be played. Goda doesn't
beat around the bush and makes clear from move one that he will play Ibisha.
Moriuchi is not so straightforward and has prepared a curve ball for this first game.

2.P3c-3d     00:00:00  00:01:00
3.P7g-7f     00:02:00  00:01:00
4.P5c-5d     00:02:00  00:03:00
5.S3i-4h     00:08:00  00:03:00
6.B2b-3c     00:08:00  00:08:00
7.K5i-6h     00:14:00  00:08:00
8.R8b-2b     00:14:00  00:09:00

This is of course not a new idea and not even the first time that Moriuchi played
this. Still, this opening is very much unexplored territory and both players are
more or less on their own as far as opening strategy is concerned.

9.K6h-7h     00:14:00  00:09:00

This is the move that has been played most often in the past. It will lead to a
slow game which is kind of the way a Meijin match game is supposed to go. An alternative
is the sharp 9,Bx3c+ Nx3c B*5f which was played by Habu against Yamasaki in the first
game of the 23rd Asahi Open match. This is very sharp, but also very risky, so Goda's
move is no surprise.

10.K5a-6b    00:14:00  00:12:00
11.P5g-5f    00:55:00  00:12:00
12.S3a-4b    00:55:00  00:26:00
13.P6g-6f    00:56:00  00:26:00
14.K6b-7b    00:56:00  00:33:00
15.G4i-5h    01:01:00  00:33:00
16.K7b-8b    01:01:00  00:36:00
17.S4h-5g    01:04:00  00:36:00
18.S4b-5c    01:04:00  00:41:00
19.G5h-6g    01:04:00  00:41:00
20.P7c-7d    01:04:00  01:08:00

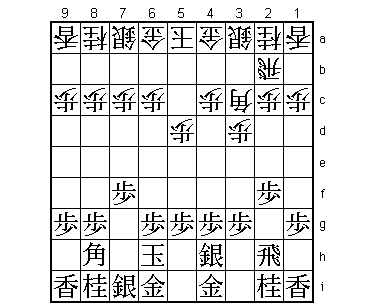
Although this looks like a very special position, it actually has been played before.
Not only that, it was played by Moriuchi in another Meijin match game, namely the 1st
game of the 62nd Meijin match against Habu. The idea is that if black goes for an Anaguma
with B7g and K8h, white has a strong counter attack with R7h followed by P7e and S6d.
Habu played 21.P2e but after 22.P6d B7g G4a-5b K8h G6c S7h L9b only the Furibisha side
was able to make an Anaguma castle. In the end, Moriuchi won this game with his king
still in a full Anaguma, showing how strong the Furibisha Anaguma is in this position.

21.B8h-7g    01:50:00  01:08:00
22.L9a-9b    01:50:00  01:32:00
23.B7g-8f    02:53:00  01:32:00

This is Goda's new plan. Putting pressure on the white position by moving the bishop
out early. By doing this, he is warning his opponent that he is ready for a quick
attack anytime and at the same time black can also move into the Anaguma himself.

24.P6c-6d    02:53:00  02:48:00
25.P3g-3f    03:27:00  02:48:00
26.R2b-6b    03:27:00  03:25:00

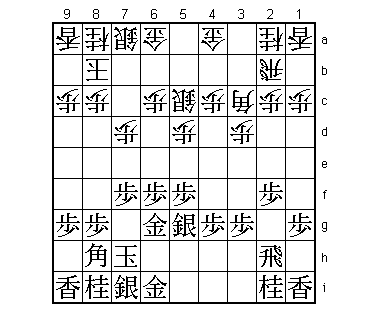
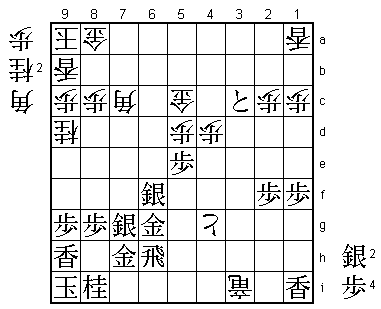
This was the sealed move and a surprise. Moving into the Anaguma with 26.K9a was
expected, but Moriuchi plays it much more aggressively.

27.N2i-3g!?  04:59:00  03:25:00

Played after long thought (92 minutes). This was definitely a move that needed to
be weighed carefully. The short-term meaning is that after 28.P4d (which is more
or less forced), the pressure on the long diagonal is off. However, the problem
is that the head of this knight is weak and is likely to become a liability. The
natural alternative seems to be 27.R3h followed by P3e to attack the head of the
bishop, but Goda said after the game that he had hardly given this move any thought,
which is a little surprising.

28.P4c-4d    04:59:00  03:35:00
29.K7h-8h    04:59:00  03:35:00
30.G4a-5b    04:59:00  03:44:00
31.G6i-7h    04:59:00  03:44:00
32.K8b-9a    04:59:00  03:47:00
33.L9i-9h    05:00:00  03:47:00
34.S7a-8b    05:00:00  04:14:00
35.K8h-9i    05:24:00  04:14:00
36.G6a-7a    05:24:00  04:15:00
37.S7i-8h    05:24:00  04:15:00
38.R6b-6a    05:24:00  04:26:00
39.P1g-1f    05:37:00  04:26:00
40.P3d-3e    05:37:00  05:12:00

Moriuchi decides to open the game with the black weakness on 3f, but after the game
he said he regretted this decision, "being lured into an unreasonable attack".
In reality, this attack is not bad at all and the resulting is very close.

41.P3fx3e    06:44:00  05:12:00
42.P6d-6e    06:44:00  05:19:00
43.N3g-2e!   06:47:00  05:19:00

Moves the knight away from the weakness early. 43.P3d looks like a natural move,
but would be a mistake after 44.B2d. If the knight then moves to 2e it no longer
attacks the bishop so white can concentrate on his attack on the 6th file. Also
bad would have been 43.R3h because of 44.Px6f Sx6f P2d and the knight can not
move away from the front of the rook.

44.B3c-5a    06:47:00  05:50:00
45.P3e-3d    06:50:00  05:50:00
46.B5a-8d    06:50:00  06:13:00
47.P6fx6e    06:57:00  06:13:00
48.R6ax6e    06:57:00  06:17:00
49.R2h-3h    06:57:00  06:17:00
50.P*3g      06:57:00  06:25:00
51.R3h-6h    07:00:00  06:25:00
52.R6e-3e    07:00:00  06:25:00
53.P7f-7e    07:07:00  06:25:00
54.P3g-3h+   07:07:00  06:47:00
55.S5g-6f    07:15:00  06:47:00
56.+P3h-3g   07:15:00  06:52:00
57.N2e-3c=   07:16:00  06:52:00
58.+P3gx4g   07:16:00  06:55:00
59.P7ex7d    07:18:00  06:55:00
60.P*7g      07:18:00  07:31:00

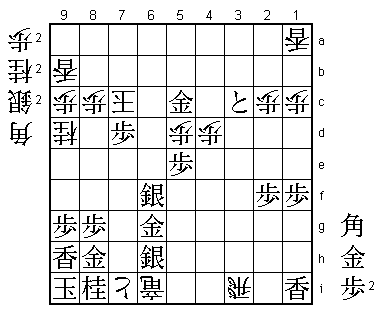
"Drop a pawn on the focal point" is a well-know shogi proverb, but dropping a
pawn on a square that is covered by no less than six pieces is not something
one sees every day. With so many ways to take this pawn, Goda had trouble
deciding which one was best.

61.S8hx7g    07:47:00  07:31:00

This seems to weaken the Anaguma a lot, but is probably the best reply. Goda
said he had even considered taking with the bishop, but the bishop is rather
effectively pointing into the white camp. Another variation that was analyzed
in the press room was 61.G7hx7g and after 62.Nx3c Px3c+ N*6e Sx6e +P5g S7f +Px6h
Gx6h black can drop a pawn on 6i to make his position very strong. However, if
we just count wood white is a rook against a knight up, so it very difficult
to say who is better here.

62.N2ax3c    07:47:00  07:39:00
63.P3dx3c+   07:47:00  07:39:00
64.N*9d      07:47:00  07:42:00
65.B8fx5c+   07:56:00  07:42:00
66.G5bx5c    07:56:00  07:46:00
67.N*7c      07:56:00  07:46:00
68.R3e-3i+   07:56:00  08:02:00
69.N7cx8a+   08:11:00  08:02:00
70.G7ax8a    08:11:00  08:03:00
71.N*7c      08:29:00  08:03:00
72.S8bx7c    08:29:00  08:05:00
73.P7dx7c+   08:29:00  08:05:00
74.B8dx7c    08:29:00  08:05:00
75.P5f-5e    08:29:00  08:05:00

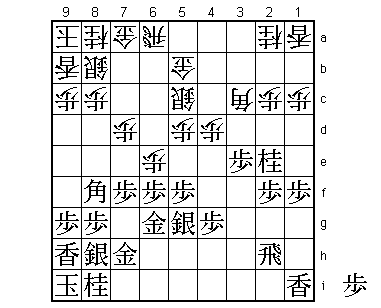
Interestingly, both players thought they were losing here. This blocks the
bishop from entering the attack and now black strongly threatens P*7d, but it
also hands over the attack to white.

76.+P4g-5h?  08:29:00  08:46:00

Even though he realized that this was probably not good enough, Moriuchi saw
no other way to play in this position. Because his Anaguma is already weakened
a lot, he had no confidence in his position, which may have clouded his judgment
here. Had he realized that the game is still very much in the air, he might have
found 76.P*7f, which is the right move here. Taking this pawn with the silver or
gold is out of the question (the same attack as in the game would now be decisive),
so the best way to play for black seems 77.P*7d, but after 78.Px7g+ G6gx7g B9e P9f
N*7f white is winning. Goda said that he had planned to play 77.S8h, but then
78.N*7d is the perfect answer, dropping where the opponent wants to drop. 79.S7e
then fails to 80.Bx5e and 79.P*7i to Nx6f Gx6f +P5g and the white attack is faster.
This position was analyzed for a long time during the post-mortem, but no good way
to play for black was discovered.

77.R6hx5h    08:29:00  08:46:00
78.B*6i      08:29:00  08:46:00
79.R5h-6h    08:29:00  08:46:00
80.B6ix7h+   08:29:00  08:50:00
81.R6hx7h    08:29:00  08:50:00
82.G*7i      08:29:00  08:50:00
83.R7hx7i    08:36:00  08:50:00
84.+R3ix7i   08:36:00  08:50:00
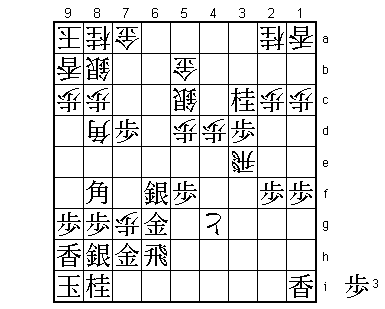
85.S*6h!     08:36:00  08:50:00

Now the white attack is stopped because black also has the strong G*8h. Black wins.

86.P*7h      08:36:00  08:51:00
87.P*7d      08:40:00  08:51:00
88.B7c-8b    08:40:00  08:51:00
89.B*7c      08:44:00  08:51:00
90.R*3i      08:44:00  08:57:00
91.G*8h      08:46:00  08:57:00
92.+R7i-6i   08:46:00  08:58:00
93.B7cx8b+   08:46:00  08:58:00
94.G8ax8b    08:46:00  08:58:00
95.B*7c      08:47:00  08:58:00
96.N*8a      08:47:00  08:58:00
97.B7cx8b+   08:51:00  08:58:00
98.K9ax8b    08:51:00  08:58:00
99.S*7c      08:51:00  08:58:00
100.N8ax7c   08:51:00  08:58:00
101.P7dx7c+  08:51:00  08:58:00
102.K8bx7c   08:51:00  08:58:00
103.N*6e     08:51:00  08:58:00
104.K7c-6d   08:51:00  08:58:00
105.S7g-7f   08:56:00  08:58:00
106.B*9e     08:56:00  08:59:00
107.S7f-7e   08:58:00  08:59:00
108.K6d-6c   08:58:00  08:59:00
109.P*6d     08:58:00  08:59:00
110.G5cx6d   08:58:00  08:59:00
111.G*5c     08:58:00  08:59:00
112.K6c-7b   08:58:00  08:59:00
113.S7ex6d   08:58:00  08:59:00
114.P7h-7i+  08:58:00  08:59:00
115.N6e-7c+  08:58:00  08:59:00
116.B9ex7c   08:58:00  08:59:00
117.S6dx7c+  08:58:00  08:59:00
118.K7bx7c   08:58:00  08:59:00
119.P*7d     08:58:00  08:59:00
Resigns      08:58:00  08:59:00

Mate after 120.Kx7d B*5b K8d G*7d etc. or 120.K6d B*7e Kx7d G*6d etc. A good win by
Goda to start this campaign. A victory in the first game by the challenger almost
always means an interesting and close match. Still, there is a long way to go yet
and Moriuchi also didn't seem too phased, looking quite relaxed during the post-mortem
analysis. He will have the black pieces in the second game to try and level the match.
