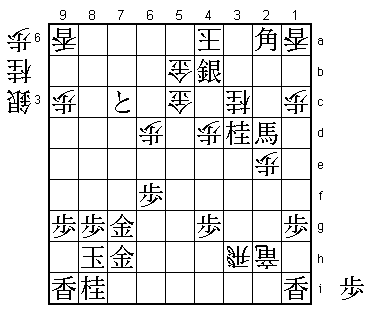
64th Meijin Match Game 5
[Black "Tanigawa Koji, Challenger"]
[White "Moriuchi Toshiyuki, Meijin"]
[Event "64th Meijin-sen, Game 5"]
[Date "June 1st and 2nd 2006"]
1.P7g-7f     00:00:00  00:00:00
2.P3c-3d     00:00:00  00:03:00
3.P6g-6f     00:02:00  00:03:00
4.P5c-5d     00:02:00  00:06:00
5.S7i-6h     00:13:00  00:06:00
6.S7a-6b     00:13:00  00:11:00
7.P5g-5f     00:35:00  00:11:00
8.G6a-5b     00:35:00  00:26:00
9.S3i-4h     01:06:00  00:26:00
10.S3a-3b    01:06:00  00:35:00
11.G4i-5h    01:08:00  00:35:00
12.K5a-4b    01:08:00  00:46:00
13.P2g-2f    01:20:00  00:46:00
14.P4c-4d    01:20:00  00:58:00
15.S6h-7g    01:28:00  00:58:00
16.S3b-3c    01:28:00  01:04:00
17.B8h-7i    01:41:00  01:04:00
18.K4b-3b    01:41:00  01:04:00
19.K5i-6h    01:57:00  01:04:00
20.B2b-3a    01:57:00  01:07:00
21.K6h-7h    01:57:00  01:07:00
22.P7c-7d    01:57:00  01:07:00
23.P3g-3f    02:02:00  01:07:00
24.R8b-7b    02:02:00  01:27:00
25.G5h-6g    02:41:00  01:27:00
26.P7d-7e    02:41:00  01:57:00

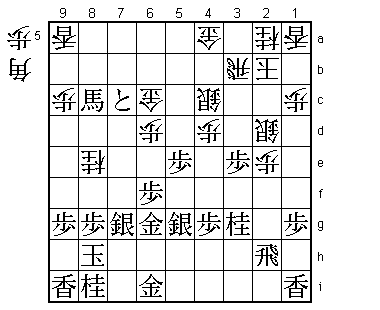
Tanigawa admitted after the game that he was not sure if he would
play Furibisha in this game or not. In the end, the game settled
into a Yagura, but this type of attack by white is rather unusual.
It is unclear whether Moriuchi prepared this for this game.

27.P7fx7e    03:14:00  01:57:00
28.B3ax7e    03:14:00  01:57:00
29.B7i-4f    03:14:00  01:57:00
30.B7e-6d    03:14:00  01:58:00
31.S4h-5g    03:15:00  01:58:00
32.K3b-2b    03:15:00  03:04:00
33.P2f-2e    04:06:00  03:04:00
34.S6b-5c    04:06:00  03:11:00
35.K7h-8h    04:10:00  03:11:00
36.S5c-4b?!  04:10:00  03:35:00

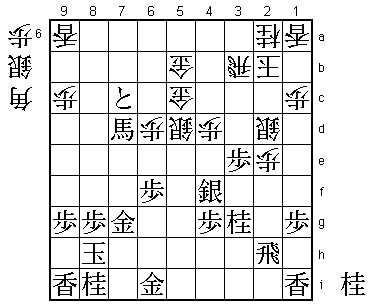
Interesting move, as white threatens to play S4c next, after which the
white position has good balance and the number of squares where black
can drop a bishop is limited. Still, Moriuchi regretted this move after
the game. There is a hidden problem with it that Tanigawa doesn't miss.
Better was 36.G3b G7h Bx4f Sx4f P4e S5g S5c-4d and we end up in a pretty
normal position. Fujii suggested that Moriuchi didn't think about this
very deeply because exchanging the bishops is a loss of tempo by white,
more or less admitting strategic defeat.

37.B4fx6d    04:46:00  03:35:00
38.P6cx6d    04:46:00  03:35:00
39.P*7c      04:46:00  03:35:00
40.N8ax7c    04:46:00  04:19:00
41.B*8a      04:47:00  04:19:00
42.R7b-6b    04:47:00  04:23:00
43.B8ax5d+   04:47:00  04:23:00
44.G5b-6c    04:47:00  04:25:00
45.P2e-2d!   05:16:00  04:25:00

Well-timed pawn sacrifice. White can't take this pawn with the silver
because of the fork +Bx4d.

46.P2cx2d    05:16:00  04:26:00

The head of the white king now is very weak and the white pieces are all
over the place. Moriuchi has to work very hard to keep his position together.

47.+B5d-5e   05:16:00  04:26:00
48.S4b-4c    05:16:00  04:48:00
49.N2i-3g    05:27:00  04:48:00
50.P3d-3e    05:27:00  05:44:00
51.+B5e-4f   05:37:00  05:44:00
52.P3ex3f    05:37:00  05:47:00
53.+B4fx3f   05:37:00  05:47:00
54.B*5d      05:37:00  05:49:00
55.+B3fx5d   06:24:00  05:49:00
56.G6cx5d    06:24:00  05:49:00
57.P5f-5e    06:24:00  05:49:00
58.G5d-5c    06:24:00  06:06:00
59.P*2e      06:33:00  06:06:00
60.P2dx2e    06:33:00  06:20:00
61.B*7d      07:01:00  06:20:00
62.G5c-6c    07:01:00  06:32:00
63.B7dx8c+   07:02:00  06:32:00
64.S3c-2d    07:02:00  06:48:00
65.P*7d      07:21:00  06:48:00
66.N7c-8e    07:21:00  06:50:00
67.P7d-7c+   07:23:00  06:50:00
68.R6b-3b    07:23:00  06:52:00
69.P*3e!     07:23:00  06:52:00

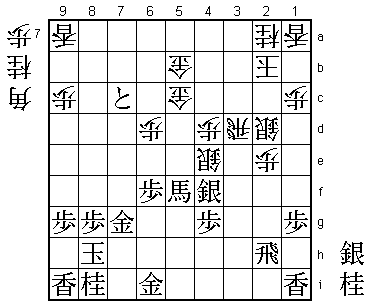
Good move. This blocks the rook and 70.Rx3e fails to 71.S4f, which defends
the bishop and attacks the rook while the gold on 6c is still under attack.

70.N8ex7g+?  07:23:00  07:16:00

The decisive mistake. Hard to see, but correct was 70.B*2c!. This move
invites black to finish his castle with 71.G7h, but then 72.P*3f is a
strong attack. The reason is that with the bishop on 2c, Nx2e is not
so effective with the bishop acting as a cushion against the black
rook on the 2nd file. Also, black wants to pull back the promoted bishop
to 5f where it works very well in attack and defense, but with the bishop
on 2c, this is no longer possible. After 72.P*3f, 73.+Px6c Px3g+ R6h Nx7g+
Kx7g Rx3e is much better for white than the game variation.

71.G6gx7g    07:24:00  07:16:00
72.G6c-5c    07:24:00  07:16:00
73.+B8c-7d   07:25:00  07:16:00
74.G4a-5b    07:25:00  07:24:00
75.P5e-5d    07:31:00  07:24:00
76.S4cx5d    07:31:00  07:24:00
77.S5g-4f!   07:37:00  07:24:00

Another good move by Tanigawa. Tempting is 77.N*3d, but after 78.K2c +P6b
G5b-4c +B4a S*3a white still has fighting chances. 77.S4f is a good move
because it defends both against Rx3e and the fork B*3i and now threatens
N*1f strongly.

78.S*2c      07:37:00  07:47:00

The head of the king is too weak, but Moriuchi will have dropped this silver
here with great regret.

79.N*3d      07:44:00  07:47:00
80.S2cx3d    07:44:00  07:49:00
81.P3ex3d    07:44:00  07:49:00
82.R3bx3d    07:44:00  07:50:00
83.+B7d-5f   07:55:00  07:50:00
84.N*4e      07:55:00  08:01:00
85.N3gx4e    08:10:00  08:01:00
86.S5dx4e    08:10:00  08:05:00

Suddenly black looks to be in trouble. R3i+ next attacks both rook and gold
and with the king open at the side, an attack with the rook looks worrying.
However, this rook promotion can't be defended because the black bishop is
attacked.

87.S4fx4e!   08:24:00  08:05:00

Tanigawa has come prepared. This required some deep calculation, but playing
a close endgame is Tanigawa's specialty.

88.R3d-3i+   08:24:00  08:07:00
89.S4e-3d!   08:25:00  08:07:00
90.+R3ix2h   08:25:00  08:09:00
91.G6i-7h!   08:27:00  08:09:00

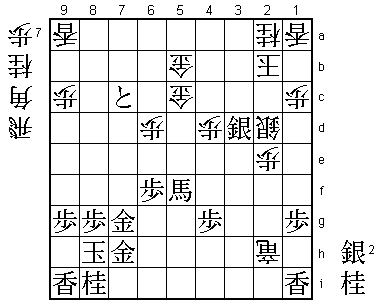
Tanigawa has given up the rook for a decisive attack. It is very important
that the gold on 7h is defended by the bishop on 5f and that black is
threatening mate here with S2c= K3c +B3d K4b N*5d Gx5d +Bx5b Kx5b S*6a
K4b G*5b K4c S*3d. It looks like white can both attack and defend with
92.R*3h, but then 93.S2c+ K3a N*3d is winning. Finally, picking of the
bishop with 92.B*7i Kx7i R*5i K8h Rx5f+ is mate after S*2c K3a N*4c etc.

92.K2b-3a    08:27:00  08:51:00

Moriuchi kind of makes a last stand, but after the game he admitted that
he was just going through the motions.

93.S3d-2c=   08:30:00  08:51:00
94.B*4a      08:30:00  08:57:00
95.S*2b      08:35:00  08:57:00
96.K3a-4b    08:35:00  08:57:00
97.+B5f-3d   08:35:00  08:57:00
98.R*3h      08:35:00  08:57:00
99.+B3dx2d   08:37:00  08:57:00
100.P*3c     08:37:00  08:57:00
101.S2bx3c+  08:42:00  08:57:00
102.N2ax3c   08:42:00  08:58:00
103.N*3d     08:42:00  08:58:00
104.K4b-4c   08:42:00  08:58:00
105.S*3b     08:42:00  08:58:00
106.B4ax3b   08:42:00  08:58:00
107.S2cx3b=  08:42:00  08:58:00
108.K4cx3b   08:42:00  08:58:00
109.B*2a     08:42:00  08:58:00
110.K3b-4a   08:42:00  08:58:00
111.S*4b     08:42:00  08:58:00
Resigns      08:42:00  08:59:00

Mate after 112.Gx4b +B2c K5a Nx4b+ Kx4b B3b+ K5a G*6b. A very good win
by Tanigawa in a game he couldn't afford to lose. He still has a mountain
to climb, because he has to win the next game with the white pieces to
force a decisive seventh game. However, the way his positive attacking
play paid off in this game will give him the confidence that this match
is not over yet.
