64th Meijin Match Game 4
[Black "Moriuchi Toshiyuki, Meijin"]
[White "Tanigawa Koji, Challenger"]
[Event "64th Meijin-sen, Game 4"]
[Date "May 18th and 19th 2006"]
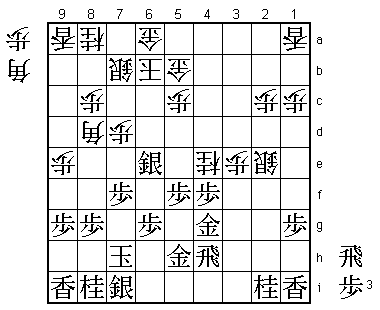
1.P7g-7f 00:00:00 00:00:00
2.P3c-3d 00:00:00 00:03:00
3.P2g-2f 00:01:00 00:03:00
4.P4c-4d 00:01:00 00:05:00
5.P2f-2e 00:02:00 00:05:00
6.B2b-3c 00:02:00 00:05:00
7.S3i-4h 00:02:00 00:05:00
8.P9c-9d 00:02:00 00:12:00
9.K5i-6h 00:03:00 00:12:00
10.R8b-4b 00:03:00 00:17:00
Although Tanigawa is an Ibisha player by nature, the Shikenbisha
opening was no surprise. Before the match, Tanigawa said that he wanted
to play many different openings and because the first game was a
Kakugawari with tempo loss, the second game a Gokigen Nakabisha and the
third game a Yagura opening, the options had become rather limited. Before
the game, Moriuchi also hinted at the possibility at playing the Kakugawari
with tempo loss again with reversed colors, but Tanigawa settled for the
Shikenbisha opening.
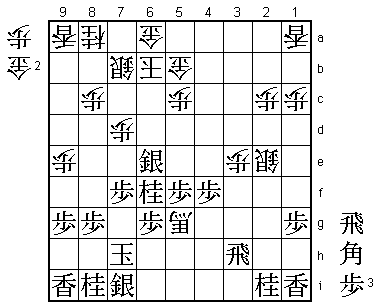
11.K6h-7h 00:08:00 00:17:00
12.S3a-3b 00:08:00 00:25:00
13.P5g-5f 00:09:00 00:25:00
14.S7a-7b 00:09:00 00:28:00
15.G4i-5h 00:12:00 00:28:00
16.S3b-4c 00:12:00 00:41:00
17.S4h-5g 00:15:00 00:41:00
18.P9d-9e 00:15:00 00:55:00
19.P3g-3f 00:16:00 00:55:00
20.K5a-6b 00:16:00 00:56:00
21.P3f-3e 00:16:00 00:56:00
The quick attack against the Fujii system is an important theoretical issue
among professionals at the moment. See for example the first game of the Asahi
Open match between Habu and Fujii, which had the same opening.
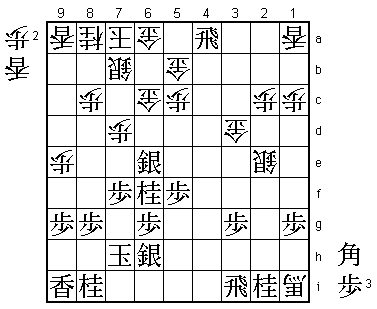
22.R4b-3b 00:16:00 01:43:00
23.P4g-4f 00:17:00 01:43:00
24.P3dx3e 00:17:00 01:46:00
25.P4f-4e 00:18:00 01:46:00
26.G4a-5b 00:18:00 01:47:00
27.P4ex4d 00:19:00 01:47:00
28.S4c-3d 00:19:00 01:48:00
29.R2h-4h 00:26:00 01:48:00
30.R3b-4b 00:26:00 01:55:00
31.S5g-4f 00:27:00 01:55:00
32.P*4g 00:27:00 02:28:00

33.R4hx4g    00:48:00  02:28:00

Up until this point, the position was the same as the Habu-Fujii game mentioned
earlier. There it followed 33.Gx4g L1b S6h K7a R2h K8b G7i and the game continued
at a rather low pace for a while. 33.Rx4g is not a new move, but clearly sharper
than 33.Gx4g. It is quite unusual to start the hostilities on the first day of a
two day title match, but obviously Moriuchi was well prepared.

34.B3cx4d    00:48:00  02:46:00
35.B8hx4d    00:49:00  02:46:00
36.R4bx4d    00:49:00  02:46:00
37.B*2b      00:49:00  02:46:00
38.R4d-7d    00:49:00  03:27:00
39.R4g-4h    01:17:00  03:27:00

The first time Moriuchi takes his time for a move (28 minutes). The alternative
is 39.S5g P*4c R2g B*3c Bx3c+ Nx3c P2d to use the rook on the second file. It is
hard to say if using the rook on the 4th file is better or worse than using it on
the 2nd file.

40.B*3c      01:17:00  03:42:00
41.B2bx3c+   01:31:00  03:42:00
42.N2ax3c    01:31:00  03:42:00
43.B*6e      01:31:00  03:42:00
44.B*8d      01:31:00  04:29:00

Now we are in unknown territory and we are also at the end of the first day. It is
becoming a pattern in this match, but Tanigawa had used almost three times as much
time at this point (Moriuchi 1 hour and 31 minutes, Tanigawa 4 hours and 29 minutes).

45.B6ex7d    02:38:00  04:29:00
46.P7cx7d    02:38:00  04:50:00
47.S4f-5g    02:59:00  04:50:00
48.N3c-4e    02:59:00  04:51:00
49.S5g-6f    03:00:00  04:51:00
50.P*4g      03:00:00  04:51:00
51.G5hx4g    04:20:00  04:51:00
52.S3dx2e    04:20:00  05:14:00
53.G6i-5h!   04:55:00  05:14:00

The obvious 53.P*4f is bad because of 54.S3f Gx3f N5g+, and in the press room 53.G6h
or S6h was expected to defend against this knight promotion. 53.G5h looks like bad
shape, but is much better because the theme of this position is the attack of the
bishop on the rook on 4h.

54.P6c-6d    04:55:00  05:40:00
55.P*4f      05:10:00  05:40:00
56.P6d-6e    05:10:00  05:56:00
57.S6fx6e    05:12:00  05:56:00
58.B*3i? 05:12:00 06:28:00
The reason why 53.G5h was a good move now becomes clear. After 58.Bx4h+ G4gx4h the
black position is still protected against a rook drop. With the gold on 6h, taking
the bishop with the gold on 4g leaves an undefended gold on 4h, which makes the
white attack much quicker. Tanigawa therefore played 58.B*3i instead, threatening
N5g+ G4gx5g Bx5g+ next after which the black position collapses. Also, 59.Px4e P*4f
is good for white. Still, 58.B*3i is a move that doesn't feel right. After all,
there is already a bishop attacking the black rook... The right way to play here
was 58.S6c. For example, 59.Px4e N7c P6f Nx6e Px6e B*6f which is good for white.
Also, 59.P7e Px7e is just creating attacking possibilities for white at the head
of the black king. Finally, if black plays 59.P5e, white can play B*3i which is much
better than the game, because the white king is better protected. Tanigawa had seen
S6c, but only thought about P*6d next, underestimating the power of N*7c which seems
to weaken the king at first glance.
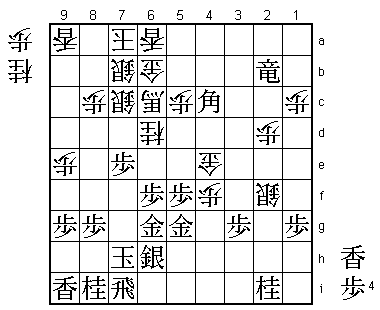
59.R4h-3h! 06:07:00 06:28:00
Simple, but white has no good continuation. Still, the game is close.
60.N4e-5g+ 06:07:00 06:29:00
61.G4gx5g 06:07:00 06:29:00
62.B3ix5g+ 06:07:00 06:29:00
63.G5hx5g 06:35:00 06:29:00
64.B8dx5g+ 06:35:00 06:29:00
65.N*6f! 06:35:00 06:29:00
Attack and defense. This knight attacks the vital pawn on 7d and also defends against
the white pawn drop on 6f.

66.G*6c?     06:35:00  07:15:00

The losing move. Correct was 66.K7a. For example, 67.S6h +B4g Rx3e N7c Nx7d G*8a R*4a
G*6c and because the white king is better defended than the black one, this position
is far from clear. The point here is that as long as the king is on 6b, Nx7d is a check,
so a counter-attack on the silver with N7c doesn't work.

67.S7i-6h    06:56:00  07:15:00
68.+B5gx4f   06:56:00  07:43:00
69.R*4a      07:13:00  07:43:00
70.+B4fx1i   07:13:00  07:44:00
71.R3hx3e    07:27:00  07:44:00
72.G*3d      07:27:00  08:04:00
73.R3e-3i    07:52:00  08:04:00
74.K6b-7a    07:52:00  08:07:00
75.P*3g      08:03:00  08:07:00
The game is over. The white gold and silver are idle and the promoted bishop cannot work
in defense. Tanigawa tries to make a fight of it, but Moriuchi doesn't give him anything.

76.+B1i-2h   08:03:00  08:18:00

Or 76.N7c Sx7d P*6e Sx6c+ Gx6c G*5b Px6f B*4c and it is clear that black is earlier.

77.R3i-7i    08:05:00  08:18:00
78.N8a-7c    08:05:00  08:31:00
79.S6ex7d    08:06:00  08:31:00
80.+B2h-2g   08:06:00  08:31:00
81.P*4c      08:10:00  08:31:00
82.P*6e      08:10:00  08:34:00
83.P4c-4b+   08:13:00  08:34:00
84.G5b-6b    08:13:00  08:40:00
85.S7dx7c+!  08:23:00  08:40:00

Perfect until the end. 85.Sx6c+ allows white to pull back the promoted bishop in defense
with attack on the rook.

86.S7bx7c    08:23:00  08:42:00

No choice. 86.G6cx7c fails to N*7d and 86.G6bx7c to +P5b.

87.+P4b-5a   08:25:00  08:42:00
88.G6ax5a    08:25:00  08:44:00
89.R4ax5a+   08:25:00  08:44:00
90.L*6a      08:25:00  08:44:00
91.N*7e      08:31:00  08:44:00
92.S*7b      08:31:00  08:46:00
93.N7ex6c+   08:38:00  08:46:00
94.+B2gx6c   08:38:00  08:46:00
95.+R5ax1a   08:38:00  08:46:00
96.P6ex6f    08:38:00  08:46:00
97.P6gx6f    08:38:00  08:46:00
98.G3d-4e    08:38:00  08:48:00
99.G*5g      08:38:00  08:48:00
100.P*4f     08:38:00  08:51:00
101.B*4c     08:41:00  08:51:00
102.P2c-2d   08:41:00  08:51:00
103.+R1a-2b  08:43:00  08:51:00
104.S2e-2f   08:43:00  08:54:00
105.P7f-7e   08:45:00  08:54:00
106.N*6d     08:45:00  08:54:00
107.G*6g     08:47:00  08:54:00
Resigns      08:47:00  08:54:00
The position is not close to mate, but the white attack is completely stopped and Moriuchi
can choose from many different good moves like P6e. Even though the white king still
is protected will, Tanigawa decided not to wait for the inevitable and resigned here.
Despite fighting a cold, Moriuchi again plays some very high level shogi to get
within one win of defending his Meijin title.