64th Meijin Match Game 3
[Black "Tanigawa Koji, Challenger"]
[White "Moriuchi Toshiyuki, Meijin"]
[Event "64th Meijin-sen, Game 3"]
[Date "May 11th and 12th 2006"]
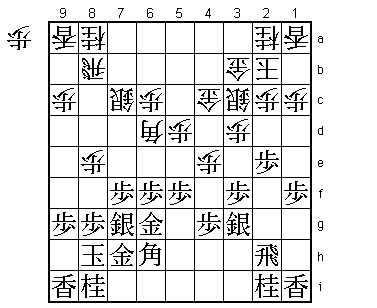
1.P7g-7f 00:00:00 00:00:00
2.P3c-3d 00:00:00 00:01:00
3.P6g-6f 00:06:00 00:01:00
4.P8c-8d 00:06:00 00:03:00
5.S7i-6h 00:15:00 00:03:00
6.S7a-6b 00:15:00 00:03:00
7.P5g-5f 00:16:00 00:03:00
8.P5c-5d 00:16:00 00:06:00
9.S3i-4h 00:19:00 00:06:00
10.S3a-4b 00:19:00 00:06:00
11.G4i-5h 00:21:00 00:06:00
12.G4a-3b 00:21:00 00:06:00
13.G6i-7h 00:23:00 00:06:00
14.K5a-4a 00:23:00 00:08:00
15.K5i-6i 00:25:00 00:08:00
16.G6a-5b 00:25:00 00:11:00
17.S6h-7g 00:29:00 00:11:00
18.S4b-3c 00:29:00 00:24:00
19.B8h-7i 00:32:00 00:24:00
20.B2b-3a 00:32:00 00:24:00
21.P3g-3f 00:33:00 00:24:00
22.P4c-4d 00:33:00 00:24:00
23.G5h-6g 00:36:00 00:24:00
24.P7c-7d 00:36:00 00:24:00
25.S4h-3g 01:03:00 00:24:00
26.B3a-6d 01:03:00 00:25:00
27.B7i-6h 01:07:00 00:25:00
28.G5b-4c 01:07:00 00:28:00
29.K6i-7i 01:12:00 00:28:00
30.K4a-3a 01:12:00 00:28:00
31.K7i-8h 01:13:00 00:28:00
32.K3a-2b 01:13:00 00:30:00
33.P2g-2f 01:37:00 00:30:00
34.P8d-8e 01:37:00 00:56:00
35.P1g-1f 01:42:00 00:56:00
After the first three moves, it looked like this game might become
a Furibisha game, but in the end it settled into a conventional Yagura
opening. The most popular way of playing this position is to start
attacking as quickly as possible with 35.S4f and N3g, but Tanigawa
plays it more old-fashioned with first 33.P2f and then 34.P1f to see
what white is doing.
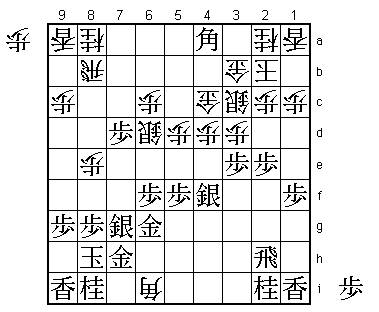
36.S6b-7c 01:42:00 00:56:00
37.S3g-4f 01:50:00 00:56:00
38.P7d-7e 01:50:00 01:00:00
39.P7fx7e 01:51:00 01:00:00
40.P4d-4e 01:51:00 01:00:00
41.S4f-3g 01:52:00 01:00:00
42.B6dx7e 01:52:00 01:00:00
43.P*7f 01:55:00 01:00:00
44.B7e-6d 01:55:00 01:08:00
45.P2f-2e 02:05:00 01:08:00
46.S7c-6b 02:05:00 01:14:00
Still a theoretical position. White wants to play S7d followed by N7c, but
there is no time here. For example, 46.S7d 47.P4f 48.Px4f 49.Bx4f or
48.G4d R4h and white has to defend and there is a considerable risk that
the silver on 7d will just sit there until the end of the game. Pulling
the silver back to the center is the best way here. Both players have
played this position before, Tanigawa had it played against him in a title
match game (the 42nd Osho match against Murayama, which Tanigawa won).
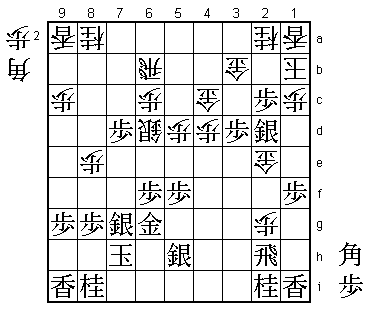
47.P4g-4f 02:24:00 01:14:00
48.P4ex4f 02:24:00 01:17:00
49.B6hx4f 02:24:00 01:17:00
50.S6b-5c 02:24:00 01:19:00
51.P7f-7e 02:58:00 01:19:00
We are still in known territory, but this is not an easy move to play
because it weakens the black king position.
52.P*4d 02:58:00 01:24:00
53.P7e-7d 03:12:00 01:24:00
54.B6dx4f 03:12:00 01:36:00
55.S3gx4f 03:12:00 01:36:00
56.S5c-6d 03:12:00 01:36:00
57.P3f-3e 04:11:00 01:36:00
58.B*6i 04:11:00 03:02:00
59.B*4a!? 04:50:00 03:02:00
This is a new move. Until now, 59.Px3d Sx3d P*3e or 59.Px3d Sx3d P*4e had
been played. It is hard to say if 59.B*4a is an improvement, but it is a
very positive move suited to Tanigawa's attacking style.
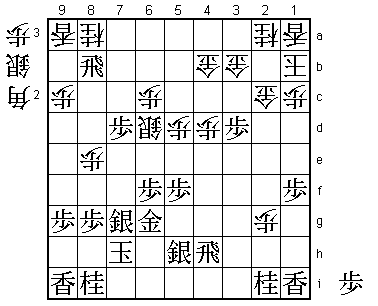
60.R8b-6b 04:50:00 03:51:00
A defense-only move, but white has no choice. After 60.B3f+ S3g +B3e Bx6c+
the white bishop has no place to go.
61.P3ex3d 05:26:00 03:51:00
62.S3cx3d 05:26:00 03:52:00
63.P*3e 05:26:00 03:52:00
64.G3b-4b 05:26:00 04:21:00
65.P3ex3d 05:59:00 04:21:00
66.G4bx4a 05:59:00 04:21:00
67.S4f-3e 05:59:00 04:21:00
68.G4a-3b 05:59:00 04:35:00
69.P2e-2d 06:14:00 04:35:00
70.P2cx2d 06:14:00 04:35:00
71.S*5h 06:15:00 04:35:00
72.B6ix7h+ 06:15:00 04:46:00
73.K8hx7h 06:15:00 04:46:00
74.G*2e 06:15:00 04:46:00
75.S3ex2d 07:02:00 04:46:00
76.P*2g 07:02:00 05:30:00
77.P*2c 07:02:00 05:30:00
78.K2b-1b 07:02:00 05:32:00
White has won material and the general opinion in the press room was that
it was very difficult for black to make his attack work. The next move
surprised everyone, including Moriuchi.

79.R2h-4h!   07:41:00  05:32:00

Both players had seen that 79.R3h Gx2d B*5a P2h+ Rx2h B*4f Rx2d Bx2d Bx2d+
R*2h was good for white. Tanigawa played 79.R4h because there was nothing
else, but Moriuchi had completely overlooked this. The point is that in the
variation above white can't play P2h+, because this doesn't attack the black
rook, so white can just take the rook on 6b instead. It seemed that Moriuchi
lost confidence in his position after 79.R4h, which could explain the errors
that follow.

80.G2ex2d    07:41:00  05:59:00
81.B*5a      07:41:00  05:59:00
82.R6b-4b    07:41:00  06:01:00
83.B5ax4b+   07:42:00  06:01:00
84.G4cx4b    07:42:00  06:01:00
85.R*8b      07:42:00  06:01:00
86.G2dx2c?   07:42:00  06:42:00
Black seems to have the advantage, but white could have made it very difficult
with 86.Kx2c instead. For example, 86.Kx2c Rx8a+ P*3a +Rx9a B*2f L*3g S*2h,
picking up the lance and knight, thus preparing the escape up the board of the
king. An entering king is a distinct possibility and Tanigawa admitted that it
would be difficult to stop it. In the post-mortem analysis, Moriuchi agreed
that this would have been the best way to play, but he also mentioned that he
had overlooked S*2h.

87.P*4c      08:13:00  06:42:00
88.G3bx4c    08:13:00  06:49:00

The only move, but having the two golds quite far away from the king is very
bad shape.

89.R8bx8a+   08:14:00  06:49:00
90.B*3e      08:14:00  07:00:00
91.+R8ax9a   08:17:00  07:00:00
92.B*4f?     08:17:00  07:05:00
The final mistake. Correct was 94.B*2d and there is still a lot of fight in
this position. For example, 95.R4i P2h+ N*3f +P3h Nx2d Gx2d and the rook has
no good place to go (R4g S*3f) or 95.N*5g B2f R3h P*3g R4h G2cx3d and the
position is still far from clear.

93.R4hx4f    08:23:00  07:05:00
94.B3ex4f    08:23:00  07:05:00
95.N*1e      08:23:00  07:05:00
96.R*7i      08:23:00  08:03:00

It must have been a long 58 minutes for Moriuchi. There is no way to avoid
the loss. If the pawn on 2g wouldn't have been there, white would have the
defense R*2h, but now there is nothing that can be done.

97.K7h-8h    08:23:00  08:03:00
98.G2c-2d    08:23:00  08:03:00

The point. 98.S*7h is hisshi, but black has a mate after 99.Nx2c+ Kx2c +Rx2a
N*2b L*2f etc.

99.L*2c      08:24:00  08:03:00
100.S*3b     08:24:00  08:05:00
101.L2cx2a+  08:29:00  08:05:00
102.S3bx2a   08:29:00  08:05:00
103.S5h-4g   08:31:00  08:05:00
104.R7ix2i+  08:31:00  08:11:00
105.S4gx4f   08:31:00  08:11:00
106.+R2i-3h  08:31:00  08:11:00
107.B*6h     08:32:00  08:11:00
Resigns      08:32:00  08:24:00
Moriuchi took 13 minutes to resign, as there is no immediate mate. However,
white has nothing but 108.N*7e and then 109.N*3e is a mating threat (N1ex2c+
Gx2c Nx2c+ Kx2c Rx2a+ N*2b S*2d etc.). Whether white attacks or defends, there
is no way to win this game. After the game, Tanigawa was obviously relieved.
Losing this game would have put him 3-0 down and the match would have been
virtually over. Now he can try and even the match in the fourth game.