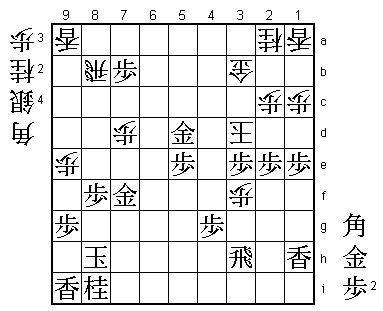
63rd Meijin Match Game 7
[Black "Moriuchi Toshiyuki, Meijin"]
[White "Habu Yoshiharu, Challenger"]
[Event "63rd Meijin-sen, Game 7"]
[Date "June 23rd and 24th 2005"]
1.P7g-7f     00:00:00  00:00:00
2.P8c-8d     00:00:00  00:02:00
3.S7i-6h     00:00:00  00:02:00
4.P3c-3d     00:00:00  00:03:00
5.P6g-6f     00:00:00  00:03:00
6.S7a-6b     00:00:00  00:05:00
7.P5g-5f     00:00:00  00:05:00
8.P5c-5d     00:00:00  00:07:00
9.S3i-4h     00:03:00  00:07:00
10.S3a-4b    00:03:00  00:10:00
11.G4i-5h    00:04:00  00:10:00
12.G4a-3b    00:04:00  00:14:00
13.G6i-7h    00:09:00  00:14:00
14.K5a-4a    00:09:00  00:18:00
15.K5i-6i    00:11:00  00:18:00
16.G6a-5b    00:11:00  00:22:00
17.S6h-7g    00:13:00  00:22:00
18.S4b-3c    00:13:00  00:24:00
19.B8h-7i    00:13:00  00:24:00
20.B2b-3a    00:13:00  00:26:00
21.P3g-3f    00:14:00  00:26:00
22.P4c-4d    00:14:00  00:27:00
23.G5h-6g    00:15:00  00:27:00
24.P7c-7d    00:15:00  00:31:00
25.B7i-6h    00:16:00  00:31:00
26.G5b-4c    00:16:00  01:13:00
27.K6i-7i    00:17:00  01:13:00
28.B3a-6d    00:17:00  01:17:00
29.S4h-3g    00:40:00  01:17:00
30.K4a-3a    00:40:00  01:20:00
31.K7i-8h    00:41:00  01:20:00
32.K3a-2b    00:41:00  01:21:00

An orthodox Yagura opening in this decisive game. Black has
the higher winning percentage, so it seemed likely that Habu
had prepared something.

33.P1g-1f    00:42:00  01:21:00
34.P8d-8e    00:42:00  01:53:00
35.P2g-2f    00:58:00  01:53:00
36.P9c-9d    00:58:00  01:54:00
37.R2h-3h    01:33:00  01:54:00
38.S6b-5c    01:33:00  02:42:00
39.P1f-1e    01:34:00  02:42:00
40.P9d-9e    01:34:00  02:42:00
41.N2i-1g    01:45:00  02:42:00
42.S3c-2d    01:45:00  02:48:00
43.N1g-2e    01:45:00  02:48:00
44.N8a-7c    01:45:00  02:49:00
45.L1i-1h    02:30:00  02:49:00
46.S5c-4b    02:30:00  03:17:00
47.S3g-4f    02:41:00  03:17:00
48.P4d-4e    02:41:00  04:29:00

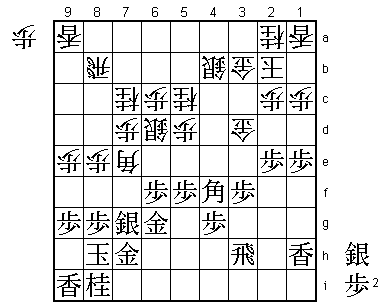
The sealed move. This is still a known position.

49.S4fx4e    02:59:00  04:29:00
50.S2dx2e    02:59:00  04:29:00
51.P2fx2e    03:04:00  04:29:00
52.N*5c      03:04:00  04:29:00
53.S4ex3d    03:10:00  04:29:00
54.G4cx3d    03:10:00  04:30:00
55.P7f-7e    03:12:00  04:30:00
56.B6dx7e    03:12:00  05:34:00
57.B6h-4f    03:32:00  05:34:00
58.S*6d      03:32:00  05:36:00

This is a new move, but not really an improvement. Habu himself
also characterized it as very painful to play. With this move,
white drops a precious silver in a defensive position, blocks
the escape route of the bishop and also makes the natural attack
P6d followed by P6e impossible. It remains unclear what he had
prepared, but here he realized that his opening strategy had failed.
The obvious way to play here would be 58.B6d, but after Bx6d Px6d P3e
G4d P2d Px2d P*2e white is in trouble (Px2e P*2d followed by B*4a and
S*2c is very quick and impossible to defend). Still, despite the drawbacks
of S*6d, white is a knight up and even though the pieces are all blocking
each other, white can still hope to win if he can free them and use them
in attack.

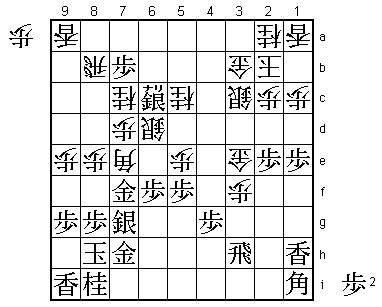
59.P*7b!     04:07:00  05:36:00

Strong move. Dropping a pawn so far from the king seems too slow, but
white has no proper attack here. This pawn can not be taken: 60.Rx7b
S*8c R7a P*7b R8a Sx7d+ is good for black. Also, defending against the
pawn promotion with 60.R8a is bad after S*6b which threatens both P7a+
and Sx7c+. Because P7a+ is next, white has to move quickly. However,
another point of P*7b is that even if black has no time to promote this
pawn, the sideways working of the rook is now blocked and attacking the
white king becomes much easier.

60.G3d-4e    04:07:00  05:44:00
61.B4f-1i    04:45:00  05:44:00
62.S4b-3c    04:45:00  05:45:00
63.P3f-3e    04:53:00  05:45:00
64.P*3f      04:53:00  05:50:00
65.S*5b      05:03:00  05:50:00
66.G4ex3e    05:03:00  05:58:00
67.S5bx6c+   05:13:00  05:58:00
68.P5d-5e    05:13:00  06:00:00
69.G6g-7f!   06:12:00  06:00:00

Another good move by the Meijin. Black has just taken the pawn on 6c, which
means that white has the extra attacking plan of P*6e now. Moriuchi defends
against this and at the same time puts pressure on the white bishop. Black
now threatens to bring the bishop on 1i into play with +Sx6d Bx6d Bx5e. Also,
at the right time, Gx7e Sx7e Bx5e is a possibility. Again, white is forced
into action.

70.P8e-8f    06:12:00  06:59:00
71.P8gx8f    06:47:00  06:59:00
72.N7c-6e    06:47:00  07:15:00

Sacrificing the knight for a desperate attack. White has no choice. 72.N4e is
answered by 73.Gx7e Sx7e +Sx7c and B*6e next is a bishop that works great in
attack and defense. No way that white's P3g+ will be in time. Black may have
the better position, but white manages to set up an attack and the game is still
reasonably close.

73.P6fx6e    06:56:00  07:15:00
74.N5cx6e    06:56:00  07:15:00
75.P*3d      07:35:00  07:15:00
76.G3ex3d    07:35:00  07:23:00
77.N*2f      07:37:00  07:23:00

78.N6ex7g+?  07:37:00  07:47:00

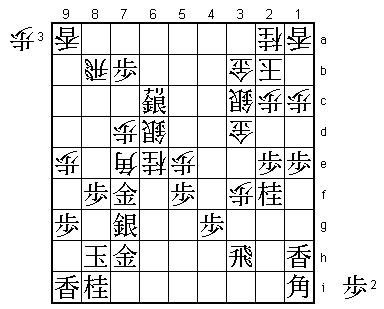
A mistake that puts Habu's hopes to become the 18th Lifetime Meijin on hold for
at least another year. White should have played immediately 78.G4e here. Then
79.+Sx6d (black wants to drop this knight on 3d) Nx7g+ Gx7g B6d N*3d is very
similar to the actual game, but the important difference is that the bishop on
6d is not under attack, so white can now play K3a.

79.G7hx7g    07:37:00  07:47:00
80.G3d-4e    07:37:00  08:24:00

After G4d or G3e, black takes the bishop and drops it on 7a.

81.N*3d      07:46:00  08:24:00

The difference. 82.K3a now fails to Gx7e.

82.S3cx3d    07:46:00  08:27:00
83.N2fx3d    07:46:00  08:27:00
84.K2b-3c    07:46:00  08:27:00
85.S*4f      07:54:00  08:27:00
86.G4e-4d    07:54:00  08:34:00
87.+S6cx6d   08:15:00  08:34:00
88.B7ex6d    08:15:00  08:34:00
89.S4fx5e    08:16:00  08:34:00
90.G4dx5e    08:16:00  08:34:00
91.B1ix5e    08:16:00  08:34:00
92.B6dx5e    08:16:00  08:35:00
93.P5fx5e    08:16:00  08:35:00
94.N*6d      08:16:00  08:35:00
95.B*5c      08:34:00  08:35:00
96.N6dx7f    08:34:00  08:37:00
97.G7gx7f    08:34:00  08:37:00
98.G*4e      08:34:00  08:38:00
99.N*5g!     08:43:00  08:38:00

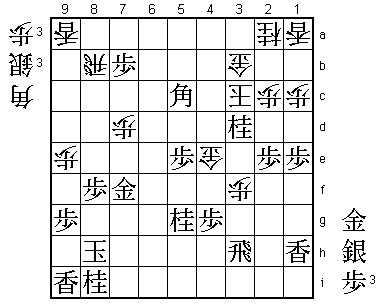
The decisive move. White has no defense.

100.B*6g     08:43:00  08:38:00

This allows mate. Moriuchi probably saw it instantly, but he takes 6 minutes
for his next move to check every variation multiple times.

101.N5gx4e   08:49:00  08:38:00
102.B6gx4e+  08:49:00  08:38:00
103.S*4d     08:51:00  08:38:00
104.+B4ex4d  08:51:00  08:38:00
105.B5cx4d+  08:51:00  08:38:00
106.K3cx4d   08:51:00  08:38:00
107.G*5d     08:52:00  08:38:00
108.K4dx3d   08:52:00  08:38:00
109.P*3e     08:53:00  08:38:00
Resigns      08:53:00  08:38:00

Mate after 110.Kx3e G*4f Kx2e Gx3f etc., or 110.Kx2e R2h Any*2f B*3d etc. A straight
victory by Moriuchi, who seemed to be the better player in this match. Habu had to
go very deep to take this match to seven games, but in the end he came up short.
Moriuchi defends a major title for the first time in his career, which also should
give him a lot of confidence for the future.
