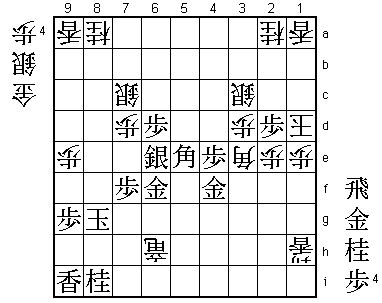
63rd Meijin Match Game 6
[Black "Moriuchi Toshiyuki, Meijin"]
[White "Habu Yoshiharu, Challenger"]
[Event "63rd Meijin-sen, Game 6"]
[Date "June 14th and 15th 2005"]
1.P7g-7f     00:00:00  00:00:00
2.P8c-8d     00:00:00  00:03:00

The first time that Habu has tried this in this match. In the
second game, he played 2.P3d, leading to the Kakugawari with
tempo loss, and in the fourth game he also played 2.P3d, this
time leading to the Gokigen-Nakabisha. He lost both games and
the opening was an important part of those losses. 2.P8d allows
black to pick either the Kakugawari or the Yagura. Both have
been analyzed very deeply and the black winning percentage with
either opening is quite high. With 3-2 down and playing white,
courage is required to select an opening that can easily lead to
a strategic defeat or where it is easy to end up in the opening
preparation of the opponent.

3.S7i-6h     00:00:00  00:03:00
4.P3c-3d     00:00:00  00:04:00
5.P6g-6f     00:00:00  00:04:00
6.S7a-6b     00:00:00  00:05:00
7.P5g-5f     00:00:00  00:05:00
8.P5c-5d     00:00:00  00:06:00
9.S3i-4h     00:00:00  00:06:00
10.S3a-4b    00:00:00  00:09:00
11.G4i-5h    00:02:00  00:09:00
12.G4a-3b    00:02:00  00:11:00
13.G6i-7h    00:05:00  00:11:00
14.K5a-4a    00:05:00  00:12:00
15.K5i-6i    00:10:00  00:12:00
16.G6a-5b    00:10:00  00:22:00
17.S6h-7g    00:16:00  00:22:00
18.S4b-3c    00:16:00  00:25:00
19.B8h-7i    00:17:00  00:25:00
20.B2b-3a    00:17:00  00:26:00
21.P3g-3f    00:17:00  00:26:00
22.P4c-4d    00:17:00  00:27:00
23.G5h-6g    00:18:00  00:27:00
24.P7c-7d    00:18:00  00:35:00
25.S4h-3g    00:21:00  00:35:00
26.B3a-6d    00:21:00  00:39:00
27.B7i-6h    00:25:00  00:39:00
28.G5b-4c    00:25:00  00:51:00
29.K6i-7i    00:26:00  00:51:00
30.K4a-3a    00:26:00  00:51:00
31.K7i-8h    00:29:00  00:51:00
32.K3a-2b    00:29:00  00:52:00
33.S3g-4f    00:29:00  00:52:00
34.S6b-5c    00:29:00  01:08:00
35.N2i-3g    00:29:00  01:08:00
36.B6d-7c    00:29:00  01:20:00
37.P1g-1f    00:45:00  01:20:00
38.P1c-1d    00:45:00  01:29:00
39.P2g-2f    00:45:00  01:29:00
40.S3c-2d    00:45:00  01:29:00
41.R2h-3h    00:49:00  01:29:00
42.P9c-9d    00:49:00  01:53:00
43.L1i-1h    00:52:00  01:53:00
44.P9d-9e    00:52:00  02:24:00
45.P6f-6e    01:03:00  02:24:00
46.P8d-8e    01:03:00  02:31:00
47.N3g-2e    01:29:00  02:31:00
48.S5c-4b    01:29:00  02:36:00
49.P5f-5e    02:07:00  02:36:00
50.P4d-4e    02:07:00  02:47:00
51.S4fx4e    02:09:00  02:47:00
52.B7cx5e    02:09:00  02:47:00
53.P4g-4f    02:20:00  02:47:00

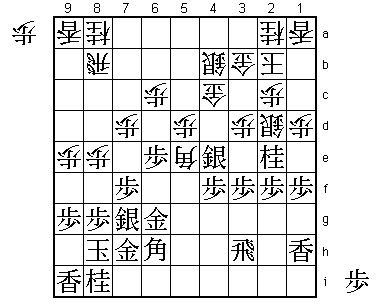
A high pace opening and that should not come as a big surprise.
Actually, both players have experience with the position up to
here. In the 5th game of last year's Osho match, Moriuchi and Habu
played the same opening, albeit with the colors reversed. After
53.P4f, Moriuchi played 54.P8f Px8f Rx8f P*8g R8b and then B5g K3a
S5f B2b S6f. Habu did not like to fight with the king on 3a, so he
plays something else here.

54.B5e-7c    02:20:00  02:55:00

Threatens to win the silver after P5e next, so the next move is forced.

55.S4e-5f    02:22:00  02:55:00
56.P5d-5e    02:22:00  04:40:00

The move everyone expected, but Habu took 105 minutes for it and
sealed it. He might have seen a problem here, but even in the
post-mortem analysis it was unclear what that was.

57.S5f-4g    02:24:00  04:40:00
58.B7c-6b    02:24:00  04:42:00
59.B6h-5i    02:33:00  04:42:00

Up until this move the position had been played before, but this is
Moriuchi's opening preparation. 59.P3e seems the obvious way to
continue, but after 60.Sx3e it is hard to find a good continuation
and black has to careful to keep this silver out of his position.
59.B5i looks passive, but the aim is to allow white one more move
to weaken its position before starting the attack.

60.G4c-5d    02:33:00  04:45:00
61.P3f-3e    03:12:00  04:45:00
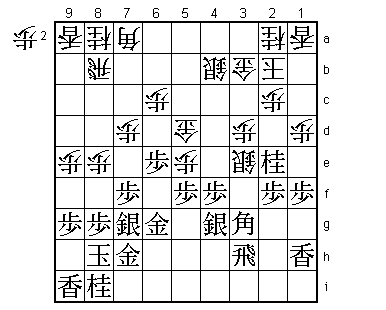
62.B6bx3e!   03:12:00  05:22:00

It is very hard to see how good this really is. 62.Sx3e P1e Px1e
P*1c S2d Rx3d S4c R3h is good for black, but why is taking with
the bishop so much better? The answer will become clear in a few
moves.

63.B5i-3g    03:25:00  05:22:00

And the position is good for black, was the general opinion in the
press room.

64.B3e-7a!   03:25:00  05:23:00

The second move of Habu's brilliant defense plan.

65.P*5f      04:33:00  05:23:00

Moriuchi sees what is going to happen and starts to take his time.
For this move he took 68 minutes.

66.S2d-3e!   04:33:00  05:49:00

There it is. This looks like a slower version of taking the pawn
directly with the silver on move 62, but there are some important
differences. The black bishop is much closer to the silver (on 3g
instead of 5i) and the white bishop is further away, protecting the
rook and the rook now also works in defense. White threatens to take
the knight with P2d next, so black has to hurry.

67.P5fx5e    06:00:00  05:49:00

Again Moriuchi takes his time (87 minutes), but he is unable to find
a good plan.

68.G5dx6e    06:00:00  05:55:00
69.P1f-1e    06:09:00  05:55:00
70.P1dx1e    06:09:00  06:03:00
71.P4f-4e    06:19:00  06:03:00
72.P2c-2d    06:19:00  06:11:00
73.P5e-5d    06:21:00  06:11:00
74.P*4f      06:21:00  06:42:00
75.S4gx4f    06:48:00  06:42:00
76.S3ex2f    06:48:00  07:02:00
77.B3g-1i    07:44:00  07:02:00
78.S2f-2g=!  07:44:00  07:31:00

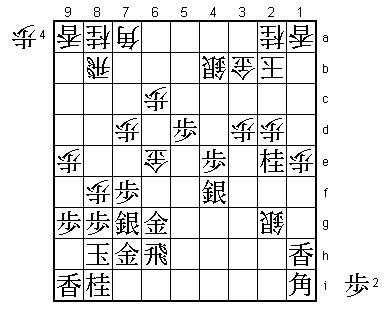
Another good move by Habu. Simply 78.Px2e is good for black after
79.P4d (Bx4d S3e) or 79.P5c+ Sx5c Rx3d.

79.R3h-6h    07:55:00  07:31:00

It seems that 79.R5h P8f Sx8f Px2e P*6f seems better (G6d S5e), but
no variation in which black was clearly better was discovered.

80.P8e-8f!!  07:55:00  07:33:00

Much better than 80.Sx1h+ Rx1h L*1f P*1g Lx1g= S3e Lx1h+ Bx8b+ Bx3e
S*4d and it is unclear who is winning this mating race. Also 80.Px2e
P4d followed by S4e, uncovering the bishop on 1i is good for black.

81.S4f-5g    08:16:00  07:33:00

It is painful to allow the capture on 8g, but black doesn't have
much choice. After 81.Px8f, white has the disrupting P*8g in the
variation after Sx1h+ given on the previous move. Furthermore,
81.Sx8f Px2e strongly threatens N*6d next and if black plays P4d
then, Bx4d is a check (P*6f G6d blocks the bishop on 1i, so S4e
is no longer a move with any impact).

82.P8fx8g+   08:16:00  07:39:00
83.G7hx8g    08:16:00  07:39:00

Now the black position suddenly looks much weaker than the white
one. The difference is still quite small, but Habu makes no mistake
from here.

84.P6c-6d    08:16:00  07:39:00
85.S5g-5f    08:20:00  07:39:00
86.P*8f      08:20:00  07:51:00
87.S7gx8f    08:21:00  07:51:00
88.P*8e      08:21:00  07:51:00
89.S8f-7g    08:21:00  07:51:00
90.S2gx1h=   08:21:00  07:51:00
91.R6hx1h    08:21:00  07:51:00
92.L*1f      08:21:00  07:51:00
93.S5fx6e    08:24:00  07:51:00
94.L1fx1h+   08:24:00  07:51:00
95.B1ix6d    08:24:00  07:51:00
96.P2dx2e    08:24:00  07:52:00
97.S*2d      08:39:00  07:52:00
98.N*8f      08:39:00  08:25:00

Forcing black to use the gold in defense.

99.G*7i      08:39:00  08:25:00
100.R*3h     08:39:00  08:30:00
101.S7g-6h   08:40:00  08:30:00
102.S4b-3c   08:40:00  08:30:00
103.P*2c     08:46:00  08:30:00
104.G3bx2c   08:46:00  08:31:00
105.S2dx2c+  08:50:00  08:31:00
106.K2bx2c   08:50:00  08:31:00
107.P5d-5c+  08:50:00  08:31:00
108.P*6f     08:50:00  08:33:00
109.G6gx6f   08:57:00  08:33:00

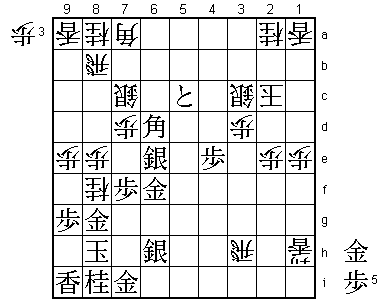
And now 110.S*5g K7g and white has the upper hand, but there is
still a long way to go...

110.S*7c!!   08:57:00  08:45:00

Again Habu shows that he has seen much more than the professionals
in the press room. This is a brilliant finish. If the bishop on 6d
moves, white can take the tokin on 5c and bring the bishop on 7a
into the attack. Furthermore, in the end this silver on 7c plays a
vital role in mating the black king.

111.P*2d     08:58:00  08:45:00
112.K2c-1d   08:58:00  08:45:00
113.B6d-5e   08:59:00  08:45:00
114.B7ax5c   08:59:00  08:45:00
115.P*6d     08:59:00  08:45:00
116.B5c-3e   08:59:00  08:48:00
117.K8h-7g   08:59:00  08:48:00
118.N8f-7h+  08:59:00  08:51:00
119.G7ix7h   08:59:00  08:51:00
120.P8e-8f   08:59:00  08:51:00
121.G8gx8f   08:59:00  08:51:00
122.R8bx8f   08:59:00  08:51:00
123.G*4f     08:59:00  08:51:00
124.G*8g     08:59:00  08:53:00
125.G7hx8g   08:59:00  08:53:00
126.R8fx8g+  08:59:00  08:53:00
127.K7gx8g   08:59:00  08:53:00
128.R3hx6h+  08:59:00  08:53:00
Resigns      08:59:00  08:53:00

A game that looked to become a long struggle is suddenly over.
P*8f next is a mating threat (thanks to the silver on 7c) and
black has no proper defense or attack. A brilliant game by Habu
with his back against the wall. Winning two in a row after going
3-1 down should give him the psychological edge in the final game.
Moreover, Habu has never lost a return match (challenging the next
year after losing a match) and Moriuchi has never defended a title.
Still, even in this game Moriuchi played really well, showing that
he had seen trouble coming a long time before anyone else. The
furigoma in the final game will probably a big factor in the outcome
of this match.
