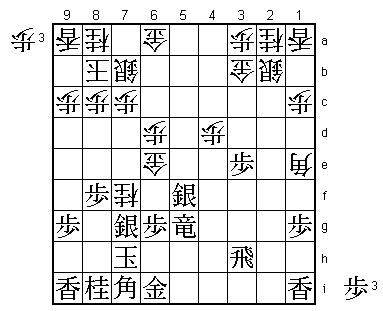
63rd Meijin Match Game 4
[Black "Moriuchi Toshiyuki, Meijin"]
[White "Habu Yoshiharu, Challenger"]
[Event "63rd Meijin-sen, Game 4"]
[Date "May 23rd and 24th 2005"]
1.P7g-7f     00:00:00  00:00:00
2.P3c-3d     00:00:00  00:01:00
3.P2g-2f     00:01:00  00:01:00
4.P5c-5d     00:01:00  00:02:00
5.S3i-4h     00:11:00  00:02:00
6.P5d-5e     00:11:00  00:07:00
7.K5i-6h     00:16:00  00:07:00
8.R8b-5b     00:16:00  00:10:00

The Gokigen Nakabisha is a surprise. The first three games were all
with the Kakugawari opening and before the game Habu hinted that he
might try something different this time. Changing the opening was to
be expected after Habu lost the third game with the black pieces, but
a different Ibisha opening was expected. Habu is an all-round player,
who plays almost everything, but the Gokigen Nakabisha with white is a
risky opening that can lead to a quick disaster if not handled very
carefully.

9.K6h-7h     00:18:00  00:10:00
10.K5a-6b    00:18:00  00:11:00
11.S7i-6h    00:25:00  00:11:00
12.K6b-7b    00:25:00  00:19:00
13.P4g-4f    00:27:00  00:19:00
14.K7b-8b    00:27:00  00:28:00
15.S4h-4g    00:28:00  00:28:00
16.S7a-7b    00:28:00  00:38:00
17.G4i-5h    00:31:00  00:38:00
18.B2b-3c    00:31:00  01:05:00
19.S6h-7g    01:00:00  01:05:00
20.P6c-6d    01:00:00  02:28:00
21.S4g-3f    02:10:00  02:28:00
22.G4a-3b    02:10:00  03:01:00

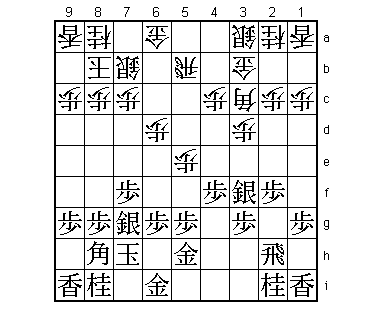
The black position looks strange with the silver on 7g blocking the bishop
and the silver on 3f is also not in an orthodox attacking position, but
this is one of the latest ideas against the Gokigen Nakabisha. The silver
on 7g might be blocking the bishop, but this also makes it impossible for
white to exchange bishops, which is always one of the white goals.
Furthermore, this silver can move to 6f at some point to attack the
vanguard pawn on 5e. The silver on 3f is aiming at the head of the white
bishop. This is an important problem for white, because this bishop can
not be exchanged in this position. The position after 22.G3b is almost
identical to the A Junisen game between Habu and Kubo (played on
February 1st). The only difference was that the pawns on the 9th file
were pushed. That game continued 23.S4e P3e P3f Px3f Sx3f S6c P2e G7b
S3e B5a P2d and even though Habu won that game, he was struggling for
most of the time and the conclusion was that white had a clear advantage.

23.P2f-2e!   02:29:00  03:01:00

Moriuchi's new move. Judging from this game it is very strong, maybe
even killing all hopes for white in this position. Further analysis will
have to show if there is something for white after this, but the mood
after the game was that white has irresolvable problems.

24.P5e-5f    02:29:00  03:25:00
25.P5gx5f    03:50:00  03:25:00
26.R5bx5f    03:50:00  03:26:00
27.G5h-4g    03:50:00  03:26:00
28.R5f-5a    03:50:00  03:29:00
29.S3f-4e    03:54:00  03:29:00
30.P3d-3e    03:54:00  03:31:00
31.S4e-3d    04:30:00  03:31:00
32.B3c-2b    04:30:00  03:55:00
33.P2e-2d    04:51:00  03:55:00
34.P2cx2d    04:51:00  03:55:00
35.P*2c      04:52:00  03:55:00
36.B2b-4d    04:52:00  04:47:00
37.P4f-4e    04:54:00  04:47:00
38.B4d-6b    04:54:00  04:48:00
39.S7g-6h    05:00:00  04:48:00
40.P*5e      05:00:00  04:49:00
41.G4g-4f    05:08:00  04:49:00
42.P3e-3f    05:08:00  05:35:00
43.R2hx2d    05:32:00  05:35:00
44.R5a-5d    05:32:00  05:42:00
45.P2c-2b+!  05:59:00  05:42:00

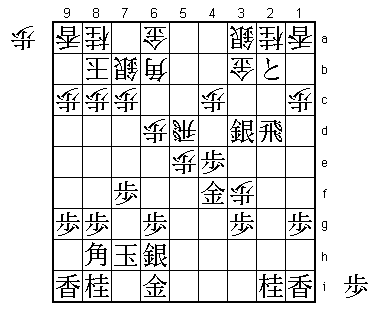
Outstanding play by Moriuchi. The commentators expected 45.P4d here,
which seems really good for black after 46.Rx4d (46.Px4d Gx5e; 46.Bx4d
G4e) G4e G3c Gx4d Gx2d Sx4c+ and the white silver on 3a and the gold on
2d are a painful sight. However, Moriuchi has looked even deeper. If
white takes the tokin with 46.Sx2b, the variation above is not possible,
because after G3c the silver on 2b is undefended. Also, depending on what
white plays, the combination Sx4c Gx4c Rx2b+ comes into the position.
This being said, the commentators wondered if Moriuchi had overlooked
the next move.

46.B6b-5a    05:59:00  06:04:00

And if the rook moves, the silver on 3d is lost, right?

47.R2d-2g!   06:17:00  06:04:00

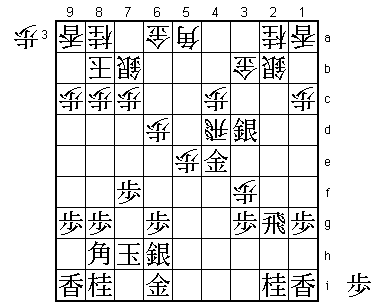
Moriuchi shows that he has looked deeper than anyone else. After 48.Rx3d
+Px3b Sx3b R2b+ Px3g+ G*3e white can not avoid losing material. If the
rook moves from the 3rd file, the silver on 3b is captured and after R3c
G2d, the white rook is lost.

48.S3ax2b    06:17:00  06:20:00
49.P4e-4d    06:20:00  06:20:00
50.R5dx4d    06:20:00  06:25:00

Also bad is 50.Px4d Gx5e R5d P*5d or 50.P*2f Rx2f Rx4d G4e Rx4e Sx4e
G*3e Rx2b+ Gx2b S5d R*2h S*6c and black can always defend with P*5h or
P*5i, making certain that the white attack is too slow. With the white
gold on the terrible squares 2b and 3e, there is no way white can win
this position.

51.G4f-4e    06:22:00  06:25:00

A complete success for black. Moriuchi wins material under the most
favorable circumstances. From a professional point of view, this game
is over.

52.P3fx3g+   06:22:00  06:27:00
53.N2ix3g    06:49:00  06:27:00
54.P*3f      06:49:00  06:27:00
55.G4ex4d    06:51:00  06:27:00
56.P3fx3g+   06:51:00  06:27:00
57.P*5b      07:22:00  06:27:00
58.B5a-6b    07:22:00  06:27:00
59.R2gx3g    07:22:00  06:27:00
60.B6bx4d    07:22:00  06:27:00
61.S3d-4e    07:30:00  06:27:00
62.B4d-3c    07:30:00  06:27:00
63.P*4d      07:37:00  06:27:00
64.P5e-5f    07:37:00  06:34:00
65.P5b-5a+   07:55:00  06:34:00

The simple 65.Sx5f is also more than enough, but gives white the option
of G*4f. Moriuchi is not in the mood for allowing Habu anything, he aims
for total annihilation.

66.G6ax5a    07:55:00  06:40:00
67.R*5c      07:55:00  06:40:00

This was the last move before the dinner break. Black captures the pawn
on 5f, which is the only thing of value in the white position. Most
commentators expected Habu to throw the towel here, but some masochistic
streak makes Habu play on for a while.

68.G5a-6a    07:55:00  06:59:00
69.R5cx5f+   07:55:00  06:59:00
70.P*5e      07:55:00  06:59:00
71.+R5fx5e   07:59:00  06:59:00
72.N*8d      07:59:00  06:59:00
73.S6h-7g    08:03:00  06:59:00
74.P*3a      08:03:00  07:00:00
75.P8g-8f    08:15:00  07:00:00
76.G*6e      08:15:00  07:01:00
77.+R5e-5h   08:25:00  07:01:00
78.B3c-2d    08:25:00  07:07:00
79.P*3e      08:28:00  07:07:00
80.B2d-1e    08:28:00  07:21:00
81.R3g-3h    08:31:00  07:21:00
82.P*5g      08:31:00  07:37:00
83.+R5hx5g   08:32:00  07:37:00
84.P4cx4d    08:32:00  07:38:00
85.S4e-5f    08:33:00  07:38:00
86.N8dx7f    08:33:00  07:39:00
87.B8h-7i    08:34:00  07:39:00
Resigns      08:34:00  07:39:00

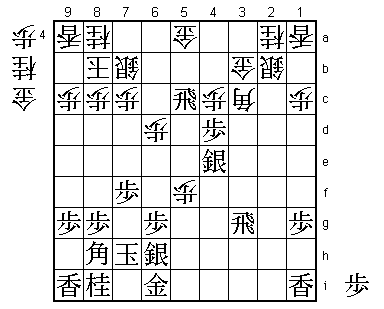
Here Habu finally had enough. White is actually a little up on material
(knight and gold for the rook), but all the black pieces are working together
and white has no moves to get anything going. This game ends without even
a check against either king. The first three games showed very interesting
shogi, but this is a game Habu would rather forget. This will not be easy,
because Moriuchi is suddenly 3-1 up and very close to defending his Meijin
title.
