63rd Meijin Match Game 3
[Black "Habu Yoshiharu, Challenger"]
[White "Moriuchi Toshiyuki, Meijin"]
[Event "63rd Meijin-sen, Game 3"]
[Date "May 12th and 13th 2005"]
1.P7g-7f     00:00:00  00:00:00
2.P8c-8d     00:00:00  00:03:00
3.G6i-7h     00:02:00  00:03:00
4.P8d-8e     00:02:00  00:06:00
5.B8h-7g     00:02:00  00:06:00
6.P3c-3d     00:02:00  00:06:00
7.S7i-6h     00:03:00  00:06:00
8.G4a-3b     00:03:00  00:14:00
9.S3i-3h     00:11:00  00:14:00
10.S7a-6b    00:11:00  00:26:00
11.P4g-4f    00:26:00  00:26:00
12.P6c-6d    00:26:00  00:47:00
13.S3h-4g    00:53:00  00:47:00
14.S6b-6c    00:53:00  00:47:00
15.S4g-5f    00:55:00  00:47:00
16.P9c-9d    00:55:00  01:14:00
17.P9g-9f    00:56:00  01:14:00
18.G6a-5b    00:56:00  01:18:00
19.P2g-2f    01:07:00  01:18:00
20.B2bx7g+   01:07:00  01:25:00
21.S6hx7g    01:07:00  01:25:00

The Kakugawari for the third time in this match. However, in the
first two games the hypermodern Kakugawari with tempo loss was played.
In this game, the old fashioned Reclining Silver position is the
opening of choice. A long theoretical battle is the likely outcome...

22.S3a-4b    01:07:00  01:25:00
23.K5i-6h    01:08:00  01:25:00
24.P1c-1d    01:08:00  01:26:00
25.P1g-1f    01:11:00  01:26:00
26.S6c-5d    01:11:00  01:27:00
27.G4i-5h    01:28:00  01:27:00
28.P4c-4d    01:28:00  01:32:00
29.P3g-3f    01:42:00  01:32:00
30.K5a-4a    01:42:00  01:43:00
31.K6h-7i    01:45:00  01:43:00
32.K4a-3a    01:45:00  01:44:00
33.P6g-6f    01:48:00  01:44:00
34.P7c-7d    01:48:00  01:45:00
35.N2i-3g    01:50:00  01:45:00
36.N8a-7c    01:50:00  01:46:00
37.P2f-2e    02:25:00  01:46:00
38.S4b-3c    02:25:00  01:46:00
39.P4f-4e    02:27:00  01:46:00
40.P4dx4e    02:27:00  01:53:00
41.P3f-3e    02:28:00  01:53:00
42.S3c-4d    02:28:00  01:53:00
43.P1f-1e    02:30:00  01:53:00
44.P1dx1e    02:30:00  01:53:00
45.P2e-2d    02:30:00  01:53:00
46.P2cx2d    02:30:00  01:53:00
47.P7f-7e    02:30:00  01:53:00
48.P7dx7e    02:30:00  01:54:00
49.R2hx2d    02:30:00  01:54:00
50.P*2c      02:30:00  01:54:00
51.R2d-2i    02:30:00  01:54:00
52.G5b-6c    02:30:00  01:55:00
53.P*1b      02:31:00  01:55:00
54.L1ax1b    02:31:00  01:55:00
55.P3ex3d    02:31:00  01:55:00
56.B*3h      02:31:00  01:56:00
57.R2i-3i    02:31:00  01:56:00
58.B3h-2g+   02:31:00  01:56:00
59.B*1a      02:31:00  01:56:00
60.+B2g-2h   02:31:00  01:58:00
61.R3i-6i    02:31:00  01:58:00
62.S5d-4c    02:31:00  02:47:00
63.N3gx4e    04:10:00  02:47:00

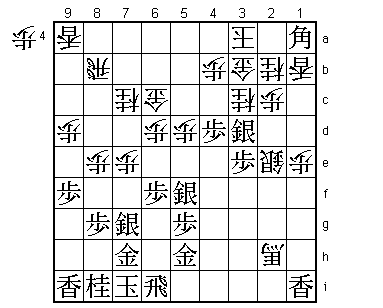
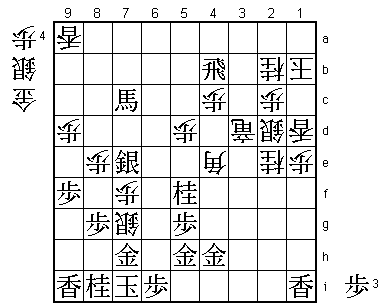
The sealed move.

64.P5c-5d    04:10:00  03:04:00
65.N4e-3c+   04:11:00  03:04:00
66.N2ax3c    04:11:00  03:04:00
67.P*4e      04:11:00  03:04:00
68.S4cx3d    04:11:00  03:07:00
69.P4ex4d    04:11:00  03:07:00
70.P*4b      04:11:00  03:10:00
71.P*3e      04:12:00  03:10:00
72.S3d-2e    04:12:00  03:10:00
73.S*3d      04:12:00  03:10:00
74.N*2b!?    04:12:00  03:11:00

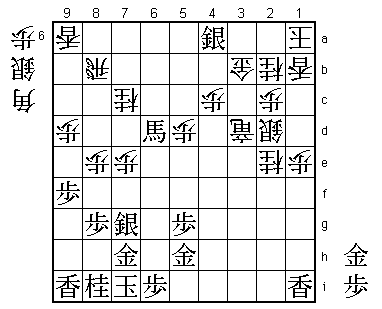
We are well into the second day of this game, but this is still theory.
Habu and Moriuchi started the discussion about this position in their
Oi league game in 2003. There Moriuchi played 74.N*4a and after 75.P6e
Px6e Sx6e Nx6e Rx6e P*6d Rx7e P*7d Sx2e Nx2e N*3d S*3c R4e black had
the advantage. Moriuchi couldn't find anything else than +B2g, but
after R4g N3g+ P*1c the edge attack was decisive and Habu scored a
convincing victory. After that game, 74.N*2b was suggested as better,
but there was no clear conclusion. Since then, 74.N*2b has been played
in a number of games but still there was no consensus about the move.
It looks dubious, as it limits white's options, while black has different
choices for his moves. Professionals don't like that, but despite this,
no clear way to win for black was found and the position was no longer
played.

75.S3dx2e    04:12:00  03:11:00
76.N3cx2e    04:12:00  03:11:00
77.P3e-3d    04:12:00  03:11:00
78.S*2d      04:12:00  03:55:00
79.P6f-6e    04:15:00  03:55:00
80.P6dx6e    04:15:00  04:12:00
81.S5fx6e    04:22:00  04:12:00
82.P*6d      04:22:00  04:20:00
83.S6ex6d    04:25:00  04:20:00
84.+B2hx6d   04:25:00  04:41:00
85.P4d-4c+   04:26:00  04:41:00
86.P4bx4c    04:26:00  05:03:00
87.R6ix6d    04:27:00  05:03:00
88.G6cx6d    04:27:00  05:03:00
89.B*5c      04:27:00  05:03:00
90.K3a-2a    04:27:00  05:03:00
91.B5cx6d+   04:27:00  05:03:00
92.K2ax1a    04:27:00  05:05:00
93.S*4a      04:58:00  05:05:00
94.R*3i      04:58:00  05:51:00
95.P*6i      04:59:00  05:51:00
96.R3ix3d+   04:59:00  05:53:00

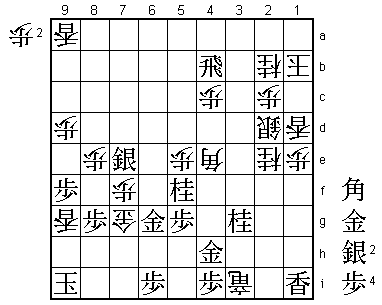
97.+B6dx7c?  05:41:00  05:53:00

Difficult to foresee, but this is an important mistake. This knight later
has to be dropped in defense, and the black bishop needs a lot of moves
to get close to the white king again. Better was 97.Sx3b+ Rx3b G*4b R3c
P*3b L1d P3a+ K1b G*3b P7f +P2a Px7g+ Nx7g K1c +Px2b +R3f Gx3c Sx3c R*3a
which seems to be good for black.

98.R8b-4b    05:41:00  06:00:00
99.+B7c-5a   05:45:00  06:00:00
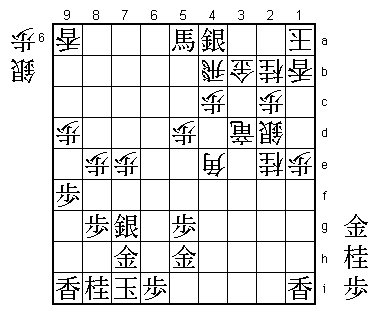
100.B*4e!    05:45:00  06:07:00

The point. White doesn't have much choice because 100.G3a P*3b G4a +Bx4b
Gx4b G*2a Kx2a R*3a is mate and 100.S*2a gives no hope of any counter-attack.
Still, even thought this bishop drop doesn't look like much, it is very
strong and Habu might have underestimated it. +R3h next is already a mating
threat (after Bx7h+) and white has also the option of taking the gold on 7h
at any time. It is not easy to shut out the bishop. For example 100.P5f Bx5f
G*5g B4e G4f is an option, but looks more like a desperate attempt at
counter-play than a sound attack.

101.S4ax3b+  06:32:00  06:07:00
102.R4bx3b   06:32:00  06:08:00
103.G*4b     06:32:00  06:08:00
104.R3b-3c   06:32:00  06:28:00
105.P*3b     06:33:00  06:28:00
106.L1b-1d   06:33:00  06:40:00
107.P3b-3a+  06:34:00  06:40:00
108.+R3d-3h  06:34:00  06:57:00
109.N*5f     07:24:00  06:57:00

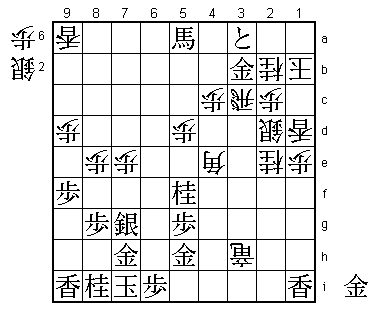
The difference with the variation given after 97.+Bx7c. Black has to give
up the knight he captured to defend against Bx7h+ followed by +Rx5h.

110.K1a-1b   07:24:00  07:09:00
111.G4b-3b?  07:25:00  07:09:00

This makes things much easier for white. Better was 111.+P3b and then 112.R3g+
is bad because of +Px2b followed by G*4h, so white has to play 112.R3f which
is answered by 113.+B4a +Rx5h +B3a G*1a G*2a K1c Gx2b S3c G*1b Kx1b +Px3c
S*2b +Px2b Gx2b G*3b Rx3b S*2a K1c Sx3b+ and now G*6g +Bx2b K2d G*3d Bx3d
+B3c K3e +Bx3d K2f is just one example where the white king barely escapes.
White still seems to have the upper hand, but there are many variations and
the margin of error is small.

112.R3c-3g+  07:25:00  07:15:00
113.G*4h     07:28:00  07:15:00
114.+R3gx3b  07:28:00  07:17:00
115.+P3ax3b  07:28:00  07:17:00
116.+R3hx3b  07:28:00  07:17:00
117.R*4b     07:28:00  07:17:00
118.+R3b-3d  07:28:00  07:26:00
119.+B5a-7c  07:39:00  07:26:00
120.P7e-7f   07:39:00  07:49:00
121.S7gx7f   07:39:00  07:49:00
122.P*7g     07:39:00  07:49:00
123.G7hx7g   07:40:00  07:49:00
124.P*7e     07:40:00  07:51:00
125.S7fx7e   07:45:00  07:51:00
126.P*7f     07:45:00  07:54:00
127.G7g-7h   07:45:00  07:54:00
128.S*7g!    07:45:00  08:02:00

Winning. 129.Nx7g+ is answered by 130.Px7g+ Gx7g N*6e and white wins quickly.

129.G5h-6g   08:14:00  08:02:00

The most beautiful variation would have been 129.R6b+ which is answered by
130.S*8f! Px8f Bx5f Nx7g Px7g+ Gx7g N*7f and white wins.

130.+R3d-3i  08:14:00  08:22:00
131.P*4i     08:14:00  08:22:00
132.G*6e     08:14:00  08:23:00
133.N8ix7g   08:19:00  08:23:00
134.P7fx7g+  08:19:00  08:27:00
135.G7hx7g   08:19:00  08:27:00
136.N*5e     08:19:00  08:29:00
137.G6g-6f   08:29:00  08:29:00

No choice. White threatened simply Nx6g+ Gx6g P*7g Gx7g P*7f.

138.P*7f     08:29:00  08:36:00
139.G6fx7f   08:29:00  08:36:00
140.G6ex7f   08:29:00  08:50:00
141.G7gx7f   08:29:00  08:50:00
142.S*6g     08:29:00  08:50:00
143.G7f-7g   08:31:00  08:50:00
144.P*7f     08:31:00  08:57:00
145.+B7cx5e  08:31:00  08:57:00
146.P5dx5e   08:31:00  08:58:00
147.G7gx6g   08:31:00  08:58:00
148.G*7g     08:31:00  08:58:00
149.N*3g     08:47:00  08:58:00
150.B*8h     08:47:00  08:59:00
151.K7i-8i   08:47:00  08:59:00
152.B8hx9i+  08:47:00  08:59:00
153.K8ix9i   08:47:00  08:59:00
154.L*9g     08:47:00  08:59:00
Resigns      08:47:00  08:59:00

Mate after 155.K8i L9h+ Kx9h (K7i +L8h) +Rx4h Px4h G*8h K9g G8hx8g.
Another fine performance by Moriuchi who seems to have taken control of
this match. With a little bit of luck in the first game he could have
been up 3-0. As it is, Habu's task is only difficult but not hopeless.
However, a win in the fourth game is vital and far from easy with the
white pieces. Can Habu deliver under pressure as he has done so often
in the past?
