63rd Meijin Match Game 2
[Black "Moriuchi Toshiyuki, Meijin"]
[White "Habu Yoshiharu, Challenger"]
[Event "63rd Meijin-sen, Game 2"]
[Date "April 25th and 26th 2005"]
1.P7g-7f     00:00:00  00:00:00

An important game for Moriuchi. Getting two games behind in a
best-of-seven match is very difficult to turn around. However,
the signs are not bad. Even though he lost the opening game,
he dictated the pace. Also, he comes into this game after securing
his place in the Ryu-O challenger finals with a win against
Kimura three days earlier. On the other hand, on the same day
Habu saw his chances of taking all seven major titles evaporate
with a loss against Maruyama in the second chance round of the
Ryu-O tournament. Moriuchi has the black pieces and wants to hold
his serve.

2.P3c-3d     00:00:00  00:03:00
3.P2g-2f     00:00:00  00:03:00
4.G4a-3b     00:00:00  00:04:00
5.G6i-7h     00:09:00  00:04:00
6.P8c-8d     00:09:00  00:12:00
7.P2f-2e     00:09:00  00:12:00
8.B2bx8h+    00:09:00  00:12:00
9.S7ix8h     00:09:00  00:12:00
10.S3a-2b    00:09:00  00:12:00
11.S3i-3h    00:31:00  00:12:00
12.S2b-3c    00:31:00  00:16:00
13.S3h-2g    00:33:00  00:16:00

Again the Kakugawari with tempo loss. Playing the silver up without
moving the king is already trying to throw white off balance. Is the
game going to be a quick fight or not?

14.P4c-4d    00:33:00  01:22:00
15.K5i-6h    01:07:00  01:22:00
16.R8b-4b    01:07:00  02:15:00
17.S2g-3f    02:39:00  02:15:00

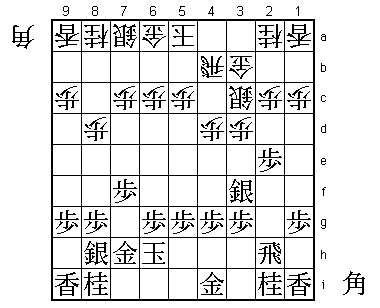
This is a very complex position where the players take a long time
to decide how to play. A detailed explanation of all the plans here
is difficult, but the reason why Moriuchi did not play 17.B*8c is
not so obvious. He rejected this because of 18.B*7d Bx7d+ Px7d B*8c
(P7e Px7e B*8c seems also possible) B*6e N7g Bx4g+ S3f +B4f Bx7d+
which is unclear. 17.S3f defends against this variation (making B*8c
a legitimate threat), but it also means that black gives up on the plan
to attack with a climbing silver, so the pace of the game slows down.

18.S7a-8b    02:39:00  02:57:00
19.P4g-4f    02:41:00  02:57:00
20.K5a-6b    02:41:00  02:58:00
21.G4i-5h    03:47:00  02:58:00
22.P3d-3e!?  03:47:00  03:38:00

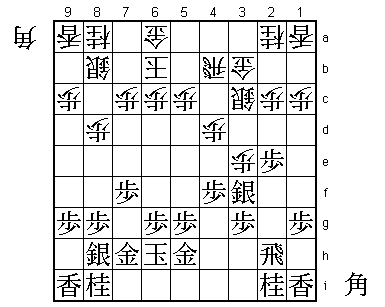
The sealed move. Playing only 21 moves on the first day is highly
unusual, even for the Meijin match (the only match where players each
have 9 hours thinking time). 22.P3e is a shobute. Habu felt that he
needed to start the fight here, because after the quiet 22.K7b, black
can play 23.S7g which strengthens the black king position considerably.
Actually, Moriuchi intended to play 23.R4h in response to K7b, which means
that 22.P3e might not have been necessary. On the other hand, if 22.P3e
is a good move, black should have played 21.R4h instead of 21.G5h.
Moriuchi was worried about 22.B*6e then, but after the game Habu said
that he had no intention of playing that bishop drop. It is interesting
how the like and dislike for certain moves seems to dominate the choices
of the players here.

23.S3fx3e    04:32:00  03:38:00
24.P4d-4e    04:32:00  03:41:00
25.B*6e      04:32:00  03:41:00

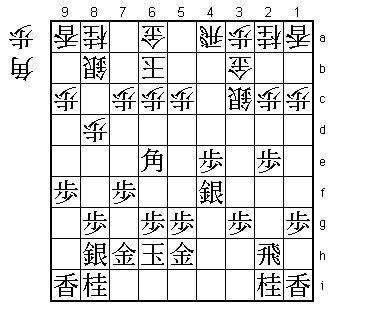
Moriuchi doesn't back away from the fight. Taking the pawn on 3e and
dropping this bishop next means that the pace of the game suddenly picks
up considerably.

26.P4ex4f    04:32:00  04:20:00

In the press room, 26.B*5d was considered the only move. Habu has seen
deeper.

27.P*4d      05:06:00  04:20:00
28.P*3a      05:06:00  04:33:00
29.S3ex4f    05:44:00  04:33:00

29.Bx3b+ Px3b G*4c fails to B*6e (Gx4b P4g+ is good for white). Pulling
back the silver seems like admitting failure of the attack, but having
forced white to drop a pawn in defense on 3a is important compensation.

30.R4bx4d    05:44:00  05:06:00
31.P*4e      05:51:00  05:06:00
32.R4d-4a    05:51:00  05:06:00
33.P9g-9f!?  06:30:00  05:06:00

A complete surprise. 33.S7g seems the obvious move to improve the position,
after which white can start the decisive fight with 34.P*4d. However,
Moriuchi thought that in this position, having the silver on 7g is actually
more a wall silver than a silver on 8h. The escape route via 7g is more
important than the escape route through 7i.

34.K6b-7b    06:30:00  05:24:00
35.P9f-9e    06:32:00  05:24:00
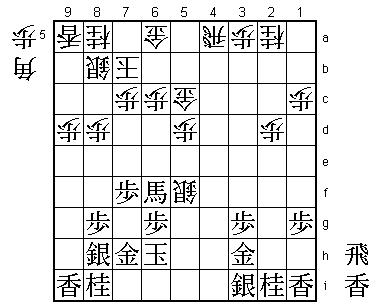
36.G3b-4c    06:32:00  05:34:00

Aiming at G5d next.

37.S4f-5e    06:56:00  05:34:00
38.P5c-5d    06:56:00  05:54:00
39.S5e-4f    06:58:00  05:54:00

39.Sx5d P6d is good for white. Going forward and backward with the silver
again looks like a pointless maneuver, but black has prevented G5d and if
he can force white into a waiting game, the extended pawn on 9e will become
important.

40.G4c-5c    06:58:00  06:00:00
41.B6e-5f    07:02:00  06:00:00
42.S3c-3d    07:02:00  06:33:00

The professionals in the press room didn't like it, but Habu agreed with
Moriuchi that white can't afford to wait.

43.P9e-9d    07:09:00  06:33:00
44.P9cx9d    07:09:00  06:35:00
45.P2e-2d    07:09:00  06:35:00
46.B*6d      07:09:00  06:37:00
47.R2h-2f    07:25:00  06:37:00
48.B6dx4f    07:25:00  07:05:00
49.R2fx4f    07:27:00  07:05:00
50.S*5e      07:27:00  07:05:00
51.R4f-4h    07:29:00  07:05:00
52.S5ex5f    07:29:00  07:05:00
53.P5gx5f    07:29:00  07:05:00
54.P2cx2d    07:29:00  07:06:00
55.B*6f      07:59:00  07:06:00

56.B*3i      07:59:00  07:46:00

After the game, Habu regretted this move. The alternative is 56.B*3c, which
Habu liked better after 57.S*4d Gx4d Px4d P2e. Still, the main line after
56.B*3i also looks good for white.

57.B6fx1a+   07:59:00  07:46:00
58.B3ix4h+   07:59:00  07:46:00
59.G5hx4h    07:59:00  07:46:00
60.R*2h      07:59:00  07:46:00
61.B*3h      08:11:00  07:46:00
62.S3dx4e    08:11:00  08:07:00
63.S*3i      08:16:00  08:07:00
64.S4ex5f    08:16:00  08:09:00
65.+B1a-6f   08:23:00  08:09:00
66.R2hx3h+   08:23:00  08:10:00
67.G4hx3h!   08:25:00  08:10:00

This just seems to allow a rook promotion, so most professionals wouldn't
even consider this move and play 67.Sx3h without much thought. However,
after 67.Sx3h, white can play 68.B*3c which forces the exchange of the vital
promoted bishop on 6f.

68.S5f-4g+   08:25:00  08:22:00

The important thing about 67.Gx3h is that Moriuchi must already have seen
some time before that 67.R4i+ +Bx5f is OK for black, even after the scary
looking B*5i K5g. Habu agreed and played 68.S4g+ instead.

69.R*2b!     08:29:00  08:22:00

Another move that needed sharp calculation. Inoue admitted that he would
almost certainly play 69.L*4i here, which is the natural defense move.
Moriuchi has calculated that black cannot win from that position.

70.G5c-5b    08:29:00  08:23:00
71.R2bx2a+   08:29:00  08:23:00
72.B*3e      08:29:00  08:27:00
73.K6h-7g    08:31:00  08:27:00
74.B3e-5g+   08:31:00  08:27:00
75.+B6fx5g   08:37:00  08:27:00
76.+S4gx5g   08:37:00  08:27:00
77.S8h-7i    08:37:00  08:27:00
78.R4a-4i+   08:37:00  08:31:00
79.+R2ax3a   08:44:00  08:31:00
80.B*5h      08:44:00  08:33:00
81.B*3d      08:51:00  08:33:00
82.P*3c      08:51:00  08:39:00
83.+R3ax3c   08:52:00  08:39:00
84.B5h-6i+   08:52:00  08:44:00
85.K7g-8h    08:52:00  08:44:00
86.P*4e?     08:52:00  08:56:00

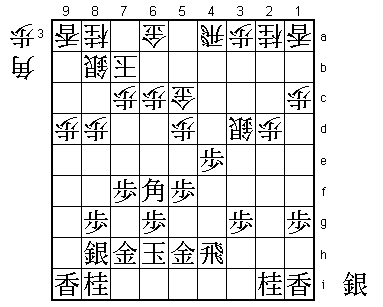
An important mistake, but it is hard to blame Habu for missing the next
move. If he would have seen it, he would have played 86.+R5h instead,
which is good for white even after 87.P*5i +Rx5i. 86.P*4e looks like a
good move. It blocks the bishop diagonal and threatens to win with +Sx6g
next. For example, 87.+R3b +Sx6g Bx5b+ +Bx7i Gx7i +Rx7i K9h G*8h and mate.

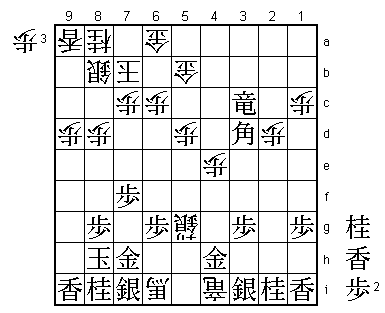
87.G3h-4h!!  08:55:00  08:56:00

A brilliant move that will go down in history. Taking this with the
promoted silver is forced and moving this piece away from the king gives
black enough time to release a very quick and decisive attack.

88.+S5gx4h   08:55:00  08:56:00
89.L*6f      08:55:00  08:56:00

This wins very quickly. The problem of 86.P*4e is now obvious. If white
would not have dropped a pawn there, the defense P*4c would have been
possible.

90.+R4ix3i   08:55:00  08:56:00
91.L6fx6c+   08:57:00  08:56:00
92.K7b-8c    08:57:00  08:56:00
93.N*7e      08:57:00  08:56:00
94.K8c-9c    08:57:00  08:56:00
95.+L6cx7c   08:57:00  08:56:00
96.N8ax7c    08:57:00  08:57:00
97.B3dx5b+   08:57:00  08:57:00
98.G6a-7b    08:57:00  08:57:00
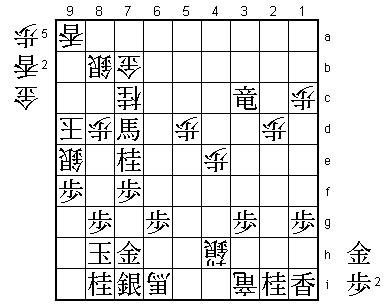
99.+B5b-7d   08:58:00  08:57:00

A very rare sight: in only a couple of moves, Habu's king is blown away
by a perfectly executed combined attack. All the black pieces are in the
right positions.

100.S*8e     08:58:00  08:58:00
101.L9ix9d   08:59:00  08:58:00
102.S8ex9d   08:59:00  08:58:00
103.P*9e     08:59:00  08:58:00
104.S9dx9e   08:59:00  08:58:00
105.P*9d     08:59:00  08:58:00
106.K9cx9d   08:59:00  08:59:00
107.P*9f     08:59:00  08:59:00
Resigns      08:59:00  08:59:00

There is no mate against the black king and 108.Sx9f P*9e Kx9e +Bx9f K9d
P*9e leads to mate. An important win for Moriuchi, who showed that Habu
is not the only one who can come from behind to snatch a game. Food for
thought for Habu and good news for the spectators, who can look forward
to a very interesting match. Game three will have Habu with the black
pieces again.
