63rd Meijin Match Game 1
[Black "Habu Yoshiharu, Challenger"]
[White "Moriuchi Toshiyuki, Meijin"]
[Event "63rd Meijin-sen, Game 1"]
[Date "April 12th and 13th 2005"]
1.P7g-7f     00:00:00  00:00:00
2.P3c-3d     00:00:00  00:02:00
3.P2g-2f     00:01:00  00:02:00
4.G4a-3b     00:01:00  00:02:00
5.G6i-7h     00:06:00  00:02:00
6.S3a-4b     00:06:00  00:19:00

The Kakugawari with tempo loss. This is a very modern way of
playing with the white pieces and both Habu and Moriuchi play
virtually anything. Still, it is very unusual for Moriuchi to
play this opening with white, so Habu might have been a little
surprised.

7.B8hx2b+    00:17:00  00:19:00
8.G3bx2b     00:17:00  00:19:00
9.S7i-6h     00:22:00  00:19:00
10.S7a-6b    00:22:00  00:20:00
11.S3i-3h    00:29:00  00:20:00
12.P6c-6d    00:29:00  00:21:00
13.P1g-1f    00:35:00  00:21:00
14.P1c-1d    00:35:00  00:22:00
15.P4g-4f    00:47:00  00:22:00
16.S6b-6c    00:47:00  00:28:00
17.S3h-4g    00:50:00  00:28:00
18.K5a-4a    00:50:00  00:57:00
19.K5i-6i    01:23:00  00:57:00
20.K4a-3a    01:23:00  01:19:00
21.K6i-7i    01:25:00  01:19:00
22.S6c-5d    01:25:00  01:21:00
23.S4g-5f    01:58:00  01:21:00
24.P9c-9d    01:58:00  01:22:00
25.P9g-9f    01:59:00  01:22:00
26.G2b-3b    01:59:00  01:33:00
27.S5f-4e    02:49:00  01:33:00

Positive play. The idea behind this quick attack is that the
tempo loss by white is more likely to be important in a quick
fight.

28.S5dx4e    02:49:00  02:57:00
29.P4fx4e    02:49:00  02:57:00
30.G6a-5b    02:49:00  02:57:00
31.R2h-4h    03:03:00  02:57:00
32.S4b-3c    03:03:00  03:00:00
33.S6h-7g    03:27:00  03:00:00
34.P3d-3e    03:27:00  03:46:00

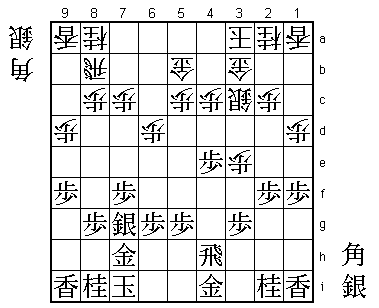
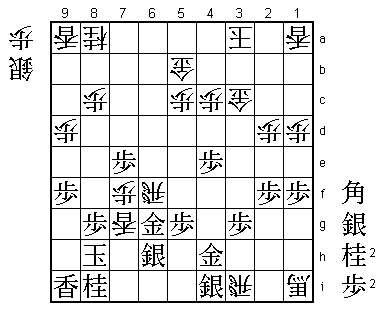
The sealed move. Playing only 33 moves on the first day of a
two day title match is quite a slow pace. However, with both
players having both a bishop and a silver in hand, careful play
is required. 34.P3e stops the black knight on 2i from developing
because 35.N1g is answered by 36.P3f Px3f B*3g. A useful move,
but white has not much else. For example, the natural 34.P7d
fails to 35.S*7a and then 36.R7b B*6a or 36.R9b B*6a and white
has no defense against the bishop promotion on 8c (with the pawn
still on 7c, white could play S*7d here and go for the bishop next
with G5a).

35.S7g-6f?!  04:21:00  03:46:00

Developing this silver is an interesting looking plan, but it
might have been based on a miscalculation, because Moriuchi gets
the upper hand now.

36.R8b-6b    04:21:00  04:22:00
37.S6f-5e    04:27:00  04:22:00
38.P7c-7d    04:27:00  04:49:00
39.S5e-4f    05:55:00  04:49:00
40.P6d-6e    05:55:00  05:18:00
41.N2i-1g    06:07:00  05:18:00
42.P7d-7e    06:07:00  06:29:00
43.P7fx7e    06:49:00  06:29:00
44.P3e-3f    06:49:00  06:41:00
45.P3gx3f    06:49:00  06:41:00
46.B*6d      06:49:00  06:41:00
47.N1g-2e    07:02:00  06:41:00
48.S*3g      07:02:00  06:45:00
49.S4fx3g    07:03:00  06:45:00
50.B6dx3g+   07:03:00  06:45:00

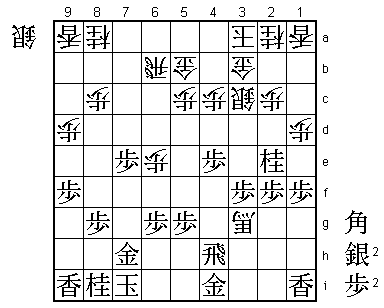
It seems that white has an overwhelming position. The promoted
bishop is strong and with the black silver moving over, the black
king position looks very weak. Black cannot afford to exchange
rooks here.

51.S*7g!      07:04:00  06:45:00

"This couldn't be helped" (Habu). This might be true, but this
was a very hard move to play. After taking all this effort to
move the silver from 7g to the other side of the board and exchanging
it, just dropping it back on 7g is more than most professionals could
bear. One of his strengths is that Habu doesn't care. The best fighting
move is the best fighting move, whichever moves were played before.
After 51.S*7g, the black position suddenly looks much more solid and
the white advantage seems much smaller than before.

52.+B3gx1i   07:04:00  06:58:00

Taking the rook is not so appealing anymore, so Moriuchi goes for
the lance instead.

53.N2ex3c+   07:07:00  06:58:00
54.N2ax3c    07:07:00  07:07:00
55.P3f-3e?   07:24:00  07:07:00

Looks like a natural attack to the head of the white knight (and king),
but black can't afford the extra move here. Better was 55.S*3d and then
56.L*4f is not possible anymore because of 57.Sx3c+ Gx3c B*5e.

56.P6e-6f    07:24:00  07:30:00
57.P6gx6f    07:38:00  07:30:00
58.L*4f      07:38:00  07:30:00

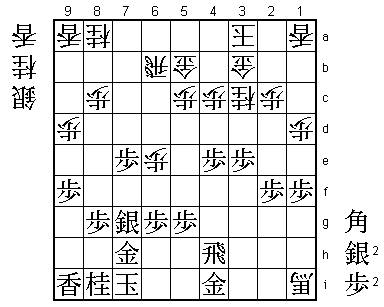
This is now very strong. White seems to be winning easily here, but
Habu is not ready to give up yet.

59.P3e-3d    07:49:00  07:30:00
60.L4fx4h+   07:49:00  07:31:00
61.P3dx3c+   07:49:00  07:31:00
62.G3bx3c    07:49:00  07:31:00
63.G4ix4h    07:49:00  07:31:00
64.R*3i      07:49:00  07:35:00
65.S*4i      07:57:00  07:35:00
66.P*7f      07:57:00  07:44:00
67.S7g-6h    07:59:00  07:44:00
68.N*5d      07:59:00  08:02:00
69.L*6g!     08:12:00  08:02:00

Only defends 6f. Such a defense-only move is very hard to play in this
stage of the game, but Habu has judged very well that it is the only
way to stay in the game. The hidden meaning is that 70.+B5e is not so
attractive anymore. Because of this, Moriuchi can't find the right timing
to bring the promoted bishop on 1i into play.

70.P2c-2d    08:12:00  08:27:00
71.K7i-8h    08:13:00  08:27:00
72.N5dx6f    08:13:00  08:31:00
73.L6gx6f    08:13:00  08:31:00
74.R6bx6f    08:13:00  08:33:00
75.P*3g!     08:13:00  08:33:00

And now it is too late. This pawn blocks both bishop and rook.

76.L*7g      08:13:00  08:35:00
77.G7h-6g!   08:15:00  08:35:00

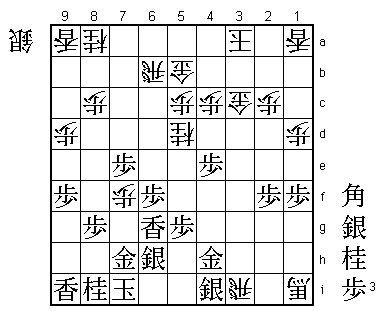
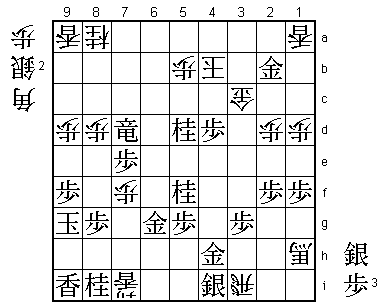
Tough on Moriuchi that this move works. 78.S*7i seems winning, but
after 79.K9g Rx4i+ Gx4i Rx6g+ Sx6g S*8h K8f the black king can escape.
Interesting is that if the game would have been a normal Bishop Exchange
Opening, the white pawn would have been on 8d and G*8e would be mate.
The white tempo loss leaves the pawn on 8c and makes this position
impossible to win for white.

78.R6f-6e    08:15:00  08:53:00

Moriuchi has seen the same things, but from now on there is no way to
win for him anymore.

79.B*7d      08:23:00  08:53:00
80.S*7i      08:23:00  08:54:00
81.K8h-9g    08:24:00  08:54:00
82.R6e-6b    08:24:00  08:55:00
83.P*6d      08:26:00  08:55:00
84.+B1i-2i   08:26:00  08:57:00
85.N*5f      08:30:00  08:57:00
86.P8c-8d    08:30:00  08:57:00
87.S*6c      08:34:00  08:57:00
88.G5bx6c    08:34:00  08:57:00
89.P6dx6c+   08:34:00  08:57:00
90.R6b-8b    08:34:00  08:57:00
91.+P6cx5c   08:35:00  08:57:00
92.S*8e      08:35:00  08:59:00
93.S6hx7i    08:39:00  08:59:00
94.S8ex7d    08:39:00  08:59:00
95.S*4b      08:39:00  08:59:00
96.R8bx4b    08:39:00  08:59:00
97.+P5cx4b   08:39:00  08:59:00
98.K3ax4b    08:39:00  08:59:00
99.R*7b      08:42:00  08:59:00
100.P*5b     08:42:00  08:59:00
101.R7bx7d+  08:42:00  08:59:00
102.L7gx7i+  08:42:00  08:59:00
103.G*2b     08:42:00  08:59:00
104.P4c-4d   08:42:00  08:59:00
105.P4ex4d   08:43:00  08:59:00
106.+B2i-1h  08:43:00  08:59:00
107.N*5d     08:44:00  08:59:00
Resigns      08:44:00  08:59:00

Mate if the king moves and no defense after 107.+Bx5d +Rx5d. Even with
an extra knight, there is no mate against the black king. An interesting
and difficult game. In the post-mortem analysis many deep variations
were examined, but it remained unclear how Moriuchi could have converted
his superior position into a win. Even at the top level shogi still
holds many secrets. Moriuchi might have lost the first game, but he is
clearly in better shape than during the Osho match. Also, he has the
black pieces in the second game, which promises to be very interesting.
