62nd Osho Match Game 2
[Black "Watanabe Akira, Challenger"]
[White "Sato Yasumitsu, Osho"]
[Event "62nd Osho-sen, Game 2"]
[Date "January 23rd and 24th 2013"]
1.P2g-2f     00:00:00  00:00:00
2.P3c-3d     00:00:00  00:00:00
3.P7g-7f     00:01:00  00:00:00
4.B2bx8h+    00:01:00  00:00:00

One of the attractions of Sato's game is that he always wants to surprise his opponent
(and the audience) in the opening. Exchanging the bishop early with white is mentioned
in every opening book for beginners as a bad example. It gives up not one, but two moves
because the black silver can move up for free. However, as the famous Kakugawari with
tempo loss opening shows, things are not so easy as written in the theory books.

5.S7ix8h     00:02:00  00:00:00
6.S3a-4b     00:02:00  00:00:00
7.S3i-4h     00:07:00  00:00:00
8.S4b-3c     00:07:00  00:00:00
9.K5i-6h     00:10:00  00:00:00
10.R8b-2b    00:10:00  00:01:00
11.P9g-9f    00:13:00  00:01:00
12.K5a-6b    00:13:00  00:11:00
13.P9f-9e    00:14:00  00:11:00
14.K6b-7b    00:14:00  00:12:00
15.K6h-7h    00:14:00  00:12:00
16.P2c-2d    00:14:00  00:12:00
17.S8h-7g    00:19:00  00:12:00
18.K7b-8b    00:19:00  00:19:00
19.K7h-8h    00:26:00  00:19:00
20.G4a-5b    00:26:00  01:03:00
21.G6i-7h    00:26:00  01:03:00
22.S7a-7b    00:26:00  01:03:00
23.P3g-3f    01:01:00  01:03:00
24.S3c-4d    01:01:00  01:06:00
25.P4g-4f    01:10:00  01:06:00
26.N2a-3c    01:10:00  01:24:00
27.N2i-3g    01:23:00  01:24:00
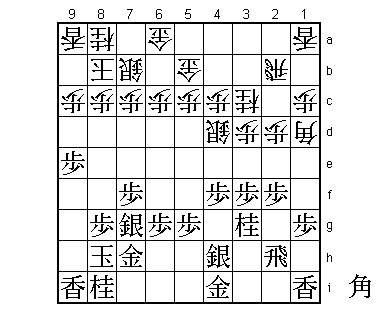
28.B*1d?!    01:23:00  01:55:00

For a while it looked like this game would become a quiet Mukaibisha opening, but
 Sato is not having any of it. This is not really a common square to drop a bishop,
but the idea is not so strange. The direct threat is to take the pawn on the head
of the knight and attack this weakness with bishop support after that. If black
tries to defend the pawn with 29.S4g, then 30.P3e is very strong. Countering with
29.N4e or 29.P4e might exchange the knight on 3g, which is not bad for black, but
at the same time the white bishop position on 1d is becoming more dangerous.

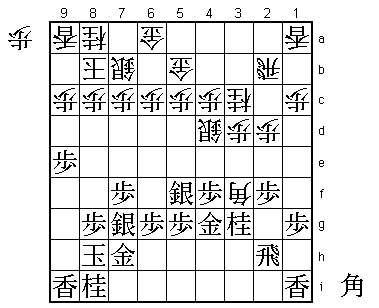
29.G4i-3h!   02:07:00  01:55:00

The move 28.B*1d surprised everyone, except the person it was meant to surprise.
This is a very strong counter. Even though Watanabe took 44 minutes for this move,
he explained after the game that he had experience with a similar position, so he
was not so worried about the bishop on 1d here. With 29.G3h, Watanabe sacrifices
the pawn on 3f in exchange for development of his generals and pressure on the
white bishop.

30.B1dx3f    02:07:00  02:55:00
31.S4h-4g    02:07:00  02:55:00
32.B3f-5d    02:07:00  02:56:00
33.S4g-5f    02:08:00  02:56:00
34.B5d-3f    02:08:00  03:24:00
35.G3h-4g    02:32:00  03:24:00

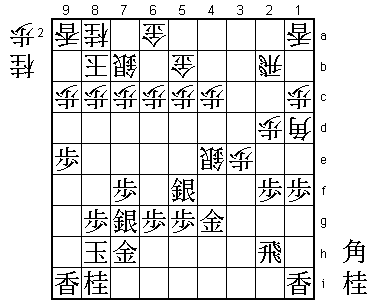
36.P3d-3e    02:32:00  03:31:00

White is already giving up on the bishop he so positively dropped on 1d, which
clearly was not the way Sato envisioned it. However, he has no choice, because
after 36.B5d P4e the black bishop is in a very bad position and after 36.B1d P1f
(threatens P1e next) S5e P2e Sx5f Gx5f and white cannot develop the knight with
Nx2e because an attack with N*7d (Px7d B*5e forks king and bishop) is too strong.

37.P4f-4e    03:05:00  03:31:00

The sealed move and Sato admitted after the game that he already felt like he was
in trouble here.

38.N3cx4e    03:05:00  04:36:00
39.N3gx4e    03:06:00  04:36:00
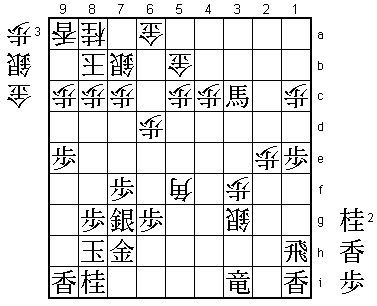
40.B3f-1d    03:06:00  04:36:00

No choice but to move the bishop again. After 40.S5e Gx3f (Sx5e Bx4g+) Px3f Sx5e
P3g+ R2i N*4e S4f! is a very cool defense. Again, if white gives up a knight the
attack with N*7d is too strong.

41.P1g-1f    04:16:00  04:36:00
42.S4dx4e    04:16:00  05:12:00

And now surely N*7d or...?

43.P2f-2e!   04:30:00  05:12:00

Actually, 43.N*7d is not so clear after 44.K9b P9d Px9d Lx9d P*9c Lx9c+ Nx9c P*9d
P7d Px9c+ Kx9c B*6f (the fork on king and rook that black is looking for) K8b Bx2b+
Sx5f Gx5f B6i+ and suddenly the bishop that was struggling is joining the attack
while the edge attack has only opened the lance rank next to the king. Judging
this too dangerous, Watanabe decides to further harass the bishop.

44.S4ex5f    04:30:00  05:14:00
45.G4gx5f    04:30:00  05:14:00
46.N*4d      04:30:00  05:14:00
47.B*3c      05:16:00  05:14:00
48.R2b-2a    05:16:00  05:24:00
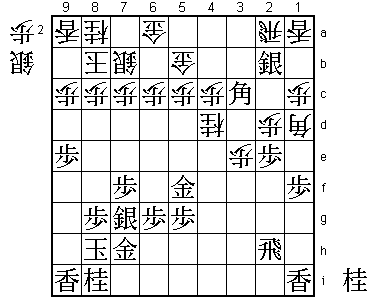
49.S*2b!     05:20:00  05:24:00

This looks very heavy, but is actually very strong. For example, if the rook moves
(for example to 4a) then Bx2d+ followed by P1e is very good for black.

50.R2ax2b    05:20:00  05:32:00

No choice, but it is not really relieving the pressure.

51.B3cx2b+   05:20:00  05:32:00
52.P3e-3f    05:20:00  05:32:00
53.R*3a      05:34:00  05:32:00
54.P3f-3g+   05:34:00  05:52:00
55.R3ax3g+   05:56:00  05:52:00
56.P*3f      05:56:00  06:17:00
57.+R3g-3i   05:56:00  06:17:00
58.S*3g      05:56:00  06:24:00
59.R2h-1h    05:57:00  06:24:00
60.N4dx5f    05:57:00  06:44:00
61.P5gx5f    05:57:00  06:44:00
62.P6c-6d    05:57:00  06:44:00
63.+B2bx1a   06:01:00  06:44:00
64.P2dx2e    06:01:00  06:44:00
65.P1f-1e    06:12:00  06:44:00
66.B1d-2c    06:12:00  06:45:00
67.+B1a-3c   06:18:00  06:45:00
68.B2cx5f    06:18:00  06:45:00

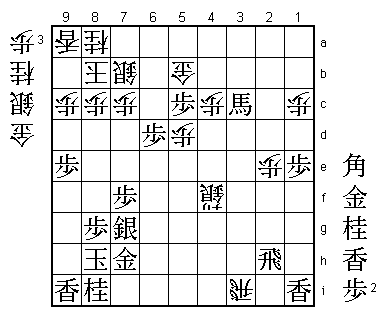
69.+R3i-5i!  06:18:00  06:45:00

The decisive move. Now 70.B4g+ is answered by L*4i. The bishop that was dropped
on 1d in the opening has been a problem until the very end.

70.B5f-6e    06:18:00  06:52:00
71.N*5f      06:21:00  06:52:00

Closing the bishop out and setting up a decisive attack on the sixth file. The
rest of the game is a textbook example of breaking down the Mino castle from
the side (where it is supposed to be the strongest).

72.S*6c      06:21:00  07:27:00
73.P6g-6f    06:28:00  07:27:00
74.B6e-5d    06:28:00  07:27:00
75.P6f-6e    06:28:00  07:27:00
76.S3g-4f+   06:28:00  07:28:00
77.N5fx6d    06:37:00  07:28:00
78.S6cx6d    06:37:00  07:28:00
79.P6ex6d    06:37:00  07:28:00
80.P3f-3g+   06:37:00  07:28:00
81.+R5ix5d   06:38:00  07:28:00
82.P5cx5d    06:38:00  07:28:00
83.S*6c      06:38:00  07:28:00
84.+P3g-2h   06:38:00  07:33:00
85.R1hx2h    06:45:00  07:33:00
86.R*3i      06:45:00  07:33:00
87.S6cx5b=   06:45:00  07:33:00
88.G6ax5b    06:45:00  07:34:00
89.P*5c      06:45:00  07:34:00
Resigns      06:45:00  07:45:00

Here Sato resigned because after 90.Rx3c+ or 90.Rx1i+ black wins the attacking
race after 91.Px5b+. Also, 90.Gx5c is answered by 91.G*6b and 90.G6b by 91.L*6c.
A bad start to the title defense for Sato. He now needs to win the third game with
the black pieces to avoid a nearly decisive 3-0 deficit. Another good win for
Watanabe, who punished the dubious bishop drop on 1d very convincingly.
