62nd Meijin Match Game 6
[Black "Moriuchi Toshiyuki, Challenger"]

[White "Habu Yoshiharu, Meijin"]

[Event "62nd Meijin-sen, Game 6"]

[Date "June 10th and 11th 2004"]

1.P7g-7f     00:00:00  00:00:00

2.P8c-8d     00:00:00  00:03:00

3.S7i-6h     00:00:00  00:03:00

4.P3c-3d     00:00:00  00:03:00

5.P6g-6f     00:00:00  00:03:00

6.S7a-6b     00:00:00  00:04:00

7.P5g-5f     00:00:00  00:04:00

8.P5c-5d     00:00:00  00:09:00

9.S3i-4h     00:02:00  00:09:00

10.S3a-4b    00:02:00  00:12:00

11.G4i-5h    00:03:00  00:12:00

12.G4a-3b    00:03:00  00:22:00

13.G6i-7h    00:03:00  00:22:00

14.K5a-4a    00:03:00  00:31:00

15.K5i-6i    00:03:00  00:31:00

16.P7c-7d    00:03:00  00:35:00

17.G5h-6g    00:13:00  00:35:00

18.G6a-5b    00:13:00  00:46:00

19.S6h-7g    00:14:00  00:46:00

20.S4b-3c    00:14:00  00:50:00

21.B8h-7i    00:14:00  00:50:00

22.B2b-3a    00:14:00  00:50:00


The yagura opening is a favorite of both players, so it is no surprise

that this opening was chosen for this important game. Especially Moriuchi

has a winning percentage of more than 80% with the black pieces in this

opening. Not enough to make Habu hesitate, because he himself has a winning

percentage of more than 70% with the white pieces.


23.P3g-3f    00:14:00  00:50:00

24.P4c-4d    00:14:00  00:52:00

25.S4h-3g    00:18:00  00:52:00

26.B3a-6d    00:18:00  00:58:00

27.B7i-6h    00:24:00  00:58:00

28.G5b-4c    00:24:00  01:11:00

29.K6i-7i    00:28:00  01:11:00

30.K4a-3a    00:28:00  01:17:00

31.K7i-8h    00:28:00  01:17:00

32.K3a-2b    00:28:00  01:23:00

33.P1g-1f    00:28:00  01:23:00

34.P8d-8e    00:28:00  02:13:00

35.P2g-2f    00:34:00  02:13:00

36.P9c-9d    00:34:00  02:45:00

37.R2h-3h    00:53:00  02:45:00

38.S6b-5c    00:53:00  02:55:00

39.P1f-1e    00:54:00  02:55:00


The attack with S4f-N3g is more often played, but Moriuchi plays the edge

pawn first.


40.S3c-2d    00:54:00  03:07:00

41.S3g-4f    01:15:00  03:07:00

42.P4d-4e    01:15:00  03:25:00

43.S4f-3g    01:16:00  03:25:00

44.S5c-4d    01:16:00  03:26:00

45.R3h-4h    01:16:00  03:26:00

46.N2a-3c    01:16:00  03:27:00


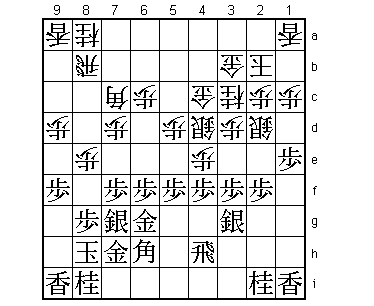
Habu is using all his pieces in defense. White has to defend the pawn on

4e, or black will break through easily. This position has been played for

more than 20 years and the surprising thing is that in this position and

positions that closely resemble it (for example, no pushed pawns on the

9th file or the lance on 1g instead of 1h) black has won only 5 out of

21 games! In the yagura in general, black is winning about 54%, so a

winning percentage of more than 75% by white is quite amazing. This

game shows that data is not to be trusted...


47.P9g-9f    01:17:00  03:27:00

48.B6d-7c    01:17:00  03:41:00

49.P4g-4f    02:05:00  03:41:00

So far, the position was identical to the 4th game of the Osho match

between Tanigawa and Habu played on February 14th 1995. This was the

first match in which Habu got the chance to hold all seven major titles.

In that game Tanigawa played 49.P2e to kill the silver after 50.Sx2e P*2f.

The game continued Sx3f P1d Px1d Lx1d Sx3g= R1h P*1g P*1b which is a

mating threat. Still, the black attack is a little thin and the white

chances of making an entering king are quite good. Habu got the advantage,

almost threw it away in the endgame, but a final mistake by Tanigawa proved

decisive. Despite this victory, Tanigawa won the match in seven games and

Habu had to wait another year before he could complete his history making

sweep of the seven major titles. Moriuchi is clearly not convinced of the

power of 49.P2e and plays 49.P4f instead, which also was the sealed move.

49.P4f has been played three times in positions with the lance on 1g and

in each case white won. Seeing what comes next, one wonders how this was

possible...


50.P4ex4f    02:05:00  04:16:00

51.S3gx4f    02:09:00  04:16:00

52.P*4e      02:09:00  04:16:00

53.S4f-3g    02:09:00  04:16:00

54.R8b-5b    02:09:00  04:19:00

55.P*4f      02:39:00  04:19:00

56.P4ex4f    02:39:00  04:25:00

57.B6hx4f    02:53:00  04:25:00

58.B7cx4f    02:53:00  04:29:00

59.S3gx4f    03:22:00  04:29:00

60.P*4g!?    03:22:00  04:37:00


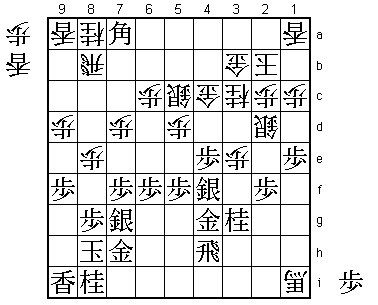
Already strong measures are required to keep the white position together.

The simple 60.P*4e S3g P5e is met with B*8c Px5f P*5h and white can not

defend against the bishop promotion. The promoted bishop is too powerful

to allow in this position.


61.R4h-2h    04:12:00  04:37:00


There also does not seem to be anything wrong with 61.Rx4g. In the press

room almost all variations that were tried here lead to a better position

for black.


62.B*4h      04:12:00  05:16:00

63.B*5g!     05:03:00  05:16:00

Impressive. Moriuchi is not contend with a good position, he wants an

overwhelming position. The simple 63.N3g is also good for black after

64.B3i+ R1h. For example, P4h+ P*4e S5c P2e and if white exchanges knights,

black has a devastating knight drop on 4d.


64.B4hx5g+   05:03:00  06:19:00

65.G6gx5g    05:03:00  06:19:00

66.B*4h      05:03:00  06:19:00

67.N2i-3g    05:06:00  06:19:00

68.B4h-3i+   05:06:00  06:24:00

69.R2h-1h    05:16:00  06:24:00

70.R5b-8b    05:16:00  06:40:00


Now we see why 63.B*5g was even better than 63.N3g. Here 70.P4h+ is pointless,

because with the black gold on 5g, white does not have the threat of +P4g

later. Habu decides to take the knight fork on 4d (and a silver drop on 4a)

out of the position by moving the rook to 8h. The high price he pays is to

lose the precious pawn on 4g, and with that pawn most of his attacking hopes.


71.G5gx4g    05:25:00  06:40:00

72.+B3i-2i   05:25:00  06:42:00

73.R1h-4h    05:50:00  06:42:00

74.+B2ix1i   05:50:00  06:51:00


White has won a lance, but he can do nothing with it and the promoted bishop

on 1i is out of play. The huge attacking base on 4d is worth much more.


75.P*4e      05:51:00  06:51:00

76.S4d-5c    05:51:00  06:51:00

77.P3f-3e    06:12:00  06:51:00

78.P3dx3e    06:12:00  07:00:00

79.B*7a!     06:15:00  07:00:00

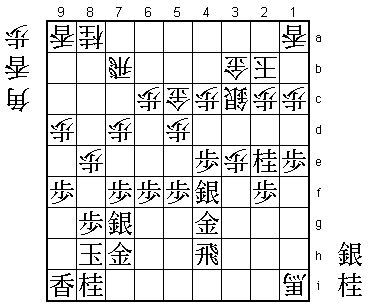
Played after only 3 minutes, but the deciding blow. Without the rook on

the 8th file, white has no attack, so black can do as he pleases.


80.R8b-7b    06:15:00  07:01:00

81.B7ax5c+   06:15:00  07:01:00

82.G4cx5c    06:15:00  07:01:00

83.P*3d      06:15:00  07:01:00

84.P*4c      06:15:00  07:21:00

85.P3dx3c+   06:33:00  07:21:00

86.S2dx3c    06:33:00  07:32:00

87.N3g-2e!   06:35:00  07:32:00

The natural move, but very strong. 88.S3d fails to 89.Sx3e! Sx3e N*3d K3a

P*3c and white has no defense.


88.R7b-8b    06:35:00  08:00:00


In the press room the desperate attack 88.P7e Px7e P8f Px8f P*8e was

expected, but that is also far from enough. It is quite possible that

Habu has already given up on the game and the match here and that he is

only concerned about having his pieces in an awkward position in the

position he resigns. To make the rook look better, he moves it to 8b.


89.S4fx3e    07:12:00  08:00:00

90.P*3d      07:12:00  08:03:00

91.N2ex3c+   07:15:00  08:03:00

92.G3bx3c    07:15:00  08:05:00

93.N*2e      07:17:00  08:05:00

94.P3dx3e    07:17:00  08:05:00

95.S*3a      07:17:00  08:05:00

Resigns      07:17:00  08:05:00

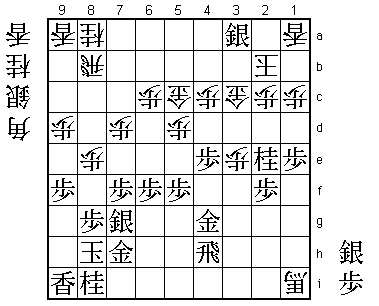
Not immediately mate, but after 96.K3b Nx3c+ Kx3c S*4b Rx4b P*3d or

96.Kx3a Nx3c+ K4a P4d Px4d S*8c R6b P*4c the black attack is simple

and decisive, while white has no hope of a counterattack. With this

complete victory, Moriuchi wins the match 4-2 and becomes triple crown

holder for the first time in his career. On the other hand, Habu is

back to only one crown (the Oza) for the first time in almost twelve years.

Moriuchi is the new player to beat in the shogi world.
