62nd Meijin Match Game 4
[Black "Moriuchi Toshiyuki, Challenger"]

[White "Habu Yoshiharu, Meijin"]

[Event "62nd Meijin-sen, Game 4"]

[Date "May 19th and 20th 2004"]

1.P7g-7f     00:00:00  00:00:00

2.P3c-3d     00:00:00  00:03:00

3.P2g-2f     00:00:00  00:03:00

4.G4a-3b     00:00:00  00:04:00

Recently, Habu has been playing the R8e Yokofudori with white

a lot, but this move is already showing that his intentions

are different in this game. 4.G3b, like 4.P1d in the previous

game, aims for the Kakugawari opening with one move tempo loss.

The advantage of 4.P1d over 4.G3b is that white keeps more options

open. The disadvantage is that P1d can become a useless move

depending on the opening that is being played. 4.G3b does not

have that risk: this move is essential in the Kakugawari. On the

other hand, there is no need for black to play P2e next.


5.G6i-7h     00:05:00  00:04:00


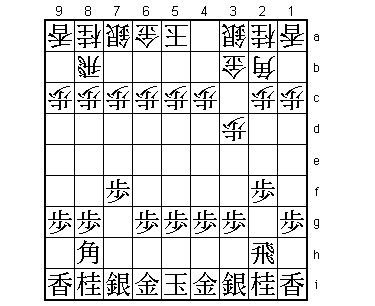
Moriuchi decides to avoid the Kakugawari and go for the R8e Yokofudori

instead. This might be because he did not fancy playing the black pieces

against an opening he used with white in the previous game or just that

he felt confident with his opening preparation against the Yokofudori.


6.P8c-8d     00:05:00  00:14:00

7.P2f-2e     00:05:00  00:14:00

8.P8d-8e     00:05:00  00:16:00

9.P2e-2d     00:05:00  00:16:00

10.P2cx2d    00:05:00  00:17:00

11.R2hx2d    00:05:00  00:17:00

12.P8e-8f    00:05:00  00:20:00

13.P8gx8f    00:05:00  00:20:00

14.R8bx8f    00:05:00  00:20:00

15.R2dx3d    00:05:00  00:20:00

16.B2b-3c    00:05:00  00:27:00

17.R3d-3f    00:05:00  00:27:00

18.S3a-2b    00:05:00  00:28:00

19.P*8g      00:07:00  00:28:00

20.R8f-8e    00:07:00  00:36:00

21.R3f-2f    00:07:00  00:36:00

22.K5a-4a    00:07:00  00:42:00

23.K5i-5h    00:07:00  00:42:00

24.S7a-6b    00:07:00  01:03:00

25.P3g-3f    00:08:00  01:03:00

26.G6a-5a    00:08:00  01:11:00

27.S3i-3h    00:08:00  01:11:00

28.P7c-7d    00:08:00  01:17:00

29.P3f-3e    00:09:00  01:17:00

30.N8a-7c    00:09:00  01:41:00

31.B8hx3c+   01:09:00  01:41:00

32.N2ax3c    01:09:00  02:08:00

33.P3e-3d    01:15:00  02:08:00

34.N3c-4e    01:15:00  02:11:00

35.B*6f      01:17:00  02:11:00

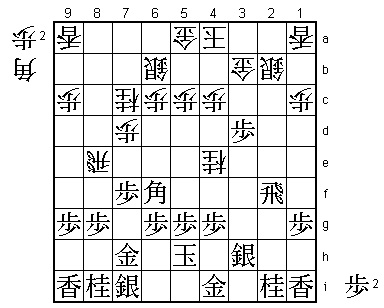
This is a very recent strategy. There are five games with this move

(black won 3), all played this year. Before that, the common way of

playing was 35.P3c+ Nx5g+ Kx5g B*3e which leads to a very sharp position.

35.B*6f is defending the head of the king and also aims at Rx2b+. The first

game with 35.B*6f was the A Junisen game between Sato Yasumitsu and Miura,

played in January. In this game black won after 36.P*2e R4f N6e P*2c Gx2c

S6h B*2d Rx4e Nx5g+ Sx5g Rx4e S4f. Habu also has experience with 35.B*6f,

as he played it in the NHK tournament against Maruyama in February. After

36.P*2e, Habu played 37.R3f instead of R4f. This is not attacking the knight,

but aims at P3c+ instead and taking the sting out of B*2d at the same time.

That game continued 38.N6e S6h P*8f Px8f Rx8f P3c+ and black got the attack

he wanted and Habu won a difficult endgame. The most recent game with 35.B*6f

was also played in the NHK tournament, in this month's game between Kitajima

and Watanabe (Watanabe won).


36.P*2e      01:17:00  03:09:00

37.R2f-4f    01:47:00  03:09:00

38.N7c-6e    01:47:00  03:35:00

39.P*2c      02:07:00  03:35:00

40.G3bx2c    02:07:00  03:38:00

41.S7i-6h    02:19:00  03:38:00

42.B*2d      02:19:00  04:09:00

43.R4fx4e    03:00:00  04:09:00

44.N6ex5g+   03:00:00  04:13:00

45.S6hx5g    03:02:00  04:13:00

46.R8ex4e    03:02:00  04:13:00

47.N*3f      03:29:00  04:13:00

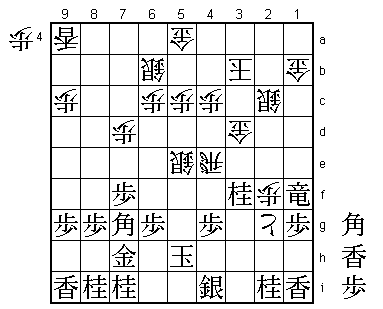
Moriuchi's new move. As explained earlier, Sato played 47.S4f here. 47.N*3f

is attacking the bishop and aiming for P*2d if the bishop moves. However,

black is inviting Bx5g+, a move white wants to play anyway, so from a

professional point of view, this is a hard move to play.


48.B2dx5g+   03:29:00  04:34:00

49.K5hx5g    03:30:00  04:34:00

50.S*5e      03:30:00  07:14:00


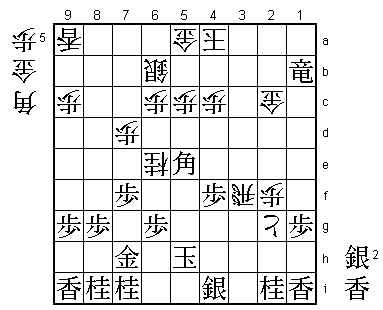
Played after 2 hours and 40 minutes. Habu will have taken a long look at

50.R*6i, because 51.N*7i S*2g looks good for white. Therefore, black probably

must go for the mutual attack with 51.P*2d, and after 52.Rx8i+ Px2c+ +Rx7h P3c+

the position seems very unclear, but maybe difficult to win for white. Habu

did not like it and decided that the bishop on 6f was to powerful and needed

to be blocked.


51.B6f-7g    05:23:00  07:14:00


Here Moriuchi takes his time (1 hour 53 minutes). 51.B8h is the alternative,

but Moriuchi did not like the fact that this bishop might be blocking a future

escape of the white king.


52.R*6i      05:23:00  07:29:00

53.N*7i      05:42:00  07:29:00

54.P2e-2f    05:42:00  07:30:00

55.P*2d      06:53:00  07:30:00

56.P2f-2g+   06:53:00  07:49:00

57.K5g-5h!   07:01:00  07:49:00

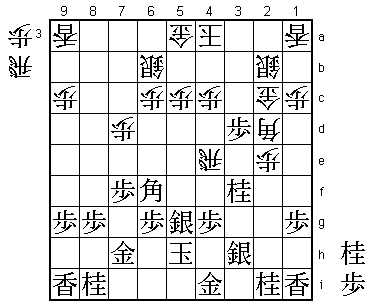
Well timed. 58.+Px3h Kx6i Rx4g+ (or +Px4i G6h) is now good for black after

either Bx5e +Rx4i K6h S*6i K7g or G6h +Rx4i K7h. It is unclear where Habu went

wrong, but Moriuchi now gets the upper hand in this game.


58.R6ix4i+   07:01:00  07:54:00

59.S3hx4i    07:01:00  07:54:00


Allows the attacked silver to escape with tempo. Still, 58.Rx4i+ was white's

best option.


60.G2cx3d    07:01:00  07:54:00


Another hard move to play, as this is defense only, but after 60.S5f Px2c+

white can not win.


61.P2d-2c+   07:07:00  07:54:00

62.S2bx2c    07:07:00  07:54:00

63.R*2a      07:17:00  07:54:00

64.K4a-3b    07:17:00  07:54:00

65.R2ax1a+   07:17:00  07:54:00

66.G*2a      07:17:00  07:54:00

67.+R1ax1c   08:00:00  07:54:00

68.G2a-1b    08:00:00  07:55:00

69.+R1c-1f   08:01:00  07:55:00

70.P*2f!     08:01:00  07:55:00

Habu is trying everything to stay in this game. The simple threat is now P*1e,

winning the rook, so black has no time to capitalize on his material advantage.


71.P*3c      08:24:00  07:55:00


Probably the best move. 71.P*2d P*1e Px2c+ Gx2c wins the white promoted rook.

In the press room 71.L*4f R3e N2d! Gx2d P*3f was discovered, which is good

for black after Rx3f Bx5e P*1e B*2e, but after the simple R3d the white rook

is now defended and it seems hard for black to continue the attack.


72.K3b-4b    08:24:00  08:23:00

73.P4g-4f    08:43:00  08:23:00

74.R4e-3e    08:43:00  08:30:00

75.B*1c      08:50:00  08:30:00

76.R3ex3f    08:50:00  08:35:00

77.B1c-3a+   08:50:00  08:35:00

78.K4bx3a    08:50:00  08:41:00

79.+R1fx1b   08:50:00  08:41:00

80.G3dx3c    08:50:00  08:41:00

81.G*2b      08:52:00  08:41:00

82.K3a-4a    08:52:00  08:52:00

83.G2bx2c    08:52:00  08:52:00

84.G3cx2c    08:52:00  08:53:00

85.B7gx5e    08:52:00  08:53:00

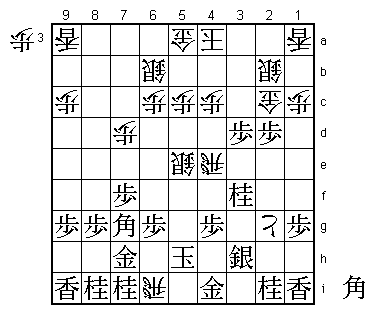
86.N*6e?     08:52:00  08:53:00

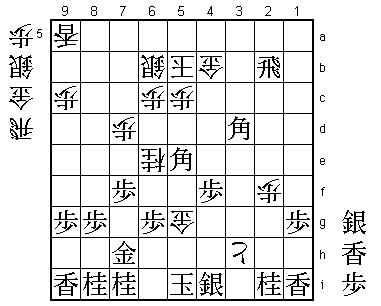
The losing move. Correct was 86.B*1d. This threatens a devastating double check

and 87.K5g R3e L*4e N*6e K6f B4g+ wins for white. In the post-mortem analysis,

the move 87.S*4g was found and it seems that black can just survive after 88.R3i+

L*3f. Whether Moriuchi would have found the correct defense in the limited time

available to him is questionable. Habu should have tried 86.B*1d here.


87.+R1bx2c   08:57:00  08:53:00

88.G*5g      08:57:00  08:55:00

89.K5h-5i    08:57:00  08:55:00

90.+P2g-3h   08:57:00  08:59:00

91.+R2cx4c   08:57:00  08:59:00

92.B*4b      08:57:00  08:59:00

93.S*3b      08:59:00  08:59:00

94.R3fx3b    08:59:00  08:59:00

95.+R4cx3b   08:59:00  08:59:00

96.K4ax3b    08:59:00  08:59:00

97.R*2b      08:59:00  08:59:00

98.K3b-4a    08:59:00  08:59:00

99.G*3b      08:59:00  08:59:00

100.K4a-5b   08:59:00  08:59:00

101.G3bx4b   08:59:00  08:59:00

102.G5ax4b   08:59:00  08:59:00

103.B*3d     08:59:00  08:59:00

Resigns      08:59:00  08:59:00

Mate after 104.P*4c Rx4b+ Kx4b G*3c K5a S*5b Kx5b Bx4c+ or 104.S*4c Bx4c+ Kx4c

S*4d K5b Rx4b+ Kx4b S*4c. Habu showed a lot of resilience, fighting back from a

bad position, but in the end it was not enough to win the game. Moriuchi now

leads 3-1 and needs only one more game to take the Meijin title from Habu.

The odds are heavily in Moriuchi's favor. The Meijin match has had a 3-1 score

at some point 28 times and only once (Nakahara-Takahashi 1992), the player 3-1

down (Nakahara) managed to win the three remaining games.
