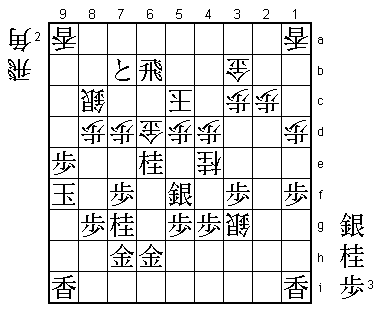
62nd Meijin Match Game 3
[Black "Habu Yoshiharu, Meijin"]
[White "Moriuchi Toshiyuki, Challenger"]
[Event "62nd Meijin-sen, Game 3"]
[Date "May 12th and 13th 2004"]
1.P7g-7f     00:00:00  00:00:00
2.P3c-3d     00:00:00  00:02:00
3.P2g-2f     00:01:00  00:02:00
4.P1c-1d     00:01:00  00:02:00

Already an important point in the game. Moriuchi is aiming for
the Kakugawari opening without pushing the pawn to 8e. Delaying
the pawn push to 8d is an important first step in this strategy.
Black has many replies to 4.P1d, but all of them have drawbacks.
5.G7h has been played here, but then white plays a ranging rook
opening, in which the black gold does not belong on 7h. 5.S4h is
another option, but then black can not longer play the climbing
silver, limited his options. Then why not answer P1d with P1f?
This move has its own problems, depending on the opening played.
For example, after the waiting move 5.P1f, white can try to get
in the Ai-Yokofudori opening. There are variations in which white
can not switch the rook to 2f because of the fork on king and rook
B*1e. With the pawn on 1d, this check is not possible, so black has
to defend the knight on 2i in that case with the pawn drop P*2h, which
is good for white. Subtle, but it is one of the reasons professionals do
not want to answer 4.P1d with 5.P1f.

5.P2f-2e     00:25:00  00:02:00

This is the most natural move, but has the drawback that black can no
longer play the attack N2e later.

6.B2bx8h+    00:25:00  00:03:00
7.S7ix8h     00:25:00  00:03:00
8.S3a-2b     00:25:00  00:03:00
9.S3i-4h     00:28:00  00:03:00
10.S2b-3c    00:28:00  00:06:00
11.K5i-6h    00:30:00  00:06:00
12.S7a-6b    00:30:00  00:22:00
13.S8h-7g    00:34:00  00:22:00
14.G4a-3b    00:34:00  00:36:00
15.P3g-3f    01:00:00  00:36:00
16.P8c-8d    01:00:00  01:04:00
17.G6i-7h    01:26:00  01:04:00
18.P9c-9d    01:26:00  01:15:00
19.P9g-9f    02:03:00  01:15:00
20.P7c-7d    02:03:00  01:41:00
21.P4g-4f    02:12:00  01:41:00
22.P6c-6d    02:12:00  01:50:00
23.P1g-1f    02:20:00  01:50:00
24.S6b-6c    02:20:00  02:03:00
25.S4h-4g    02:29:00  02:03:00
26.K5a-4b    02:29:00  02:06:00
27.G4i-5h    02:53:00  02:06:00
28.G6a-5b    02:53:00  02:38:00
29.S4g-5f    03:23:00  02:38:00
30.S6c-5d    03:23:00  03:49:00

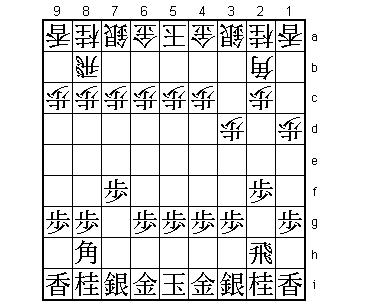
The difficulty of the one-tempo-loss Kakugawari is illustrated by the
slow pace of the game. This is the sealed move. Both players have not
shown their hand yet.

31.K6h-7i    03:45:00  03:49:00
32.R8b-6b    03:45:00  04:17:00

The main idea of the white opening strategy becomes clear after 32.N7c
P6f P4d K3a. With the pawn on 8e, black can then start the fight with
P4e, P2d and P7e. Particularly, because of the weakness of 7d, white has
to answer P7e with G6c and is put on the defensive. However, with the pawn
still on 8d, white can just take the pawn on 7e and answer P*7d with the
counter attack N8e. Moriuchi might have found a problem with the move
sequence N7c P6f P4d K3a, because he played 32.R6b instead.

33.P6g-6f    05:36:00  04:17:00
34.K4b-3a    05:36:00  04:18:00
35.N2i-3g    05:36:00  04:18:00
36.N8a-7c    05:36:00  04:45:00
37.S7g-8f!   05:57:00  04:45:00

Strange looking, but a good move. 37.K8h P6e or 37.P7e N8e are both good for
white. 37.S8f is threatening to attack with P7e, more or less forcing the
next move. Playing 37.S8f first is the correct move order. If 37.P7e Px7e
S8f, then after P7f S7e G6c, the pawn on 7f becomes an important base for
the white attack.

38.G5b-6c    05:57:00  05:14:00

This gold is now pulled away from the white king, which is an important weakness.

39.S8f-7g    06:00:00  05:14:00
40.R6b-8b    06:00:00  05:20:00
41.K7i-8h    06:02:00  05:20:00
42.K3a-4b    06:02:00  05:25:00
43.G5h-6g    06:15:00  05:25:00
44.K4b-3a    06:15:00  05:31:00
45.G6g-6h    06:23:00  05:31:00
46.K3a-4b    06:23:00  05:46:00

Both players seem to be waiting, and sennichite is in the air...

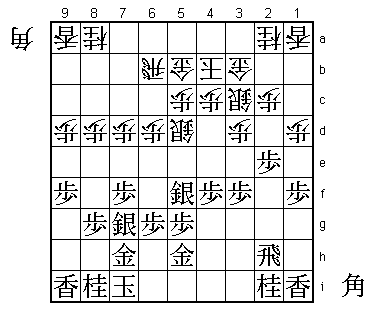
47.S5f-4e!   07:12:00  05:46:00

Positive play. After the game, Habu said he had thought about sennichite
here, but that the game had not even been opened up yet, so he decided to
go for it. This is the perfect time to attack. With the king on 3a, the
black attack has to come from to far to have good chances of success.
With the king on 4b, however, the black attack can succeed. When the
position is getting sharp, the white pawn on 8d is a handicap. The quickest
white counter attack starts by playing P8f or N*8f (with the pawn on 8e),
which is not possible here. Also, after a silver drop on 7a, white can
not move up the rook to 8d.

48.S5d-5e    07:12:00  06:05:00
49.S4e-5f    07:13:00  06:05:00
50.S5ex4f    07:13:00  06:21:00
51.N3g-4e    07:13:00  06:21:00
52.S3c-4d    07:13:00  06:23:00
53.P2e-2d    07:15:00  06:23:00
54.P2cx2d    07:15:00  06:23:00
55.R2hx2d    07:21:00  06:23:00
56.P*2c      07:21:00  06:24:00
57.R2dx3d    07:22:00  06:24:00
58.P9d-9e    07:22:00  06:37:00
59.P9fx9e    07:33:00  06:37:00
60.N2a-3c    07:33:00  06:46:00
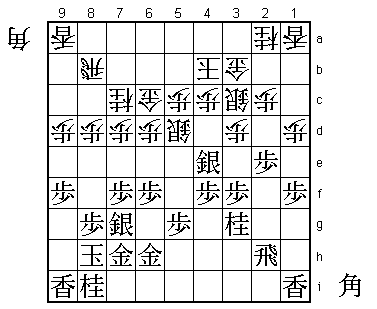
61.P*4g!     07:38:00  06:46:00

Again well judged by Habu. Drawing away the silver, followed by attacking
at the other side of the board is the correct way of playing here.

62.S4f-3g=   07:38:00  07:15:00
63.P6f-6e    07:43:00  07:15:00
64.P*9g      07:43:00  07:57:00

No choice but to go for a desperate counter attack. 64.Nx4e fails to
65.Px6d G6b Sx4e Sx4e B*5a Kx5a Rx3b+ and even though black is almost
a full bishop down, his castle is rock solid and white has no defense
against the promoted rook.

65.P6ex6d    08:08:00  07:57:00
66.G6cx6d    08:08:00  07:58:00
67.B*7a      08:09:00  07:58:00
68.R8b-5b    08:09:00  08:00:00
69.P*6b      08:09:00  08:00:00
70.N3cx4e    08:09:00  08:05:00
71.P6b-6a+   08:09:00  08:05:00
72.P5c-5d    08:09:00  08:32:00
73.+P6a-6b   08:19:00  08:32:00

This tokin attack decides the game.

74.R5b-5c    08:19:00  08:32:00
75.+P6b-7b   08:19:00  08:32:00
76.P*3c      08:19:00  08:37:00
77.R3dx4d    08:23:00  08:37:00
78.P4cx4d    08:23:00  08:37:00
79.B7ax5c+   08:24:00  08:37:00
80.K4bx5c    08:24:00  08:37:00
81.R*6b      08:27:00  08:37:00
82.N*9f      08:27:00  08:42:00
83.K8hx9g    08:30:00  08:42:00
84.N7c-8e    08:30:00  08:50:00
85.K9gx9f    08:30:00  08:50:00
86.N8ex7g+   08:30:00  08:51:00
87.N8ix7g    08:30:00  08:51:00
88.S*8c      08:30:00  08:54:00
89.N*6e      08:36:00  08:54:00
Resigns      08:36:00  08:56:00

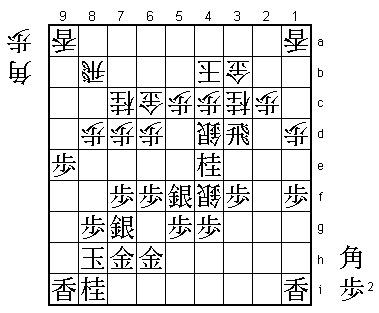
Moriuchi has tried everything and even managed to create a mating threat.
However, 89.N*6e is the perfect answer. 90.Gx6e Nx6e K4c S*5b leads to
mate, while 90.K4c Rx6d+ defends against the mating threat and threatens
mate, leaving white without any hope. A fine game by Habu, who showed
a very positive attitude in this important game. He is still 2-1 down,
so the next game is just as important.
