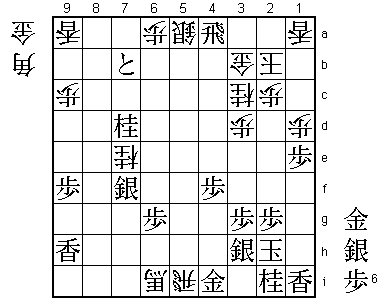
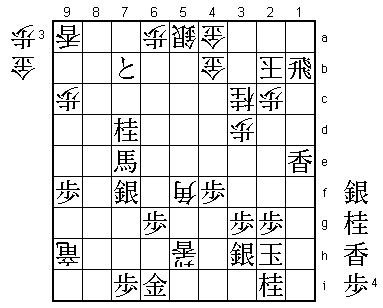
61st Osho Match Game 4
[Black "Kubo Toshiaki, Osho"]
[White "Sato Yasumitsu, Challenger"]
[Event "61st Osho-sen, Game 4"]
[Date "February 22nd and 23rd 2012"]
1.P7g-7f     00:00:00  00:00:00
2.P3c-3d     00:00:00  00:00:00
3.P7f-7e     00:02:00  00:00:00
4.P8c-8d     00:02:00  00:00:00
5.R2h-7h     00:02:00  00:00:00

With his back against the wall, it is no surprise that Kubo selects his ace opening,
the Quick Ishida.

6.P8d-8e     00:02:00  00:00:00
7.K5i-4h     00:05:00  00:00:00
8.S7a-6b     00:05:00  00:00:00
9.R7h-7f     00:10:00  00:00:00
10.B2bx8h+   00:10:00  00:14:00
11.S7ix8h    00:10:00  00:14:00
12.S3a-2b    00:10:00  00:18:00
13.K4h-3h    00:51:00  00:18:00
14.G4a-3b    00:51:00  00:35:00
15.K3h-2h    00:54:00  00:35:00
16.P1c-1d    00:54:00  00:36:00
17.P1g-1f    00:56:00  00:36:00
18.K5a-4b    00:56:00  00:56:00
19.S3i-3h    00:56:00  00:56:00
20.K4b-3a    00:56:00  01:03:00
21.N8i-7g    01:15:00  01:03:00
22.S2b-3c    01:15:00  01:32:00
23.P7e-7d    01:20:00  01:32:00
24.P7cx7d    01:20:00  01:35:00
25.R7fx7d    01:20:00  01:35:00
26.K3a-2b    01:20:00  01:38:00

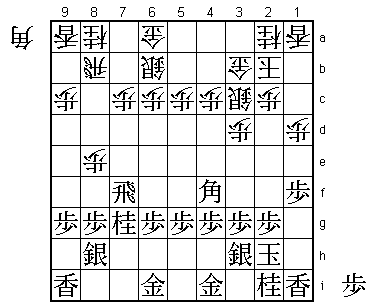
Sato's new idea in this opening is to castle the king on 2b instead of 3b. The
difference is that the king is one move further away from where the fighting will
start, which could be an important difference in the endgame. Especially against
Kubo, who is known as the "Sabaki artist" it is likely that the endgame will become
a mating race. However, this game seems to indicate that Sato's idea is not very
effective.

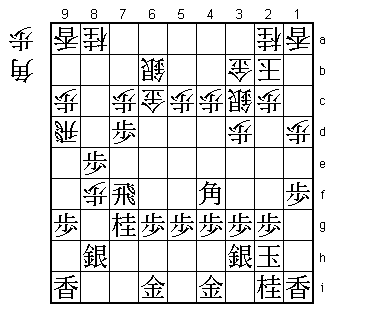
27.B*4f!     01:38:00  01:38:00

This is a very good bishop drop that puts a lot of pressure on the long diagonal.

28.P*7c      01:38:00  02:44:00
29.R7d-7f    01:42:00  02:44:00

Black now threatens P*7d next, which is not so easy to defend against.

30.G6a-7b    01:42:00  02:46:00

This is a standard way of defending, but even during the game Sato was not very
happy about it. He even considered playing 30.R8c here, to answer 31.P*7d with
32.B*8b. This makes it hard for black to keep the attack going, but the formation
of the rook on 8c and the bishop on 8b can hardly be called good shape. Anyway,
black can also answer 30.R8c with 31.P5f which threatens B5g followed by P8f Px8f
P*8d which is very good for black.

31.P*7d      01:49:00  02:46:00
32.P6c-6d    01:49:00  04:15:00

Defend against major pieces by pulling them closer.

33.B4fx6d    02:01:00  04:15:00
34.G7b-6c    02:01:00  04:15:00
35.B6d-4f    03:28:00  04:15:00

White has sacrificed a pawn, but there is still a lot of pressure to deal with.
Black has a clear advantage here.

36.R8b-8d    03:28:00  04:16:00
37.P8g-8f    03:29:00  04:16:00
38.P8ex8f    03:29:00  04:20:00
39.P*8e      03:30:00  04:20:00
40.R8d-9d    03:30:00  04:30:00

41.G6i-7h!   03:35:00  04:30:00

This is not an easy move to play, because it moves the gold away from the king.
 Usually, white would welcome this, but here it is the best move. Of course, 41.Rx8f
is the obvious move here, but after 42.P*8g! black suddenly is in trouble because
43.Sx8g is answered by B*8h and 43.Rx8g by B*7f followed by Bx6g+. Actually, Sato
agreed that 41.G7h was the move he expected and feared in this position.

42.P4c-4d    03:35:00  05:36:00

An alternative seems 42.B*5d and after 43.Rx8g Gx7d white threatens G7e next, but
black can answer Gx7d with P*7f and then there is no continuation.

43.P9g-9f    03:52:00  05:36:00
44.P5c-5d    03:52:00  06:48:00
45.P5g-5f    04:32:00  06:48:00
46.P5d-5e    04:32:00  06:55:00
47.B4fx5e    05:31:00  06:55:00
48.P*5g      05:31:00  06:58:00
49.P7dx7c+   05:43:00  06:58:00
50.N8ax7c    05:43:00  07:21:00
51.G7h-6h    05:44:00  07:21:00
52.R9d-5d    05:44:00  07:22:00
53.B5e-4f    05:54:00  07:22:00
54.P8f-8g+   05:54:00  07:27:00
55.S8hx8g    05:54:00  07:27:00
56.B*8h      05:54:00  07:27:00
57.L9i-9h    06:12:00  07:27:00
58.B8h-7i+   06:12:00  07:36:00
59.G6h-7h    06:19:00  07:36:00
60.+B7i-6i   06:19:00  07:37:00
61.B4fx5g    06:19:00  07:37:00
62.G6c-6d    06:19:00  07:42:00
63.B5g-8d    06:25:00  07:42:00
64.G6d-7d    06:25:00  07:46:00
65.B8d-4h    06:26:00  07:46:00
66.P4d-4e    06:26:00  07:57:00
67.P8e-8d    06:47:00  07:57:00
68.P4e-4f    06:47:00  07:57:00
69.P4gx4f    06:48:00  07:57:00
70.G7dx8d    06:48:00  07:57:00
71.R7f-6f    06:52:00  07:57:00
72.P*6a      06:52:00  07:57:00
73.R6f-8f    06:52:00  07:57:00
74.P*7e      06:52:00  07:58:00
75.P*8c      07:01:00  07:58:00
76.G8d-7d    07:01:00  07:59:00
77.P8c-8b+   07:04:00  07:59:00
78.N7c-6e    07:04:00  07:59:00

79.+P8b-7b?  07:08:00  07:59:00

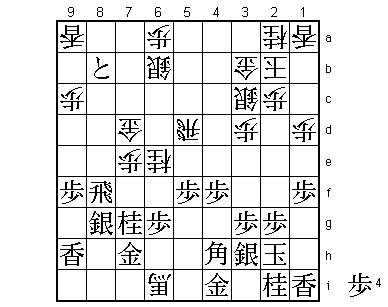
Sato has been forced to use a lot of time to avoid turning a bad position in a
losing one. He is already in byoyomi, while Kubo still has 52 minutes left. It
was expected that Kubo would use this time difference to score a comfortably victory,
but here he makes an important mistake that lets Sato back in. Forcing the silver
back towards the castle is a bad idea. After 80.S5a, white always has the option to
strengthen his castle with S5a-4b which makes it a lot harder to get to the white
king. Kubo thought he was making space for a rook promotion, but there are multiple
disadvantages to chasing the silver away, as will become clear soon. The right move
here was 79.B6f and white doesn't get a chance to get back in the game.

80.S6b-5a    07:08:00  07:59:00
81.B4h-6f    07:27:00  07:59:00
82.P7e-7f    07:27:00  07:59:00
83.R8fx7f    07:29:00  07:59:00
84.N6ex7g+   07:29:00  07:59:00
85.B6fx7g    07:29:00  07:59:00
86.N*7e      07:29:00  07:59:00
87.N*6f      07:40:00  07:59:00

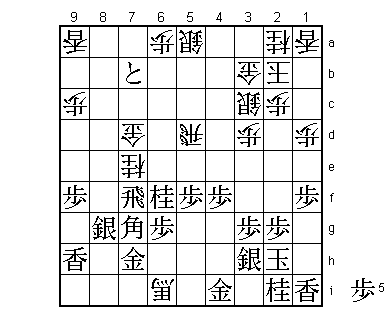
Now we see the second reason why 79.+P7b was a bad move. If the silver would still
have been on 6b, this knight would now attack it after Rx5f Nx7d, so white cannot
play this variation. Kubo realized here what he had done and actually thought that
he had given it all away. He was right, but Sato is in major time trouble in a
difficult position.

88.R5dx5f?   07:40:00  07:59:00

Tempting, but wrong. Correct was 88.R6d Nx7d Nx8g+ which would have lead to a difficult
endgame because after both B5e R6e and B9e S5a-4b white still threatens to simply
take the gold on 7h.

89.N6fx7d    07:40:00  07:59:00
90.R5fx7f    07:40:00  07:59:00
91.S8gx7f    07:40:00  07:59:00
92.+B6ix7h   07:40:00  07:59:00
93.B7gx3c+   07:41:00  07:59:00
94.N2ax3c    07:41:00  07:59:00
95.P1f-1e!   07:41:00  07:59:00

This edge attack is very strong. Black still has the edge, albeit only slightly.

96.P*4h      07:41:00  07:59:00
97.G4ix4h    07:42:00  07:59:00
98.+B7h-6i   07:42:00  07:59:00
99.R*4a      07:44:00  07:59:00
100.R*5i     07:44:00  07:59:00
101.G4h-4i   07:45:00  07:59:00

102.G*3a     07:45:00  07:59:00

Sato thought he was winning here and had planned to go all in with 102.G4h here. This
is winning for white after 102.Gx5i B*3i K1h Gx3h because there is no mate after R*2a
K1c Rx1a+ S*1b. However, here Sato saw that after 103.S*1c white would lose. Of course,
104.Lx1c fails to G*2a so white has to play 105.Kx1c, but then 106.Px1d K2d G*1e K3e
Gx5i threatens mate after R*4e, so white has no time for B*3i followed by Gx3h. However,
after the game Kubo admitted that he had not read this variation until the end. He thought
that he probably could play G*3i after 102.G*4h, but this seems unclear. After 102.G*3a
white has to give up both of his major pieces and this ends his chances of winning this
game, so after the game he said that he probably should have played 102.G*4h anyway and
hope for the best.

103.G4ix5i   07:46:00  07:59:00
104.G3ax4a   07:46:00  07:59:00
105.G5ix6i   07:46:00  07:59:00
106.R*9i     07:46:00  07:59:00
107.P*7i     07:47:00  07:59:00
108.R9ix9h+  07:47:00  07:59:00
109.P*5h     07:47:00  07:59:00
110.P1dx1e   07:47:00  07:59:00
111.P*1c     07:47:00  07:59:00
112.L*5b     07:47:00  07:59:00
113.L1ix1e   07:47:00  07:59:00
114.L5bx5h+  07:47:00  07:59:00
115.G*1b     07:53:00  07:59:00
116.L1ax1b   07:53:00  07:59:00
117.P1cx1b+  07:53:00  07:59:00
118.K2b-3a   07:53:00  07:59:00
119.B*5c     07:53:00  07:59:00
120.G3b-4b   07:53:00  07:59:00
121.B5cx7e+  07:53:00  07:59:00
122.B*5f     07:53:00  07:59:00
123.+P1b-2b  07:53:00  07:59:00
124.K3ax2b   07:53:00  07:59:00
125.R*1b     07:53:00  07:59:00
Resigns      07:53:00  07:59:00

Simple mate after 126.K2a S*3b G4ax3b (or G4bx3b) R1a+ or 126.K3a N*4c K2a S*3b etc.
Kubo got a little scare in the endgame after dominating the game from the opening,
but he survives to finally get a win after losing the first three games in a row.
There must have been some pressure to win this game in his home prefecture, but he
pulls it off and can still hope to add his name to those of Fukauara (in the Oi)
and Watanabe (in the Ryu-O) to come back from 3-0 down. He needs to take it one game
at a time though, because Sato has the black pieces in game 5.
