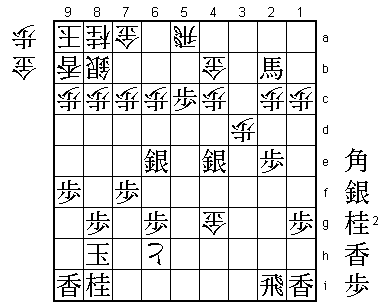
61st Osho Match Game 3
[Black "Sato Yasumitsu, Challenger"]
[White "Kubo Toshiaki, Osho"]
[Event "61st Osho-sen, Game 3"]
[Date "February 16th and 17th 2012"]
1.P7g-7f     00:00:00  00:00:00
2.P3c-3d     00:00:00  00:00:00
3.P2g-2f     00:01:00  00:00:00
4.P5c-5d     00:01:00  00:01:00
5.P2f-2e     00:01:00  00:01:00
6.R8b-5b     00:01:00  00:01:00
7.S3i-4h     00:02:00  00:01:00
8.P5d-5e     00:02:00  00:01:00
9.K5i-6h     00:02:00  00:01:00
10.B2b-3c    00:02:00  00:01:00
11.P3g-3f    00:03:00  00:01:00
12.S3a-4b    00:03:00  00:01:00
13.S4h-3g    00:03:00  00:01:00
14.S4b-5c    00:03:00  00:01:00
15.S3g-4f    00:03:00  00:01:00
16.S5c-4d    00:03:00  00:01:00

Like in the first game, Sato plays the ultra quick S3g attack against Kubo's Gokigen
Nakabisha opening. However, in the first game Kubo defended with the not so popular
K6b followed by P4d. In this game, he chooses the most popular variation, moving the
silver to 4d. This makes it hard for either side to start the hostilities early, so
both players now strengthen the positions of their kings.

17.K6h-7h    00:17:00  00:01:00
18.K5a-6b    00:17:00  00:01:00
19.G4i-5h    00:44:00  00:01:00
20.K6b-7b    00:44:00  00:02:00
21.S7i-6h    00:52:00  00:02:00
22.K7b-8b    00:52:00  00:04:00
23.S6h-7g    00:52:00  00:04:00
24.L9a-9b    00:52:00  00:04:00
25.S7g-6f    00:52:00  00:04:00
26.K8b-9a    00:52:00  00:04:00
27.N2i-3g    00:55:00  00:04:00
28.S7a-8b    00:55:00  00:12:00
29.P9g-9f    01:16:00  00:12:00
30.P5e-5f    01:16:00  00:25:00
31.P5gx5f    01:21:00  00:25:00
32.R5bx5f    01:21:00  00:25:00

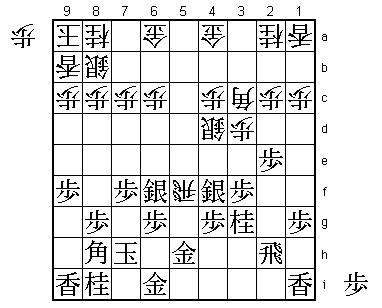
This looks very risky, because black can trap the rook with 33.P*5e here. However,
34.P3e is the perfect answer to this. For example, 35.S6e (Px3e is of course answered
by P*3f) Rx4f Px4f Px3f N4e B1e and even though black has been forced to give up
the rook, white has enough fighting chances in this position.

33.N3g-4e    01:22:00  00:25:00

Sato said after the game that he had no confidence in 33.P*5e and used only one
minute to play the knight.

34.B3c-1e    01:22:00  00:49:00

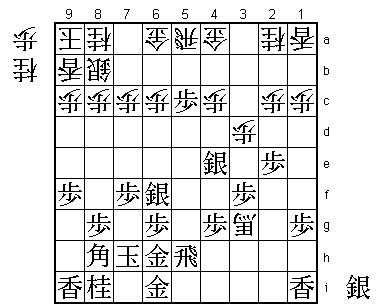
This threatens Sx4e Sx4e B3g+, but Sato has a very good answer to this.

35.G5h-6h!   02:23:00  00:49:00

This opens the square 5h for the black rook. Because white cannot do anything to
prevent this rook switch, it seems that Kubo's position is already suspect.

36.R5f-5a    02:23:00  01:28:00
37.P*5c      02:28:00  01:28:00
38.S4dx4e    02:28:00  02:07:00
39.S4fx4e    02:28:00  02:07:00
40.B1e-3g+   02:28:00  02:08:00
41.R2h-5h    02:28:00  02:08:00

42.+B3gx4g?  02:28:00  02:20:00

This makes matters worse. Better was 42.+Bx1i. Kubo was worried about 43.S*5b, but
after 44.G4ax5b Px5b+ Rx5b (Gx5b fails to G*4a) Rx5b+ Gx5b R*5i white can counter
the fork on the promoted bishop and gold with N*5c, attacking the silver on 4e.
Sato had intended to play 43.S5d after +Bx1i, and after 44.P*5f Sx6c+ (Rx5f is not
good because of N*6d) N*7a S*5b Nx6c Sx5a+ G4ax5a R*3a S*7b Rx2a+ it seems that
black has the better position after both L*5d N*4f or L*6d Rx5f. However, considering
what happened in the game, white has a lot more fighting chances in these variations,
so Kubo probably had no choice but to play it like this.

43.S4e-5d    02:41:00  02:20:00
44.G6a-7a    02:41:00  03:18:00
45.R5h-5i!   03:45:00  03:18:00

Sato is known for his forceful moves and it is tempting to play 45.Sx6c+ or 45.S6e
here, but instead he calmly plays the rook out of harm's way. Great judgment, because
if black goes in for the kill while allowing white to get a rook in hand, there is
a serious risk for a strong counter attack. Also, Kubo has given the initiative to
black on purpose with 44.G7a, hoping to force Sato into an overplay. Giving the
initiative right back is a good strategy, because white is stuck for moves in this
position.

46.N*5f      03:45:00  04:03:00

This was the sealed move. It must have been a very painful night for Kubo, as his
 position is very bad here. This knight drop is a desperate measure, because 45.R5i
also strongly threatened R4i next.

47.G6h-5h    03:55:00  04:03:00
48.+B4gx3f   03:55:00  04:05:00
49.S*4e      04:25:00  04:05:00
50.+B3f-2g   04:25:00  04:11:00
51.S6f-6e!   04:37:00  04:11:00

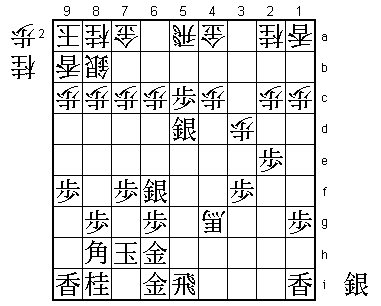
Black still needs to be careful. The shogi common sense is to defend the king with
three generals, so to open the bishop diagonal with 51.S5g looks better. However,
this is risky after 52.G4b Bx1a+ (or S5gx5f) N3c and white can break the silver
chain that is putting so much pressure on the white position. The silver pyramid
that black builds after 51.S6e may not have a very solid foundation, but the vital
silver on 5d is now double defended. The Gokigen Nakabisha aims at activating the
rook, but Kubo's rook is in a sad place.

52.P*5g      04:37:00  04:33:00
53.G5h-4g    04:37:00  04:33:00
54.+B2gx4e   04:37:00  04:40:00
55.S5dx4e    04:37:00  04:40:00
56.S*6h      04:37:00  04:40:00
57.S4ex5f    04:43:00  04:40:00
58.S6hx6i=   04:43:00  04:40:00
59.R5ix6i    04:44:00  04:40:00
60.P5g-5h+   04:44:00  04:40:00
61.R6i-2i    05:11:00  04:40:00
62.G4a-4b    05:11:00  05:06:00
63.B8hx1a+   05:15:00  05:06:00
64.N2a-3c    05:15:00  05:07:00
65.+B1a-2b   05:15:00  05:07:00
66.P*5e      05:15:00  05:08:00
67.S5fx5e    05:18:00  05:08:00
68.N3c-4e    05:18:00  05:08:00
69.S5e-4f    06:14:00  05:08:00
70.G*5g      06:14:00  05:11:00
71.S4fx4e    06:14:00  05:11:00
72.+P5h-6h   06:14:00  05:13:00
73.K7h-8h    06:14:00  05:13:00
74.G5gx4g    06:14:00  05:13:00

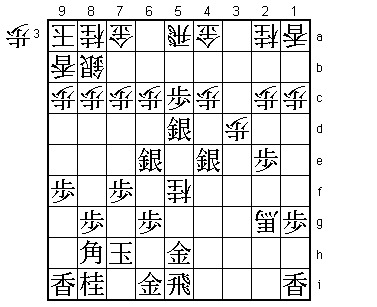
The white king is still in a perfect Anaguma castle. Sato now gives a clinic in how
to break it down in a flash.

75.N*7e      06:14:00  05:13:00
76.G4bx5c    06:14:00  05:19:00
77.L*8f      06:15:00  05:19:00
78.G*7b      06:15:00  05:27:00
79.N*9e      06:17:00  05:27:00

Suddenly three pieces are aiming at the weakest spot of the Anaguma. White has no way
to defend against this and the bear is buried in his hole.

80.G5c-6d    06:17:00  05:40:00
81.N7ex8c=   06:33:00  05:40:00
82.S8bx8c    06:33:00  05:40:00
83.N9ex8c=   06:33:00  05:40:00
84.G7bx8c    06:33:00  05:40:00
85.L8fx8c+   06:33:00  05:40:00
86.P*8b      06:33:00  05:57:00
87.S*7b      06:34:00  05:57:00
88.G7ax7b    06:34:00  06:01:00
89.+L8cx7b   06:34:00  06:01:00
90.G6dx6e    06:34:00  06:01:00
91.S*8c      06:35:00  06:01:00
92.+P6h-7h   06:35:00  06:02:00
93.K8hx7h    06:46:00  06:02:00
94.R5a-5h+   06:46:00  06:02:00
95.G*6h      06:46:00  06:02:00
Resigns      06:46:00  06:02:00

No mate after 96.N*6f +Bx6f or 96.S*6i Rx6i or +Rx6h Kx6h and the white king cannot
be defended so Kubo resigned here. This match has become very one-sided with Sato
taking a convincing 3-0 lead. He is now only one win away from winning the Osho
title for the first time in 10 years. The only thing Kubo can do is forget the score
line and play the match game by game. It may help a little that the next game is
being played in Hyogo Prefecture where Kubo is from. Winning that game could maybe
give him the momentum he desperately needs.
