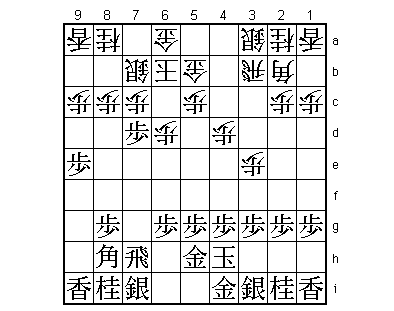
61st Osho Match Game 2
[Black "Kubo Toshiaki, Osho"]
[White "Sato Yasumitsu, Challenger"]
[Event "61st Osho-sen, Game 2"]
[Date "January 26th and 27th 2012"]
1.P7g-7f     00:00:00  00:00:00
2.P3c-3d     00:00:00  00:00:00
3.P7f-7e     00:03:00  00:00:00
4.P3d-3e     00:03:00  00:01:00
5.R2h-7h     00:09:00  00:01:00
6.R8b-3b     00:09:00  00:01:00

Being behind in the match, Kubo doesn't experiment and plays his favorite opening,
the Ishida variation. Sato replies by playing the same variation with white.
There are a number of variations in this opening that have been deeply analyzed,
but the variation played in this game is not one of them. Both players are basically
on their own and take their time for their moves.

7.K5i-4h     00:13:00  00:01:00
8.K5a-6b     00:13:00  00:06:00
9.G6i-5h     00:24:00  00:06:00
10.G4a-5b    00:24:00  00:20:00
11.P9g-9f    00:42:00  00:20:00
12.S7a-7b    00:42:00  01:25:00
13.P9f-9e    01:10:00  01:25:00
14.P4c-4d    01:10:00  01:42:00
15.P7e-7d    01:50:00  01:42:00
16.P6c-6d    01:50:00  01:46:00
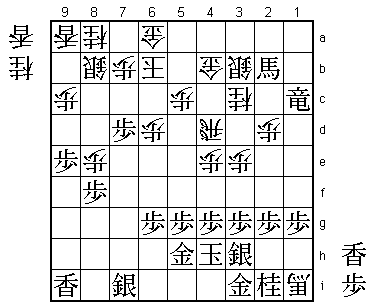
This is a well-known plan in this opening. By allowing black to exchange on 7c, the
white silver can move up and white can try to move into a favorable Yagura position.
The move 16.P6d is a preparation for this, to play the gold to 6c. There is a risk to
playing this as is shown by Kubo in this game.
17.P7dx7c+ 02:06:00 01:46:00
18.S7bx7c 02:06:00 01:46:00
19.R7h-7f! 02:06:00 01:46:00
Strong move. The direct threat is to move the rook to 2f and the pawn on 2c cannot
be defended properly. If white defends against R2f by 20.R3d, then 21.P*7d is quite
awkward for white because 22.S8d is answered by 23.P8f and it is hard to defend against
N7g followed by P8e which wins the silver. Also, 22.S8b is followed by 23.B6f and N7g
followed by an edge attack. In both cases black has the better position and in the press
room the general opinion was that it was already quite hard for white to get his pieces
on the right squares.
20.P4d-4e 02:06:00 02:14:00
Positive response by Sato, but also quite risky.
21.N8i-7g 02:14:00 02:14:00
A little surprisingly, Kubo declines the invitation to start the hostilities. He
prefers to improve his position first.
22.R3b-3d 02:14:00 03:23:00
23.S3i-3h 02:34:00 03:23:00
24.B2b-3c 02:34:00 03:34:00
25.P8g-8f 02:48:00 03:34:00
26.S7c-8b 02:48:00 04:05:00
27.P*7d 03:08:00 04:05:00
28.P2c-2d 03:08:00 04:09:00
29.R7f-7e 03:14:00 04:09:00
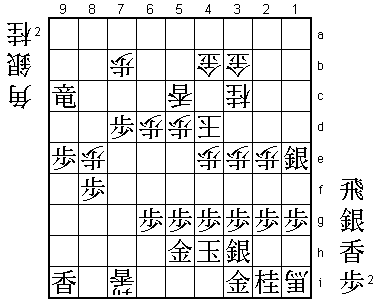
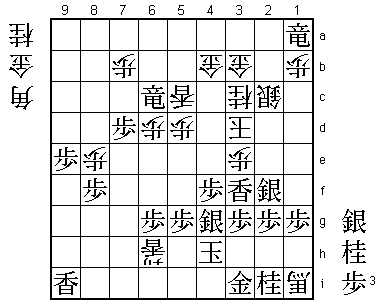
30.S3a-3b 03:14:00 04:37:00
The sealed move. It is quite rare these days that only 29 moves are played on the
first day of a two-day title match game. A clear indication of the difficulty of
the position.
31.N7g-8e 03:18:00 04:37:00
32.P*7b 03:18:00 04:42:00
33.B8hx3c+ 03:38:00 04:42:00
34.N2ax3c 03:38:00 04:42:00
35.B*2b 03:39:00 04:42:00
36.B*2h 03:39:00 04:43:00
37.L1i-1h 03:40:00 04:43:00
38.B2h-1i+ 03:40:00 04:45:00
39.B2bx1a+ 03:40:00 04:45:00
40.+B1ix1h 03:40:00 04:45:00
41.R7e-7f 03:49:00 04:45:00
42.P8c-8d 03:49:00 05:23:00
43.G4i-3i 04:43:00 05:23:00
44.+B1h-1i 04:43:00 05:31:00
45.R7f-1f 04:55:00 05:31:00
46.P8dx8e 04:55:00 05:47:00
47.+B1a-1b 05:01:00 05:47:00
48.R3d-4d 05:01:00 06:08:00
49.+B1b-2b 05:08:00 06:08:00
50.G5b-4b 05:08:00 06:10:00
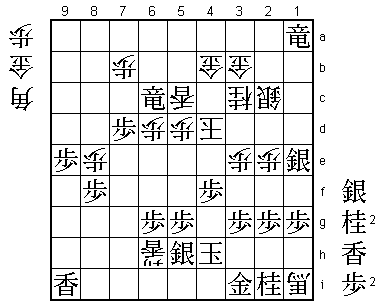
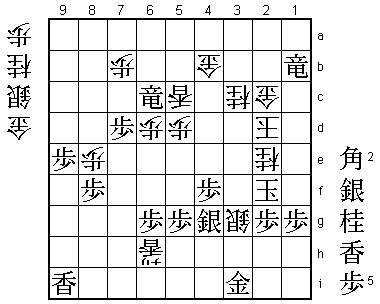
51.R1fx1c+ 05:08:00 06:10:00
Kubo has switched his rook over from the 7th file and breaks into the enemy camp
on the edge. Black has a clear advantage, but Sato is not ready to throw the towel
yet.

52.G6a-5a!?  05:08:00  06:15:00

It is unclear if this is the best move, but it shows that Sato is willing to make
it as hard as possible for his opponent. There aren't many alternatives, because a
counter attack like 52.P4f Px4f Rx4f fails to L*4f R7f Lx4b+ which is good for black.

53.+R1c-1e   05:23:00  06:15:00
54.P2d-2e?!  05:23:00  06:55:00

In the post-mortem analysis both players agreed that 54.P6e followed at some point
by R7d would probably have been better.

55.+R1e-1a   05:34:00  06:55:00
56.G5a-4a    05:34:00  06:55:00
57.L*2d!     06:09:00  06:55:00

Sato probably underestimated this move.

58.R4dx2d    06:09:00  07:43:00

No choice. Moves like 58.P3f or 58.P4f are ignored and black just plays 59.L2c+.

59.+B2bx3b   06:14:00  07:43:00
60.G4ax3b    06:14:00  07:43:00
61.+R1ax8a   06:14:00  07:43:00

And black wins easily, or...

62.L*5d      06:14:00  07:44:00
63.+R8ax8b   06:48:00  07:44:00
64.K6b-5b    06:48:00  07:44:00
65.+R8bx9a   06:51:00  07:44:00
66.K5b-4c    06:51:00  07:44:00

Like in the first game, Sato is adventurous with his king. This time he has no
choice: this is the safest place on the board for the white king, which makes clear
that white is in trouble.

67.L*5f      07:07:00  07:44:00
68.L*7e      07:07:00  07:46:00
69.L5fx5d    07:10:00  07:46:00
70.P5cx5d    07:10:00  07:46:00
71.S*1e      07:19:00  07:46:00
72.R2d-4d    07:19:00  07:49:00
73.N*5f      07:23:00  07:49:00
74.L7ex7i+   07:23:00  07:49:00
75.+R9ax9c   07:32:00  07:49:00
76.L*5c      07:32:00  07:52:00
77.N5fx4d    07:32:00  07:52:00
78.K4cx4d    07:32:00  07:52:00
79.R*1d?     07:37:00  07:52:00

Based on a miscalculation. If Kubo would have calculated correctly, he would have
played 79.+R6c immediately.

80.N*3d      07:37:00  07:55:00
81.+R9c-6c   07:48:00  07:55:00

A change of plan. Kubo initially thought that he could play 81.S2d here and win
after 82.S*6i S4i, but here he realized that after that white can play N*5f K3h
(Px5f is answered by B*7e) P2f! which is a perfect combination of attack and defense.
For example, Sx3e Kx3e L*3f K2e attack the rook and white survives. It seems that
81.+R6c is still good enough because black threatens S2d next, but there is a difference.

82.S*2c!     07:48:00  07:56:00

Attacks the rook and gives white some vital breathing space. If black wouldn't have
dropped the rook on 1d and played 79.+R6c instead, this would not have been possible.
Objectively, black is still winning, but when an easy position suddenly becomes difficult,
it is hard to stop the rot.

83.R1d-1a+   07:49:00  07:56:00
84.N*4f      07:49:00  07:56:00
85.P4gx4f    07:49:00  07:56:00
86.N3dx4f    07:49:00  07:56:00
87.S3h-4g    07:49:00  07:56:00
88.N4fx5h+   07:49:00  07:57:00
89.S4gx5h    07:49:00  07:57:00
90.P4e-4f    07:49:00  07:58:00
91.P*4g      07:52:00  07:58:00
92.+L7i-6i   07:52:00  07:59:00
93.P4gx4f    07:54:00  07:59:00
94.+L6i-6h   07:54:00  07:59:00
Looks very threatening, but white still doesn't have enough to mate the black king.
Kubo still gets two chances to win this game.

95.S5h-4g?   07:55:00  07:59:00

Here Kubo blows his first chance. After 95.P4e K3d (Nx4f is mate after N*5f etc.)
 N*4f wins because K4e is answered by S4g.

96.K4d-3d    07:55:00  07:59:00
97.N*2f?     07:56:00  07:59:00

There goes Kubo's second chance. Again 97.P4e was the correct move. This threatens
N*4f next, so white can only play a move like 98.P*4f, but then Sx4f B*6i N*4g! is
a perfect counter.

98.P2ex2f    07:56:00  07:59:00
99.S1ex2f    07:56:00  07:59:00
100.P*1b     07:56:00  07:59:00
101.L*3f     07:59:00  07:59:00
Both players in byoyomi and an unclear position on the board. This is no longer
about skill, but about what Japanese shogi players call "finger luck".

102.N*4c!    07:59:00  07:59:00

The two knights work perfectly in defense. Kubo sees no other way but to go all in,
but gives up the pieces Sato needs to mate the black king.

103.L3fx3e   07:59:00  07:59:00
104.N4cx3e   07:59:00  07:59:00
105.S2fx3e   07:59:00  07:59:00
106.K3dx3e   07:59:00  07:59:00
107.K4h-3h   07:59:00  07:59:00
108.B*6i     07:59:00  07:59:00
109.S*3f     07:59:00  07:59:00
110.K3e-2d   07:59:00  07:59:00
111.N*3e     07:59:00  07:59:00
112.L*3d     07:59:00  07:59:00
113.N3ex2c+  07:59:00  07:59:00
114.G3bx2c   07:59:00  07:59:00
115.+R1ax1b  07:59:00  07:59:00
116.B6ix4g+  07:59:00  07:59:00
117.S3fx4g   07:59:00  07:59:00
118.L3dx3g+  07:59:00  07:59:00
119.N2ix3g   07:59:00  07:59:00
120.+B1ix3g  07:59:00  07:59:00
121.K3hx3g   07:59:00  07:59:00
122.N*2e     07:59:00  07:59:00
123.K3g-2f   07:59:00  07:59:00
124.S*3g     07:59:00  07:59:00
Resigns      07:59:00  07:59:00
Mate after 125.K1f (K3f G*3e) Nx1g+ Kx1g N*2e K1h P*1g +Rx1g Nx1g+ Kx1g N*2e etc.
A great game, illustrated by the fact that there isn't a single white piece that is
still on its initial square. Kubo will rue the missed chances, because he is now 2-0
down and suddenly in quite a bit of trouble. On the other hand, Sato will be delighted
by snatching this game from the jaws of defeat. If he can win the third game with the
black pieces, he will get four chances to take the Osho title from Kubo.