61st Meijin Match Game 3
[Black "Moriuchi Toshiyuki, Meijin"]
[White "Habu Yoshiharu, Challenger"]
[Event "61st Meijin-sen, Game 3"]
[Date "May 7th and 8th 2003"]
1.P7g-7f 00:01:00 00:00:00
2.P3c-3d 00:01:00 00:01:00
3.P2g-2f 00:02:00 00:01:00
4.P4c-4d 00:02:00 00:04:00
5.P2f-2e 00:03:00 00:04:00
6.B2b-3c 00:03:00 00:05:00
7.S3i-4h 00:03:00 00:05:00
8.P9c-9d 00:03:00 00:07:00
9.G4i-5h 00:05:00 00:07:00
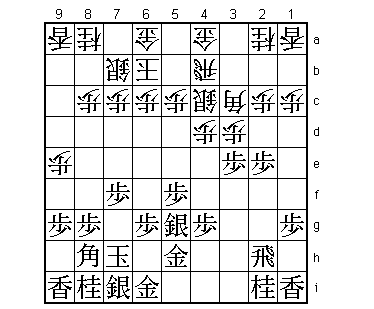
10.R8b-4b 00:05:00 00:15:00
The Furibisha was more or less as expected. Habu likes to play different
openings in his matches and he often picks the Furibisha when he is ahead.
Some thought he might go for Nakabisha, but a Shikenbisha it is.
11.K5i-6h 00:05:00 00:15:00
12.S3a-3b 00:05:00 00:19:00
13.K6h-7h 00:05:00 00:19:00
14.S3b-4c 00:05:00 00:20:00
15.P5g-5f 00:11:00 00:20:00
16.S7a-7b 00:11:00 00:23:00
17.S4h-5g 00:19:00 00:23:00
18.P9d-9e 00:19:00 00:31:00
19.P3g-3f 00:25:00 00:31:00
20.K5a-6b 00:25:00 00:46:00
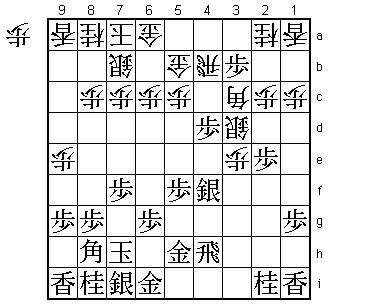
21.P3f-3e 00:29:00 00:46:00
This quick attack tries to make use of the fact that the white king is
still not in the Mino castle. It is a rather new idea, as all 12 games
with this move have been played in the last three years. It hasn't been
an overwhelming success, as black and white both won 6 games, but it is
interesting enough to be studied. Goda's style seems to fit this idea
well, as he won all three games he played with this attack. A textbook
example is his 2001 Osho game against Kubo. Kubo played 22.Px3e and lost
after 23.S4f P3f R2f R3b S3e P4e Bx3c+ Rx3c B*5g!. Since then, taking
the pawn on 3e is considered dangerous for white and 22.R3b has become
the main line of defense for white.

22.R4b-3b    00:29:00  01:37:00
23.P4g-4f    00:33:00  01:37:00
24.P3dx3e    00:33:00  02:11:00
25.P4f-4e    00:35:00  02:11:00
26.G4a-5b    00:35:00  02:12:00
27.P4ex4d    00:42:00  02:12:00
28.S4c-3d    00:42:00  02:12:00
29.R2h-4h    00:43:00  02:12:00
30.R3b-4b    00:43:00  02:35:00
31.S5g-4f    00:57:00  02:35:00
32.K6b-7a    00:57:00  02:36:00
33.P*3b?     02:28:00  02:36:00
A new move that unfortunately for Moriuchi backfires. In the past, there
have been three games with 33.S4e. Then 34.Sx4e Rx4e S*3d R4h (or R4i)
P*4e P*3b! is considered slightly better for black (Rx3b N3g gives black
good attacking chances).
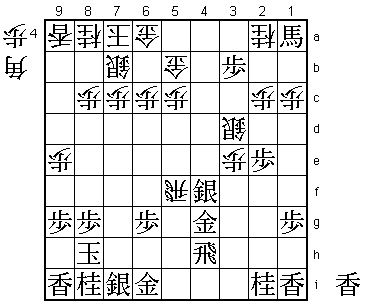
34.B3cx4d! 02:28:00 04:49:00
Played after more than two hours and a complete surprise to all following
the game. The professionals in the press room were nicely divided along
Furibisha and Ibisha players. Furibisha players like Suzuki Daisuke
liked 34.R4a, while Ibisha veterans like Kato and Aono liked 34.Rx3b.
Then 35.S4e Sx4e Rx4e S*3d S*4c leads to a very wild variation: Gx4c
Px4c+ Bx8h+ Kx8h Sx4e +Px3b. However, Habu has picked a variation that
is even wilder. The main reason for taking so long for this move is
that, just like in game 2, he doesn't want to show this move to
Moriuchi before the end of the first day. He sealed this move and
when umpire Aono opened the envelope the next day, he couldn't
completely hide his surprise.
35.B8hx4d 02:40:00 04:49:00
36.R4bx4d 02:40:00 04:49:00
37.B*5e 02:40:00 04:49:00
38.R4d-7d 02:40:00 04:52:00
39.B5ex1a+ 02:45:00 04:52:00
40.R7dx7f 02:45:00 04:55:00
41.K7h-8h 03:35:00 04:55:00
42.R7fx5f 03:35:00 05:09:00
43.G5h-4g 04:22:00 05:09:00
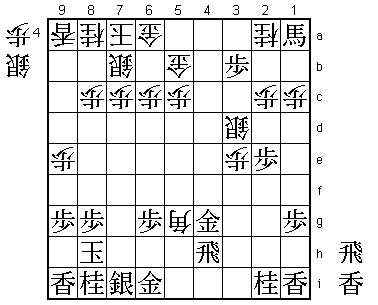
44.R5fx4f!!  04:22:00  05:27:00

Up until now Moriuchi played with complete confidence, but this move
changes everything. Only a player of Habu's talent can judge that this
rook sacrifice is good enough to take the lead in the game. White's
attack looks extremely thin, as he has only a bishop and a silver to
work with. However, black has no pawns in hand and the difference in
king defence is quite big. During the two hours that Habu took to seal
his move, he must have weighted the chances of Rx4f and finally decided
to go for it.

45.G4gx4f    04:23:00  05:27:00
46.B*5g      04:23:00  05:27:00
47.G4f-4g?   05:43:00  05:27:00
A mistake that makes it impossible for Moriuchi to stop the white
attack. 47.R4g was the only move here. After 48.B3i+, black has a number
of moves to choose from: 49.N3g is not good because of 50.S*3h R*4a
Sx4g+ Gx4g +B3h G4h +B6e 49.R*4a is also good for white after 50.+Bx2i
Rx2a+ +Bx4g Gx4g R*4i. However, according to Suzuki, black could have
put up a fight with 49.G5e P*4c R5i and after +B3h R4f +B2h R2f +Bx1i
+B2a black is definitely not out of trouble, but white still has a
lot of possibilities to make a mistake in the long fight that is ahead.

48.B5gx4h+   05:43:00  05:49:00
49.G4gx4h    05:43:00  05:49:00
50.R*2h      05:43:00  05:50:00
51.L*4i      05:46:00  05:50:00

Here 51.R*4a would have been better, but it doesn't make much difference.

52.P*4g      05:46:00  06:09:00
53.+B1a-5e   05:47:00  06:09:00
54.R2hx2i+   05:47:00  06:10:00
55.B*5f      05:48:00  06:10:00
56.+R2i-3i   05:48:00  06:21:00
57.B5fx4g    05:52:00  06:21:00
58.N*3f      05:52:00  06:24:00
59.G6i-5h    06:31:00  06:24:00
60.N3fx4h+   06:31:00  06:35:00
61.G5hx4h    06:31:00  06:35:00
62.G*4e      06:31:00  06:43:00
63.+B5e-6e   06:39:00  06:43:00
64.P*4f      06:39:00  06:55:00
65.B4g-2i    06:49:00  06:55:00
66.S*4g      06:49:00  06:57:00
67.N*7e      06:51:00  06:57:00
68.+R3ix2i   06:51:00  07:05:00
69.N7ex8c+   07:12:00  07:05:00
70.P6c-6d    07:12:00  07:19:00
Resigns      07:41:00  07:19:00
After 71.+Nx7b Gx7b R*3a N*6a there is no way to continue and if the
promoted bishop moves, white wins easily after Sx4h+. Black has no
attack and is way behind in material. Not a good game for the Meijin,
whose new opening idea was brilliantly countered by Habu. Moriuchi is
now three games down with four to play, which seems impossible to come
back from.