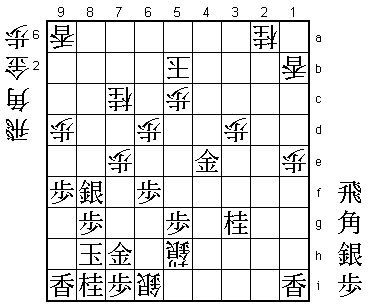
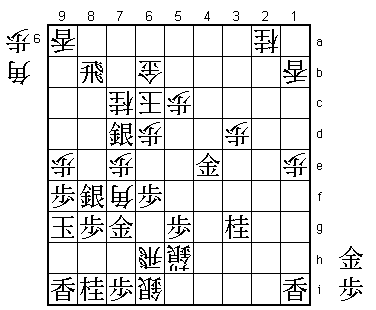
61st Meijin Match Game 2
[Black "Habu Yoshiharu, Challenger"]
[White "Moriuchi Toshiyuki, Meijin"]
[Event "61st Meijin-sen, Game 2"]
[Date "April 24th and 25th 2003"]
1.P7g-7f     00:01:00  00:00:00
2.P8c-8d     00:01:00  00:02:00
3.P2g-2f     00:03:00  00:02:00
4.G4a-3b     00:03:00  00:03:00
5.G6i-7h     00:06:00  00:03:00
6.P8d-8e     00:06:00  00:03:00
7.B8h-7g     00:09:00  00:03:00
8.P3c-3d     00:09:00  00:03:00
9.S7i-8h     00:11:00  00:03:00
10.B2bx7g+   00:11:00  00:04:00
11.S8hx7g    00:11:00  00:04:00

The Kakugawari or Bishop Exchange Opening. Despite the general opinion
that black has a small advantage in this opening, it still is immensely
popular in professional games. One of the reasons is probably that it
is quite easy to study this opening as there is a vast amount of
literature and games on it.

12.S3a-4b    00:11:00  00:04:00
13.S3i-3h    00:18:00  00:04:00
14.S7a-7b    00:18:00  00:04:00
15.P9g-9f    00:20:00  00:04:00
16.P9c-9d    00:20:00  00:05:00
17.P4g-4f    00:29:00  00:05:00
18.P6c-6d    00:29:00  00:05:00
19.S3h-4g    00:32:00  00:05:00
20.S7b-6c    00:32:00  00:05:00
21.K5i-6h    00:35:00  00:05:00
22.K5a-4a    00:35:00  00:17:00
23.P1g-1f    00:44:00  00:17:00
24.P1c-1d    00:44:00  00:19:00
25.K6h-7i    00:59:00  00:19:00
26.K4a-3a    00:59:00  00:20:00
27.S4g-5f    01:04:00  00:20:00
28.P7c-7d    01:04:00  00:31:00
29.G4i-5h    01:56:00  00:31:00
30.N8a-7c    01:56:00  00:45:00
31.P3g-3f    02:02:00  00:45:00
32.P4c-4d    02:02:00  01:44:00
33.P6g-6f    02:56:00  01:44:00
34.S6c-5d    02:56:00  01:45:00
35.P2f-2e    02:56:00  01:45:00
36.S4b-3c    02:56:00  01:45:00
37.N2i-3g    02:57:00  01:45:00
38.G6a-5b    02:57:00  01:51:00
39.P4f-4e    03:10:00  01:51:00
40.P4dx4e    03:10:00  01:52:00
41.P3f-3e    03:10:00  01:52:00
42.S3c-4d    03:10:00  01:54:00
43.P1f-1e    03:51:00  01:54:00
44.P1dx1e    03:51:00  01:55:00
45.P2e-2d    03:51:00  01:55:00
46.P2cx2d    03:51:00  01:55:00
47.P7f-7e    03:52:00  01:55:00
48.P7dx7e    03:52:00  01:55:00
49.R2hx2d    03:53:00  01:55:00
50.P*2c      03:53:00  01:55:00
51.R2d-2i    03:54:00  01:55:00
52.G5b-6c    03:54:00  01:55:00
53.P*1b      04:09:00  01:55:00
54.L1ax1b    04:09:00  01:56:00
55.B*1a      04:17:00  01:56:00
56.S4dx3e    04:17:00  01:58:00

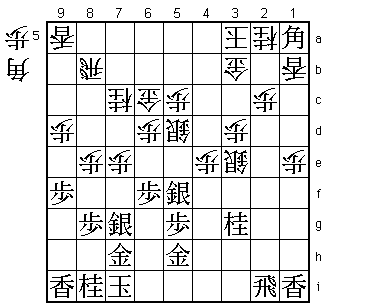
This move was first played more than 10 years ago in a 1992 Oi game
between Maruyama and Yonenaga. Maruyama won this game quite convincingly
and when a year later Habu tried this move again in a game against
Tanigawa in the first game of the Kio match and lost, it was generally
considered to be a suspect move. This is the way you can find this move
in the opening books "Habu no zunou", "Tanigawa no 21seiki joseki"
and "Shinban Kakugawari Koushikakegin Kenkyuu". However, in the 4th game
of the 2002 Kio match, Sato Yasumitsu re-introduced 56.Sx3e and despite
losing the game showed that this move is very interesting for white. Since
then, 56.Sx3e has been played no less than 19 times, with black winning
11 games. Highlight for white was the 4th game of the 2002 Oi match
between Tanigawa and Habu, which Habu won after 57.Sx4e B*2b P*3c Gx3c
Bx2b+ Kx2b Sx5d Px5d N4e G2d!.

57.S5fx4e    04:33:00  01:58:00
58.B*2b      04:33:00  02:01:00

The usual move. 58.B*3h has been played as well, but after 59.R2h B4i+
P*3c Nx3c Sx3d black seems to have the better position.

59.B1ax2b+   05:01:00  02:01:00

This was the sealed move. There is a big difference in time between
black and white here, exactly 3 hours. The observation by Inoue (8-dan)
regarding this difference is very interesting: "Moriuchi wants to see
black's attacking plan on the first day and therefore has played
quickly. On the other hand, Habu suspected this and takes the actual
fight into the second day by using a lot of time. He has a new move that
he isn't ready to show yet".

60.K3ax2b    05:01:00  02:02:00
61.B*4a      05:04:00  02:02:00
62.B*7d      05:04:00  02:19:00
63.R2i-2h    05:06:00  02:19:00
64.K2b-3a    05:06:00  02:25:00
65.B4ax3b+   05:07:00  02:25:00
66.K3ax3b    05:07:00  02:25:00
67.S4ex5d    05:07:00  02:25:00
68.G6cx5d    05:07:00  02:33:00
69.S*4c      05:07:00  02:33:00
70.K3bx4c    05:07:00  02:55:00
71.R2hx2c+   05:07:00  02:55:00
72.S*3c      05:07:00  02:55:00
73.G*2e!?    05:07:00  02:55:00

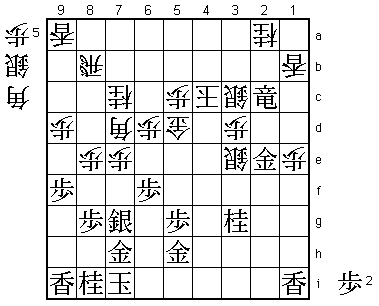
This is the move that Habu wanted to try. Black is a full bishop down and
only has a promoted rook and some attack as compensation. 73.G*2e is a hard
move to play, as it hands over the initiative to white. This is the chance
for Moriuchi to counter attack, but which attack is the best?

74.P8e-8f    05:07:00  05:13:00

An alternative is 74.P7f. The critical position is after 75.Sx7f (75.S6h
gives white a huge attacking base on 7g) B*4i Gx3d K5b +Rx1b P*4b Gx3c
Nx3c. Moriuchi said that during the game he didn't like L*7e here, but
admitted after the game that 74.P7f is indeed a viable alternative.
Still, 74.P8f is not the reason why white lost this game.

75.S7gx8f    05:44:00  05:13:00
76.P*8h      05:44:00  05:15:00
77.K7ix8h    06:25:00  05:15:00
78.S*6i      06:25:00  05:17:00

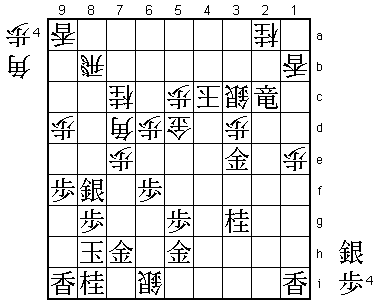
Looks like a strong attack.

79.G2ex3e!   07:18:00  05:17:00

In this game we again see HabuˇÇs exceptional endgame strength. 79.Gx3d
was the only move that was analyzed in the press room. Again, Habu hands
over the initiative to white. Now this must surely be good enough for
Moriuchi to win...
80.S6ix5h+ 07:18:00 07:01:00
81.P*4d! 07:44:00 07:01:00
Again, the obvious move is 81.Gx3d, but after 82.K5b +R3b P*4b G4c K6b
+Rx2a P*3a Gx3c Rx8f! Px8g S*6i white wins. The strange thing is that
after the game it became clear that Habu hadn't really considered Gx3d
here and at the previous move. He really looks differently at these
positions than mere mortals...
82.G5dx4d 07:44:00 07:16:00
83.G3ex4d 07:44:00 07:16:00
84.K4cx4d 07:44:00 07:16:00
85.G*4e 07:44:00 07:16:00
86.K4d-4c 07:44:00 07:16:00
87.P*4d 07:44:00 07:16:00
88.K4c-5b 07:44:00 07:22:00
89.+R2c-3b 07:44:00 07:22:00
90.S3c-4b 07:44:00 07:59:00
91.P4d-4c+ 07:45:00 07:59:00
92.K5b-6a 07:45:00 08:10:00
93.S*5b 07:53:00 08:10:00

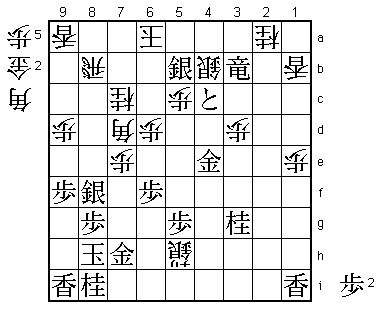
94.B7dx5b?   07:53:00  08:23:00

Only here Moriuchi makes an important mistake. After 94.K7b 95.+Rx4b
96.K8a the position is extremely complicated. For example, 97.+R5a
K9b P9e fails to Rx8f which is a mating threat defending against a
mating threat (Px8f P*8g leads to mate).

95.+R3bx4b   07:56:00  08:23:00
96.S*6i      07:56:00  08:28:00
97.+P4cx5b   08:16:00  08:28:00
98.R8bx5b    08:16:00  08:28:00
99.+R4bx5b   08:21:00  08:28:00
100.K6ax5b   08:21:00  08:28:00
101.P*7i!    08:21:00  08:28:00

Looks like just defense, but actually wins the game. The first point is
that after 102.Sx7h+ Px7h +S6h, black has a mate with B*7d G*6c S*4a
because white doesn't have the right pieces for intermediate drops.
The second point is that without Sx7h+, white has no good way to continue
his attack.

102.B*7f     08:21:00  08:55:00
103.G7h-7g   08:35:00  08:55:00
104.R*6h     08:35:00  08:56:00
105.K8h-9g   08:36:00  08:56:00

White loses because he has no pieces in hand that can move diagonally.

106.P9d-9e   08:36:00  08:56:00
107.R*8b     08:38:00  08:56:00
108.G*6b     08:38:00  08:56:00
109.B*7d     08:38:00  08:56:00
110.G*6c     08:38:00  08:57:00
111.B7dx6c+  08:39:00  08:57:00
112.K5bx6c   08:39:00  08:57:00
113.S*7d     08:39:00  08:57:00
Resigns      08:39:00  08:59:00

Mate after 114.K5b Rx6b+ Kx6b G*6c etc., or 114.Kx7d Sx7e followed by
picking up the bishop on 7f. Moriuchi must be disappointed being 2-0
down at this point. He played both games very well and lost only by the
smallest of margins. Can he get back in this match?
