60th Oza Match Game 3
[Black "Habu Yoshiharu, Challenger"]
[White "Watanabe Akira, Oza"]
[Event "60th Oza-sen, Game 3"]
[Date "September 19th 2012"]
1.P7g-7f     00:00:00  00:00:00
2.P8c-8d     00:00:00  00:00:00
3.S7i-6h     00:02:00  00:00:00
4.P3c-3d     00:02:00  00:00:00
5.P6g-6f     00:02:00  00:00:00
6.S7a-6b     00:02:00  00:00:00
7.P5g-5f     00:03:00  00:00:00
8.P5c-5d     00:03:00  00:00:00
9.S3i-4h     00:04:00  00:00:00
10.S3a-4b    00:04:00  00:00:00
11.G4i-5h    00:06:00  00:00:00
12.G4a-3b    00:06:00  00:01:00
13.G6i-7h    00:06:00  00:01:00
14.K5a-4a    00:06:00  00:02:00
15.K5i-6i    00:06:00  00:02:00
16.P7c-7d    00:06:00  00:03:00
17.G5h-6g    00:07:00  00:03:00
18.S6b-5c    00:07:00  00:05:00
19.P2g-2f    00:18:00  00:05:00
20.P8d-8e    00:18:00  00:06:00
21.P2f-2e    00:20:00  00:06:00
22.P8e-8f    00:20:00  00:09:00
23.P8gx8f    00:20:00  00:09:00
24.R8bx8f    00:20:00  00:09:00
25.P*8g      00:20:00  00:09:00
26.R8f-8b    00:20:00  00:10:00

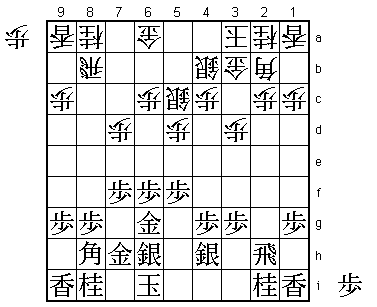
The same opening as in the first game, but Watanabe changes the position of the
rook and pulls it back to 8b instead of 8e. Watanabe may have won the first game,
but the opening was won by Habu, so it is not a surprise that he changes the moves.

27.P2e-2d    00:20:00  00:10:00
28.P2cx2d    00:20:00  00:10:00
29.R2hx2d    00:20:00  00:10:00
30.P*2c      00:20:00  00:10:00
31.R2d-2h    00:20:00  00:10:00
32.K4a-3a?!  00:20:00  00:21:00

After the game, this was the move that Watanabe regretted the most. This move was
prepared at home, but the timing is a mistake as we will see later.

33.S4h-5g    00:24:00  00:21:00
34.P4c-4d    00:24:00  00:23:00
35.S6h-7g    00:44:00  00:23:00
36.S4b-4c    00:44:00  00:27:00
37.B8h-7i    00:44:00  00:27:00
38.G6a-5b    00:44:00  00:27:00
39.B7i-6h    00:44:00  00:27:00
40.P6c-6d    00:44:00  00:32:00
41.K6i-7i    00:44:00  00:32:00

42.N8a-7c    00:44:00  00:36:00

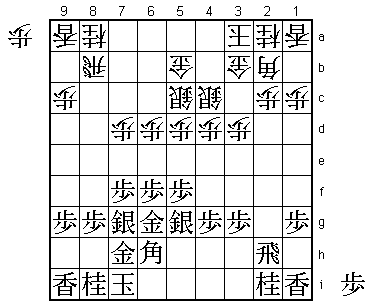
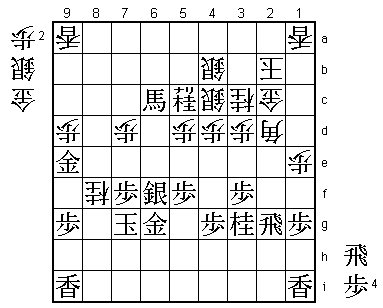
Watanabe has moved into a Gangi castle, which was planned. However, the point of
the white strategy is to use the bishop on the other side of the board with the
maneuver B3c-B5a-B8d and only then play N7c followed by P6e. If white succeeds
in playing this, he will get an overwhelming attacking position. Unfortunately
for white, there is no time for this bishop maneuver here, because the black
attack with P3f followed by P3e is too fast. The reason the bishop cannot be
activated in the way Watanabe planned is that he played the move 32.K3a, which
was too early. Now he has to play the attack N7c-P6e without activating the
bishop, which becomes the cause of all of white problems.

43.P3g-3f    00:54:00  00:36:00
44.P6d-6e    00:54:00  00:58:00
45.P6fx6e    00:58:00  00:58:00
46.N7cx6e    00:58:00  01:00:00

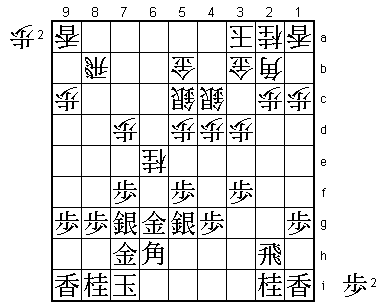
Black has simply allowed the fork on the silvers. This is unusual, but Habu has
judged the position to perfection. Without the help of the bishop, the white
attack lacks punch and the combination of K3a and B2b is unnatural. Despite
being down in material, Habu felt that his position would be good if he could
keep the white bishop inactive. In the post-mortem analysis 46.B5i was also
analyzed, but after 47.Px6f S5g-6f P4e B3g P*6d black may have avoided loss of
material, but the white bishop line has been opened up and black cannot use the
right knight in attack.

47.S5g-6f    00:58:00  01:00:00
48.N6ex7g+   00:58:00  01:00:00
49.N8ix7g    00:58:00  01:00:00
50.P1c-1d?   00:58:00  01:09:00

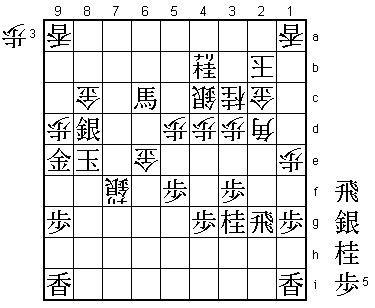
Watanabe tries to get the bishop into play on the edge, but this plan doesn't
work. His only chance would have been 50.B3c here. For example, 51.K8h R8a N3g
B2d Bx2d Px2d and white has managed to exchange the inactive bishop. In the
post-mortem analysis most time was spent on the position after 50.B3c and even
though there was no variation discovered that led to a good position for white,
the conclusion was that the position was unclear.

51.P*2d      01:34:00  01:09:00
52.P2cx2d    01:34:00  01:09:00
53.N2i-3g    01:34:00  01:09:00
54.N2a-3c    01:34:00  01:35:00
55.N*1f!     02:05:00  01:35:00

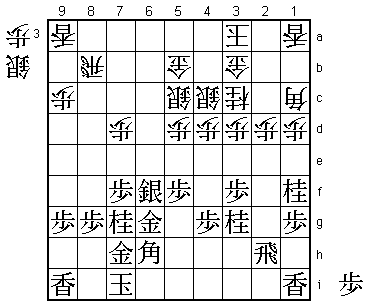
This move was a surprise for Watanabe, who thought that it was not possible to
play it here.

56.B2b-1c    02:05:00  02:10:00

And 57.N2d G2b P*2c Gx2c N1b+ fails to Bx6h+ which is check and G6gx6g is
answered by P*2d and white threatens both B*3i and Lx1b. Also G7hx6h is not
possible because of Rx8g+. This is why Watanabe thought that 55.N*1f was not
possible, but the next move was like a cold shower.

57.K7i-8h!   02:08:00  02:10:00

Takes the check out of the position, but Watanabe has no useful way to make use
of the extra move. The bishop on 1c remains boxed in and even though black cannot
easily take the pawn on 2d, the bad position of the white bishop is decisive.

58.R8b-8a    02:08:00  02:29:00
59.N7g-6e    02:20:00  02:29:00
60.S5c-4b    02:20:00  03:03:00
61.B6h-4f    02:43:00  03:03:00
62.K3a-2b    02:43:00  03:12:00
63.B4f-7c+   02:48:00  03:12:00
64.P1d-1e    02:48:00  03:12:00
65.N1fx2d    03:00:00  03:12:00
66.G3b-2c    03:00:00  03:12:00
67.P*6c!     03:00:00  03:12:00

While white is busy sorting out the mess on the king side, black starts a decisive
attack on the other side of the board.

68.B1cx2d    03:00:00  03:17:00

No choice. The obvious 68.P*6a fails to 69.+B7b followed by +Bx6a and black promoted
the pawn anyway.

69.P6c-6b+   03:00:00  03:17:00
70.P*2g      03:00:00  03:21:00
71.R2hx2g    03:05:00  03:21:00
72.G5bx6b    03:05:00  03:42:00
73.+B7cx6b   03:05:00  03:42:00
74.P*8f      03:05:00  03:42:00
75.P8gx8f    03:06:00  03:42:00
76.N*9d      03:06:00  03:42:00
77.+B6b-6c   03:15:00  03:42:00
78.R8a-8d    03:15:00  03:43:00
79.G*9e      03:34:00  03:43:00
80.P*8g      03:34:00  03:44:00
81.G7hx8g    03:34:00  03:44:00
82.R8dx8f    03:34:00  03:44:00
83.G8gx8f    03:34:00  03:44:00
84.N9dx8f    03:34:00  03:44:00
85.K8h-7g    03:34:00  03:44:00
86.P9c-9d    03:34:00  04:01:00
87.N6e-5c+!  03:54:00  04:01:00

The black king position looks quite dangerous, but with this move Habu shows that
he has read all variations and knows that his attack is stronger.

88.S*7h      03:54:00  04:25:00

Or 88.Px9e +Nx4b and now S*7h is answered by Rx2d (threatening mate while defending
against the white mating threat), P*8e by P7e and S*8e by S6e and black wins.

89.P7f-7e    03:59:00  04:25:00
90.P7dx7e    03:59:00  04:27:00
91.K7gx8f    04:01:00  04:27:00
92.S7hx6g=   04:01:00  04:32:00
93.+N5cx4b   04:09:00  04:32:00
94.S6g-7f+   04:09:00  04:37:00
95.K8f-8e    04:09:00  04:37:00
96.G*8c      04:09:00  04:37:00
97.S6fx7e    04:09:00  04:37:00
98.G*6e      04:09:00  04:37:00
99.S7e-8d    04:09:00  04:37:00
Resigns      04:09:00  04:38:00

The only way to continue the attack is 100.B5g+, but this fails to 101.R*2a Kx2a
Rx2c+ so Watanabe resigned here. After the game, Watanabe apologized to the fans
for not putting up a decent fight. This may be an overreaction, but he clearly
felt that he was outplayed in this game. Habu now only needs one more win to regain
the Oza title, but Watanabe is not the type of player to feel the influence of
bad losses for a long time, so we can expect him to give it all he has in the next
game.
