60th Oza Match Game 2
[Black "Watanabe Akira, Oza"]
[White "Habu Yoshiharu, Challenger"]
[Event "60th Oza-sen, Game 2"]
[Date "September 5th 2012"]
1.P7g-7f     00:00:00  00:00:00
2.P3c-3d     00:00:00  00:00:00
3.P2g-2f     00:01:00  00:00:00
4.R8b-4b     00:01:00  00:01:00
5.K5i-6h     00:06:00  00:01:00
6.B2bx8h+    00:06:00  00:03:00

A surprise. Including the first game of this match, Habu has now lost four
games in a row against Watanabe. Maybe that is the reason he tries something
unusual. Or maybe Fujii showed him in the Oi match that this bishop exchange
in the Furibisha is a strong enough strategy to give it a try himself.

7.S7ix8h     00:06:00  00:03:00
8.K5a-6b     00:06:00  00:03:00
9.K6h-7h     00:07:00  00:03:00
10.S3a-2b    00:07:00  00:05:00
11.S3i-4h    00:08:00  00:05:00
12.K6b-7b    00:08:00  00:05:00
13.G4i-5h    00:13:00  00:05:00
14.S2b-3c    00:13:00  00:07:00
15.S8h-7g    00:13:00  00:07:00
16.P4c-4d    00:13:00  00:21:00
17.P5g-5f    00:14:00  00:21:00
18.K7b-8b    00:14:00  00:22:00
19.K7h-8h    00:49:00  00:22:00
20.S7a-7b    00:49:00  00:28:00
21.G6i-7h    00:49:00  00:28:00
22.G4a-5b    00:49:00  00:35:00
23.S4h-5g    00:52:00  00:35:00
24.P7c-7d    00:52:00  00:39:00
25.P6g-6f    01:00:00  00:39:00
26.P6c-6d    01:00:00  00:41:00
27.G5h-6g    01:02:00  00:41:00
28.G5b-6c    01:02:00  00:41:00
29.P5f-5e    01:05:00  00:41:00
30.P9c-9d    01:05:00  00:50:00
31.P9g-9f    01:06:00  00:50:00
32.N8a-7c    01:06:00  00:57:00
33.P2f-2e    01:09:00  00:57:00
34.P8c-8d    01:09:00  01:03:00
35.P3g-3f    01:12:00  01:03:00
36.P1c-1d    01:12:00  01:05:00
37.P1g-1f    01:13:00  01:05:00
38.S7b-8c    01:13:00  01:35:00

39.L9i-9h    01:32:00  01:35:00

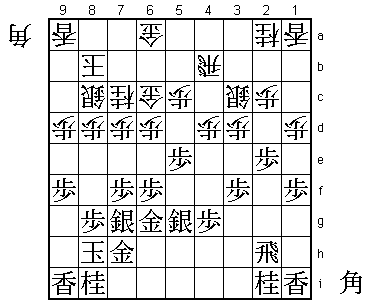
The opening is developing at a slow pace. Black has the option here to play
N3g followed by S5f and attack through the center, but Watanabe decides to
strengthen his king position into an Anaguma formation. Watanabe often plays
like this, so this is not a real surprise. White has no good moves to improve
his position, so Habu is forced into a "one side sennichite", repeating the
moves K9b-K8b waiting for the black attack to start. This is a clear sign that
black has won the opening battle.

40.G6a-7b    01:32:00  01:38:00
41.K8h-9i    01:32:00  01:38:00
42.K8b-9b    01:32:00  01:50:00
43.S7g-8h    01:37:00  01:50:00
44.K9b-8b    01:37:00  01:50:00
45.G7h-7i    01:50:00  01:50:00
46.K8b-9b    01:50:00  01:53:00
47.S5g-6h    01:52:00  01:53:00
48.K9b-8b    01:52:00  01:53:00
49.N2i-3g    01:53:00  01:53:00
50.K8b-9b    01:53:00  01:58:00
51.P4g-4f    02:25:00  01:58:00
52.K9b-8b    02:25:00  02:02:00
53.R2h-4h    02:27:00  02:02:00
54.L1a-1b    02:27:00  02:50:00
55.R4h-2h    02:38:00  02:50:00
56.K8b-9b    02:38:00  03:15:00

Black has completed his castle and will start the attack as soon as the black
king is on 9b, which is a weaker position than on 8b. Therefore, white would
like to avoid playing K9b, but there is no alternative.

57.P2e-2d    02:45:00  03:15:00
58.P2cx2d    02:45:00  03:15:00
59.P1f-1e    02:45:00  03:15:00
60.P1dx1e    02:45:00  03:16:00
61.P3f-3e    02:45:00  03:16:00
62.B*5b      02:45:00  03:21:00

Another tough move to play for white, as the bishop for the moment only works
in defense. However, 62.Px3e is not possible because of 63.Lx1e Lx1e P*3d S2b
Rx2d P*2c R2e and even though black is a lance behind he has plenty of useful
moves.

63.P3ex3d    02:55:00  03:21:00
64.B5bx3d    02:55:00  03:21:00
65.R2h-2f    02:55:00  03:21:00
66.K9b-8b    02:55:00  03:22:00
67.P4f-4e    03:04:00  03:22:00
68.P9d-9e    03:04:00  03:29:00
69.P9fx9e    03:05:00  03:29:00
70.P*9g      03:05:00  03:29:00
71.S8hx9g    03:15:00  03:29:00
72.P4dx4e    03:15:00  03:33:00
73.P*4c      03:23:00  03:33:00
74.B3dx4c    03:23:00  03:34:00
75.G7i-8h!   03:23:00  03:34:00

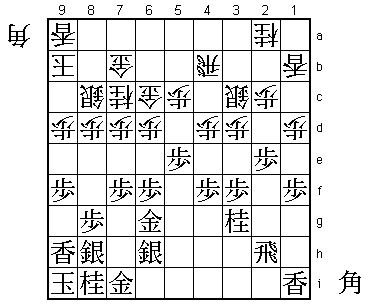
White has managed to put some pressure on the Anaguma, even being able to use
the bishop that was out of place. However, this gold is a strong move that
strengthens the black defense. The general opinion was that black had a big
advantage here.

76.N7c-8e    03:23:00  03:44:00
77.S9g-8f    03:25:00  03:44:00
78.P*9g      03:25:00  03:44:00
79.N8ix9g    03:33:00  03:44:00
80.P*9f      03:33:00  03:47:00
81.N9gx8e    03:33:00  03:47:00
82.P8dx8e    03:33:00  03:47:00
83.S8fx8e    03:33:00  03:47:00
84.L9ax9e    03:33:00  03:47:00

85.L9hx9f?   03:51:00  03:47:00

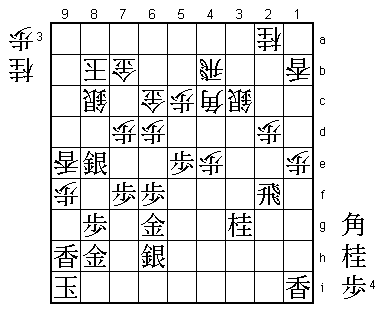
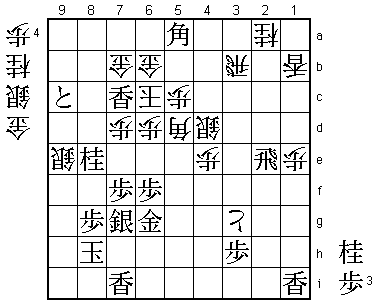
This was the position on which the most time was spent in the post-mortem analysis.
The correct way to play here was 85.B*5a. If white then plays 86.P9g+ then 87.Bx9e+
P*9d +B5a +Px8h Kx8h and the black king is hard to attack. Or 86.N*7c Sx9f Lx9f
Lx9f P*9e Lx9e P*9d and after P*3d Bx3d Bx4b+ Sx4b Rx2d black has the better
position.

86.L9ex9f    03:51:00  03:47:00
87.S8ex9f    03:51:00  03:47:00
88.P*9e      03:51:00  03:47:00
89.S9fx9e    03:54:00  03:47:00
90.L*9a      03:54:00  03:49:00
91.P*9f      03:54:00  03:49:00
92.L9ax9e    03:54:00  03:55:00
93.P9fx9e    03:54:00  03:55:00
94.N*8d!     03:54:00  03:55:00

Best move of the game. Like in game one, Habu plays a knight that doesn't seem
to be very powerful and gives the initiative to the opponent. However, Watanabe
admitted after the game that this move was very tough to deal with. At some point,
white wants to put the knight on 9f, but at this point the white attack is to weak
for this move to be effective. By dropping it on 8d, the pawn on 7f is attacked
and white can still play the knight to 9f in the future.

95.L*7i      04:05:00  03:55:00

Not much choice, but this lance will be inactive for the rest of the game.

96.P2d-2e    04:05:00  04:01:00
97.R2f-2i    04:06:00  04:01:00
98.S3c-4d    04:06:00  04:01:00
99.P9e-9d    04:12:00  04:01:00
100.R4b-3b   04:12:00  04:10:00

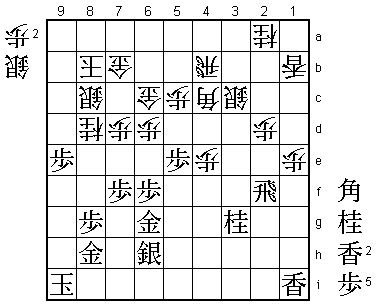
White has managed to activate the pieces on the left side of the board and now
the outlook of the game has completely changed. Watanabe ended the post-mortem
analysis here because he felt that the game as over at this point.

101.P*3c     04:17:00  04:10:00
102.R3bx3c   04:17:00  04:10:00
103.P*3h     04:17:00  04:10:00
104.S8cx9d   04:17:00  04:21:00
105.B*5a     04:17:00  04:21:00
106.G6c-6b   04:17:00  04:21:00
107.K9i-8i   04:23:00  04:21:00
108.R3c-3b   04:23:00  04:23:00
109.P5e-5d   04:23:00  04:23:00
110.N8d-9f   04:23:00  04:24:00
111.S6h-7g   04:37:00  04:24:00
112.N9fx8h+  04:37:00  04:36:00
113.K8ix8h   04:37:00  04:36:00
114.B4cx5d   04:37:00  04:39:00
115.P*9c     04:37:00  04:39:00
116.P*3f     04:37:00  04:44:00
117.R2ix2e   04:41:00  04:44:00
118.P3fx3g+  04:41:00  04:46:00
119.P9c-9b+  04:41:00  04:46:00
120.K8b-7c   04:41:00  04:46:00
121.+P9b-9c  04:44:00  04:46:00
122.S9d-9e   04:44:00  04:51:00
123.N*8e     04:50:00  04:51:00
124.K7c-6c   04:50:00  04:51:00
125.L*7c     04:50:00  04:51:00

126.G6b-6a!  04:50:00  04:53:00

The white position looks dangerous, but Habu has judged it all to perfection.
If the black bishop on 5a is removed, there is no way for black to get to the
king.

127.L7cx7b+  04:50:00  04:53:00
128.G6ax5a   04:50:00  04:53:00
129.N8e-7c+  04:50:00  04:53:00
130.K6c-5b   04:50:00  04:53:00
131.N*4f!    04:58:00  04:53:00

This looks very strong because this knight cannot be taken: 132.Px4f Rx9e.
However, Habu has the perfect answer. By the way, 131.N*5f seems like a good
alternative here, but after 132.P*8f Nx4d K4c is good enough. Also, 131.Rx2a+
is not a mating threat, so white again can play 132.P*8f.

132.P*8f!    04:58:00  04:56:00

This ends all hope for black. The white attack is faster.

133.+L7b-6b  04:58:00  04:56:00
134.G5ax6b   04:58:00  04:56:00
135.+N7cx6b  04:58:00  04:56:00
136.K5bx6b   04:58:00  04:56:00
137.N4fx5d   04:58:00  04:56:00
138.P5cx5d   04:58:00  04:56:00
139.B*7a     04:58:00  04:56:00
140.K6bx7a   04:58:00  04:57:00
141.R2ex2a+  04:58:00  04:57:00
142.G*3a     04:58:00  04:57:00
143.+R2ax3b  04:59:00  04:57:00
144.P8fx8g+  04:59:00  04:57:00
Resigns      04:59:00  04:57:00

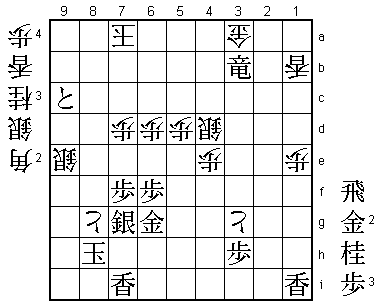
Mate after 145.Kx8g B*9f K9g N*8e K8h S*8g K8i N9g= K9i L*9h, so Watanabe resigned
here. In the first game Watanabe came back from behind to win with the white pieces
and in this second game Habu has done the same. This is turning into a very
interesting match.
