60th Osho Match Game 5
[Black "Toyoshima Masayuki, Challenger"]
[White "Kubo Toshiaki, Osho"]
[Event "60th Osho-sen, Game 5"]
[Date "March 8th and 9th 2011"]
1.P2g-2f     00:00:00  00:00:00
2.P3c-3d     00:00:00  00:00:00
3.P7g-7f     00:01:00  00:00:00
4.P5c-5d     00:01:00  00:04:00
5.P2f-2e     00:03:00  00:04:00
6.R8b-5b     00:03:00  00:06:00
7.S3i-4h     00:05:00  00:06:00
8.P5d-5e     00:05:00  00:11:00
9.K5i-6h     00:06:00  00:11:00
10.B2b-3c    00:06:00  00:15:00
11.P3g-3f    00:07:00  00:15:00
12.K5a-6b    00:07:00  00:32:00
13.S4h-3g    00:08:00  00:32:00
14.K6b-7b    00:08:00  00:39:00
15.S3g-4f    00:09:00  00:39:00
16.K7b-8b    00:09:00  00:58:00
17.K6h-7h    00:10:00  00:58:00
18.S7a-7b    00:10:00  01:03:00
19.S7i-6h    00:11:00  01:03:00
20.G4a-3b    00:11:00  01:09:00
21.S6h-7g    00:37:00  01:09:00
22.P5e-5f    00:37:00  01:28:00
23.P5gx5f    00:38:00  01:28:00
24.R5bx5f    00:38:00  01:28:00
25.P*5e      00:38:00  01:28:00

This blocks the return path of the rook and as a result, white needs to sacrifice a
major piece. Of course this is all opening theory and both players will have been
confident that their side has good chances.

26.R5fx5e    00:38:00  01:28:00
27.S4fx5e    00:39:00  01:28:00
28.B3cx5e    00:39:00  01:28:00
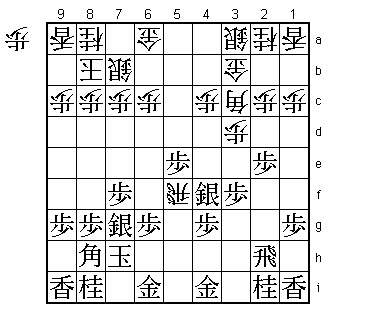
29.R2h-1h    00:39:00  01:28:00

Only two official games have been played with 29.R1h, but considering that this
variation is on the frontier of current opening theory, it is certain that both
players have studied it deeply and played it in training games.

30.S*2h      00:39:00  02:41:00

Interestingly, this position appeared in a recent book published by Toyoshima called
"Toyoshima Masayuki no joseki kenkyuu" (Toyoshima Masayuki's opening research). This
book is regarded highly among professionals for its accurate position evaluation.
About this position Toyoshima wrote "black cannot be confident". Despite this, he
plays this position with black in this win-or-go-home game.

31.P4g-4f!?  00:41:00  02:41:00

A new move that Toyoshima obviously found after writing his book. Even after the
game Toyoshima said that he wasn't sure that this new move actually achieved its
goal, but this game seems to indicate that black not necessarily has the worst
position here.

32.B5ex4f    00:41:00  02:47:00
33.S7g-6h    00:52:00  02:47:00
34.N2a-3c    00:52:00  02:49:00
35.P3f-3e    02:13:00  02:49:00
36.P3dx3e    02:13:00  03:09:00
37.R*2f      03:14:00  03:09:00
38.S2hx1i+   03:14:00  03:41:00
39.R1h-5h    03:15:00  03:41:00

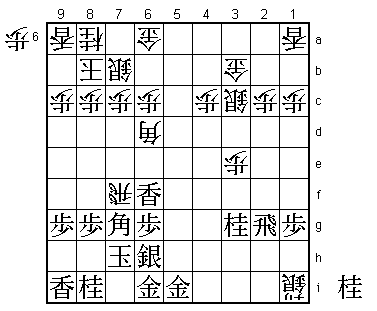
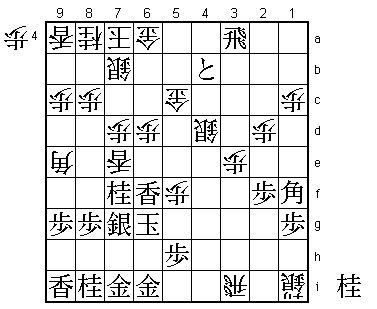
Here the players had a difference of opinion. In the press room, 39.R3h was expected
next, after which black can answer 40.B6d with Rx3e. Kubo also thought that this was
the move that black would play, but Toyoshima said in the post-mortem analysis that
he didn't know what to play after 40.L*4d. If 39.R5h is answered by 40.L*4d, black
has the forceful 41.Bx4d. Even though white also has the frightening Bx6h+ at any
time, with the black rook on 5h the white castle is too weak to give black a bishop
in hand.

40.B4f-6d    03:15:00  04:27:00
41.P2e-2d    03:17:00  04:27:00
42.P2cx2d    03:17:00  04:27:00
43.R2fx2d    03:17:00  04:27:00
44.L*5a      03:17:00  04:27:00
45.R5hx5a+   04:24:00  04:27:00

Looks like forcing the issue, but black has little choice here. After 45.P*5d he
is again out of pawns and after 46.S2b there is no good way to attack.

46.G6ax5a    04:24:00  04:27:00
47.P*3d      04:24:00  04:27:00
48.P*2c      04:24:00  04:40:00
49.R2d-2g    04:26:00  04:40:00
50.S3a-4b    04:26:00  04:48:00
51.P3dx3c+   04:53:00  04:48:00
52.S4bx3c    04:53:00  04:52:00
53.N2i-3g    04:54:00  04:52:00
54.R*4f      04:54:00  05:20:00

White is up on material, so Kubo wants to slow down the game. This defends against
N4e and N*5f, trying to take away all the black attack options.

55.G4i-5i    04:56:00  05:20:00
56.G5a-6a    04:56:00  05:24:00
57.B8h-7g    05:07:00  05:24:00
58.R4fx7f    05:07:00  05:56:00
59.L*6f      05:47:00  05:56:00

60.B6d-4b?   05:47:00  06:12:00

Kubo has played the game very well up to this point. The rook on 7f is pinning the
bishop, which is very good for white. Furthermore, black is again without pawns.
However, 60.B4b is a mistake. Correct was 60.B5e. Of course Kubo had looked at
this, but he was worried about 61.N4e S4d R5g, but this can be answered simply
with B4f.

61.N*5e      05:50:00  06:12:00
62.P6c-6d    05:50:00  06:14:00
63.N5ex4c+   05:50:00  06:14:00
64.G3bx4c    05:50:00  06:14:00
65.R2gx2c+   05:50:00  06:14:00

Black has sacrificed additional material, but the promotion of the rook is huge.
If white allows the dragon to go to 3b, the bishop on 4b becomes a major liability.

66.S3c-3d    05:50:00  06:26:00
67.+R2c-3b   05:52:00  06:26:00
68.G6a-5a    05:52:00  06:38:00

Or 68.B5c P*5d B4d Lx6d P*6b P*4e and if the bishop moves Lx6b+ is too strong.

69.N3g-2e!   06:01:00  06:38:00

White has been trying to tough it out, but this knight is too strong. The simple
threat is P*4d Gx4d N3c+, but it is very hard to defend against this.

70.R7fx7g+   06:01:00  07:00:00

Desperate times call for desperate measures. Exchanging this rook for the immobile
bishop on 7g must have hurt Kubo a lot.

71.S6hx7g    06:01:00  07:00:00
72.B*1d      06:01:00  07:00:00
73.+R3b-2b   06:02:00  07:00:00
74.P*2a      06:02:00  07:05:00
75.+R2bx2a   06:05:00  07:05:00
76.B1dx2e    06:05:00  07:08:00

White has managed to take the knight on 2e off the board, but the cost is high
as the defensive pieces all are very unstable positions.

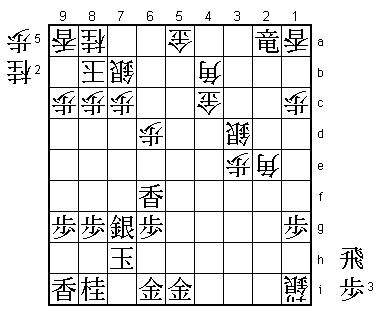
77.P*4d?     06:06:00  07:08:00

An important mistake by Toyoshima. He could have decided the game here with 77.R*2b.
For example, 78.P*4a P*5b Gx5b +Rx4a and the white defense collapses after G5a
Rx4b+ G5ax4b B*7a.

78.G4c-5c    06:06:00  07:10:00

The difference is that the previous attack no longer works because this gold defends
against the pawn drop on 5b.

79.R*3b      06:19:00  07:10:00
80.P*4a      06:19:00  07:10:00
81.P*2f      06:21:00  07:10:00
82.S3d-4c!   06:21:00  07:18:00

Nice move. This silver cannot be taken because after 83.Px4c+ Bx4c black has to
give up one of the rooks.

83.R3b-2b+   06:26:00  07:18:00
84.B2ex6i+   06:26:00  07:18:00
85.G5ix6i    06:26:00  07:18:00
86.S4cx4d    06:26:00  07:21:00
87.+R2bx1a   06:26:00  07:21:00
88.P*5f      06:26:00  07:21:00
89.P*5h      06:28:00  07:21:00
90.N*5e      06:28:00  07:24:00
91.+R2ax4a   06:42:00  07:24:00

Toyoshima goes for the all-out attack, but in a few moves regretted this decision.
Still, it seems that he didn't have an alternative. For example, 91.G6h is a common
professional technique to give the initiative to the opponent, but in this case
white has the good continuation of 92.P6e Lx6e P*6f.

92.G5ax4a    06:42:00  07:24:00
93.+R1ax4a   06:42:00  07:24:00
94.G*5a      06:42:00  07:24:00
95.G*6b      06:43:00  07:24:00
96.R*7a!     06:43:00  07:25:00

Great defense that stopped Toyoshima in his tracks.

97.G6bx5a    07:08:00  07:25:00

Wrong direction of play, but again Toyoshima had no alternative because 97.Gx7a
is met by 98.Gx4a.

98.B4bx5a    07:08:00  07:25:00
99.P*4c      07:08:00  07:25:00
100.P7c-7d   07:08:00  07:30:00
101.P4c-4b+  07:25:00  07:30:00
102.B5a-9e   07:25:00  07:31:00

The highlight of Kubo's defensive scheme. The only move for black is 102.+Rx7a,
but after 103.Kx7a white is threatening mate with Bx7g+ next (because of the
extra rook), so black has to force his attack.

103.+R4ax7a  07:25:00  07:31:00
104.K8bx7a   07:25:00  07:31:00
105.R*3a     07:25:00  07:31:00
106.G*6a     07:25:00  07:38:00

White has to be careful here. If 106.K8b to keep the mating threat in the position,
 then after 107.G*6h the position is actually quite complicated.

107.B*2e     07:25:00  07:38:00
108.P*2d     07:25:00  07:45:00
109.B2e-1f   07:27:00  07:45:00
110.N*7e     07:27:00  07:47:00
111.L*6h     07:28:00  07:47:00
112.R*3i     07:28:00  07:52:00
113.G*7i     07:49:00  07:52:00
114.N5ex6g+  07:49:00  07:52:00
115.L6hx6g   07:49:00  07:52:00
116.N7ex6g+  07:49:00  07:52:00
117.K7hx6g   07:49:00  07:52:00
118.L*7e     07:49:00  07:52:00
119.N*7f     07:53:00  07:52:00

120.L7ex7f?  07:53:00  07:58:00

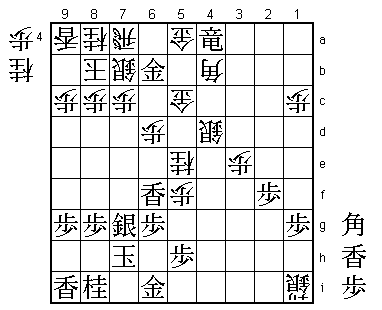
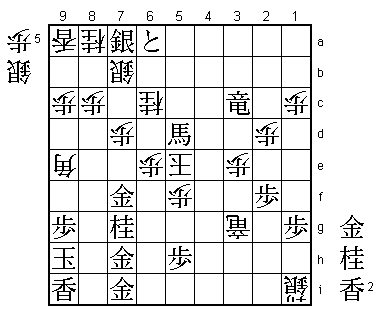
Here Kubo could have cashed in on his valiant defensive effort with 120.R3g+.
Again, he had of course seen this, but after 121.K7h Bx7g+ Nx7g Lx7f B*9e Lx7g+
Bx7g N*8e (actually, S*7f would have been hard to defend against as well) he
thought that black could play B*5i. However, the post-mortem analysis showed that
white wins after S*7g K8i +R6g L*6h +R7f Lx6d +Rx8g and mate. Black has to defend
against the mating threat +R7f, but Toyoshima said in the post-mortem analysis
that he could see no good way of doing that.

121.K6gx7f   07:55:00  07:58:00
122.R3i-3g+  07:55:00  07:58:00
123.P8g-8f!  07:55:00  07:58:00

This opens an escape route for the black king that swings the game. Black has given
himself just enough time to make his attack work.

124.S4d-5e   07:55:00  07:59:00
125.+P4b-5b  07:55:00  07:59:00
126.S5ex6f   07:55:00  07:59:00
127.+P5bx6a  07:56:00  07:59:00
128.K7a-8b   07:56:00  07:59:00
129.K7fx6f   07:56:00  07:59:00
130.G5c-5d   07:56:00  07:59:00
131.S*7a     07:56:00  07:59:00
132.K8b-7c   07:56:00  07:59:00
133.R3a-3c+  07:56:00  07:59:00
134.N*6c     07:56:00  07:59:00
135.K6f-7f   07:56:00  07:59:00
136.P6d-6e   07:56:00  07:59:00
137.K7f-8g   07:56:00  07:59:00
138.L*7e     07:56:00  07:59:00
139.G6i-7h   07:56:00  07:59:00
140.K7c-6d   07:56:00  07:59:00
141.K8g-9h   07:56:00  07:59:00
142.L7ex7g+  07:56:00  07:59:00
143.N8ix7g   07:56:00  07:59:00
144.B9ex8f   07:56:00  07:59:00
145.G*7f     07:57:00  07:59:00
146.B8f-9e   07:57:00  07:59:00
147.B1f-4c+  07:57:00  07:59:00
148.K6d-5e   07:57:00  07:59:00
149.+B4cx5d  07:57:00  07:59:00
Resigns      07:57:00  07:59:00

Mate after 150.Kx5d (K4f +R4d) +R3d P*4d Gx6e K5c G*4c so Kubo resigned here. Toyoshima
dodges a bullet in a game that could have gone either way, but he is still alive at
2-3 down in the match. Will Kubo be able to close out this match with the black pieces
in the sixth game or can Toyoshima takes this match the full distance?
