60th Osho Match Game 2
[Black "Kubo Toshiaki, Osho"]
[White "Toyoshima Masayuki, Challenger"]
[Event "60th Osho-sen, Game 2"]
[Date "January 21st and 22nd 2011"]
1.P5g-5f     00:00:00  00:00:00

Kubo wastes no time in trying to hide his choice of opening. From the first move,
Kubo calls for the Nakabisha opening.

2.P3c-3d     00:00:00  00:03:00
3.R2h-5h     00:04:00  00:03:00
4.B2b-3c     00:04:00  00:18:00
5.P7g-7f     00:06:00  00:18:00
6.P4c-4d     00:06:00  00:19:00
7.K5i-4h     00:19:00  00:19:00
8.R8b-2b     00:19:00  00:22:00

Toyoshima has prepared the Ai-Furibisha for this game. This is considered to be
Kubo's specialty, but Toyoshima isn't afraid.

9.K4h-3h     00:28:00  00:22:00
10.S3a-4b    00:28:00  00:31:00
11.K3h-2h    00:39:00  00:31:00
12.P2c-2d    00:39:00  00:39:00
13.S7i-6h    00:43:00  00:39:00
14.P2d-2e    00:43:00  00:53:00
15.S6h-5g    00:47:00  00:53:00
16.K5a-6b    00:47:00  01:04:00
17.L1i-1h    00:51:00  01:04:00

Kubo moves into the Anaguma, trying to get an edge through the difference in castle
formation.

18.G4a-5b    00:51:00  01:24:00
19.G4i-3h    00:57:00  01:24:00
20.S7a-7b    00:57:00  01:27:00
21.K2h-1i    01:08:00  01:27:00
22.K6b-7a    01:08:00  01:28:00
23.G6i-5i    01:51:00  01:28:00
24.P1c-1d    01:51:00  01:31:00
25.S3i-2h    02:04:00  01:31:00
26.P1d-1e    02:04:00  01:35:00
27.G5i-4i    02:10:00  01:35:00
28.P2e-2f    02:10:00  02:28:00
29.P2gx2f    02:10:00  02:28:00
30.R2bx2f    02:10:00  02:28:00
31.P*2g      02:10:00  02:28:00
32.R2f-2b    02:10:00  02:30:00
33.P5f-5e    02:22:00  02:30:00
34.N2a-1c    02:22:00  03:03:00
35.S5g-4f    02:28:00  03:03:00
36.N1c-2e    02:28:00  03:04:00
37.P3g-3f    03:00:00  03:04:00
38.K7a-8b    03:00:00  03:34:00
39.P9g-9f    03:17:00  03:34:00
40.R2b-2d    03:17:00  03:36:00
41.B8h-7g    04:01:00  03:36:00

The sealed move.

42.P1e-1f    04:01:00  03:45:00
43.P1gx1f    04:02:00  03:45:00
44.P*1g      04:02:00  03:45:00

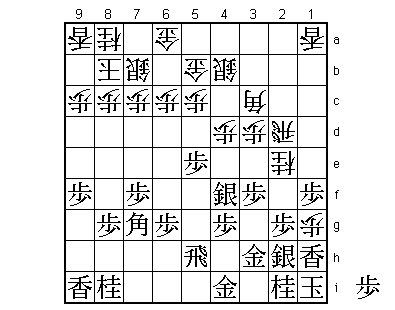
White is attacking strongly and it is possible that Kubo underestimated its strength.
This edge attack seems to be a little too straightforward to work at this level,
but the young challenger plays it anyway.

45.N2ix1g    04:40:00  03:45:00

The point of the white attack is that the natural 45.Lx1g, which would leave white
without pawns, is good for white after 46.P4e Sx4e P3e Px3e R6d P6f R7d.

46.L1ax1f    04:40:00  03:45:00
47.N1gx2e    04:41:00  03:45:00
48.L1fx1h+   04:41:00  03:45:00
49.K1ix1h    04:41:00  03:45:00
50.R2dx2e    04:41:00  03:45:00
51.S4f-3g    04:41:00  03:45:00

White has exchanged the attacking knight and lance for the defensive knight and
lance and there is a gaping hole in front of the black king. However, Kubo doesn't
give up that easily and gathers his forces in defense before starting a strong
counter attack.

52.P4d-4e    04:41:00  03:53:00
53.P7f-7e    04:48:00  03:53:00

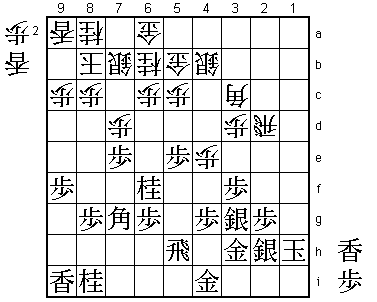
This aims straight at the soft spot of the Mino castle: the square 7c.

54.R2e-2d    04:48:00  04:41:00
55.P7e-7d    05:15:00  04:41:00
56.P7cx7d    05:15:00  04:42:00
57.N*6f      05:33:00  04:42:00
58.N*6b      05:33:00  04:55:00
59.P*7e      06:05:00  04:55:00

60.P3d-3e?   06:05:00  05:47:00

Now the game changes in Kubo's favor. Correct was 60.P*1f Px7d L*1a and after B4d
next, white has a lot of interesting options as well.

61.P5e-5d    06:26:00  05:47:00
62.P5cx5d    06:26:00  05:50:00
63.P7ex7d    06:29:00  05:50:00
64.P6c-6d    06:29:00  06:04:00
65.L*7f      06:35:00  06:04:00
66.G5b-6c    06:35:00  06:16:00
67.P*1g!     06:41:00  06:16:00

Professionals don't like to drop pawns, but this pawn acts as a helmet for the black
king, which is suddenly a lot safer. Kubo has taken the upper hand, but now it is
time for Toyoshima to show what he is made of.

68.P5d-5e    06:41:00  06:43:00
69.P7d-7c+   06:56:00  06:43:00
70.S7bx7c    06:56:00  06:43:00
71.L7fx7c+   06:56:00  06:43:00
72.K8bx7c    06:56:00  06:43:00
73.R5h-7h    06:59:00  06:43:00
74.K7c-8b    06:59:00  06:43:00
75.B7g-6h    07:00:00  06:43:00
76.L*7a!     07:00:00  06:43:00

The first of two very good lance drops on the back rank. This lance, close to the
white king, slows down the black attack considerably.

77.B6hx3e    07:05:00  06:43:00
78.R2d-1d    07:05:00  06:43:00
79.P*7e      07:12:00  06:43:00
80.L*2a!     07:12:00  07:01:00

This second lance drop, close to the black king, can be captured by black, but
the price is high.

81.P*5c      07:28:00  07:01:00
82.S4bx5c    07:28:00  07:10:00
83.S*3b      07:29:00  07:10:00

Kubo decides to attack the white attacking formation, but this may not have been
the best plan.

84.P*3d      07:29:00  07:30:00
85.B3e-7i    07:35:00  07:30:00
86.P6d-6e    07:35:00  07:36:00
87.N6f-7d    07:40:00  07:36:00
88.N6bx7d    07:40:00  07:36:00
89.S3b-4c+   07:43:00  07:36:00
90.B3c-1a    07:43:00  07:36:00
91.+S4cx5c   07:43:00  07:36:00
92.G6cx5c    07:43:00  07:36:00
93.P7ex7d    07:43:00  07:36:00
94.P*7e      07:43:00  07:37:00
95.N8i-7g    07:45:00  07:37:00
96.G5c-6d    07:45:00  07:39:00

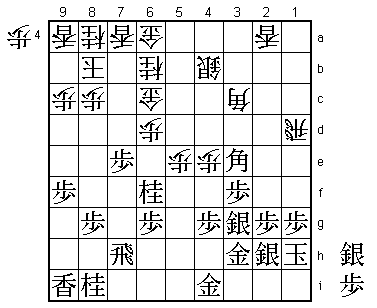
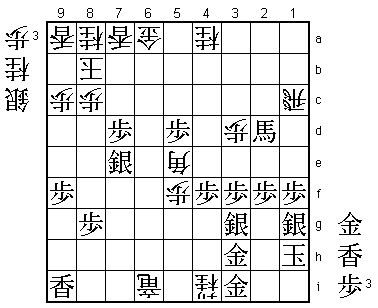
97.N*1c?     07:48:00  07:39:00

Dropping the knight on this unusual square was met with cries of surprise in the
press room. Then, some analysis seemed to indicate that Kubo had found an interesting
 way to stop the white attack. For example, 98.L2c is met with S*1b and 98.L2d with
N2a+ B4d S*2c and the white attacking pieces are in disarray. However, Toyoshima has
seen all of this and more. Therefore, Kubo should have played the simple 97.N*7c here.
Then 98.Lx7c Px7c+ Nx7c Nx6e Nx6e P6f is good for black or 98.Nx7c Px7c+ Kx7c and
only then N*1c is a lot better than what happened in the game because the white king
is in a much more dangerous position.

98.P*1f!     07:48:00  07:45:00

An important extra move.

99.P1gx1f    07:49:00  07:45:00
100.L2a-2d   07:49:00  07:47:00
101.P2g-2f   07:50:00  07:47:00

Now 101.N2a+ B4d S*2c is not good because of P*1g and after Sx1g Bx1g+ Kx1g N*2e
white breaks through on the edge. It seems that Toyoshima has grabbed the advantage,
but again Kubo refuses to go down easily.

102.P5e-5f   07:50:00  07:49:00
103.P6g-6f   07:56:00  07:49:00
104.N*5g     07:56:00  07:50:00
105.G4i-3i   07:57:00  07:50:00
106.R1dx1f   07:57:00  07:50:00
107.P*1g     07:57:00  07:50:00
108.R1fx1c   07:57:00  07:50:00
109.N7gx6e   07:57:00  07:50:00
110.P4e-4f   07:57:00  07:57:00
111.P*5d     07:57:00  07:57:00
112.N*4a     07:57:00  07:57:00
113.P4gx4f   07:58:00  07:57:00
114.G6dx7d   07:58:00  07:57:00
115.B7i-9g   07:58:00  07:57:00
116.P*6d     07:58:00  07:58:00
117.P*7f     07:58:00  07:58:00
118.P6dx6e   07:58:00  07:58:00
119.P7fx7e   07:58:00  07:58:00
120.G7d-6d   07:58:00  07:58:00
121.P6fx6e   07:58:00  07:58:00
122.G6dx6e   07:58:00  07:58:00
123.P7e-7d   07:58:00  07:58:00
124.P*7e     07:58:00  07:58:00
125.P*6f     07:58:00  07:58:00
126.G6e-6d   07:58:00  07:58:00
127.R7hx7e   07:58:00  07:58:00
128.G6dx7e   07:58:00  07:58:00
129.B9gx7e   07:58:00  07:58:00
130.P*1f     07:58:00  07:58:00
131.P1gx1f   07:58:00  07:58:00
132.P*1g     07:58:00  07:58:00
133.S2hx1g   07:58:00  07:58:00
134.B1a-5e   07:58:00  07:58:00
135.B7e-4b+  07:58:00  07:58:00
136.R*7i     07:58:00  07:58:00
137.S*6d     07:58:00  07:58:00
138.B5ex6f   07:58:00  07:58:00
139.P*6i     07:58:00  07:58:00
140.R7ix6i+  07:58:00  07:58:00
141.S6d-7e   07:58:00  07:58:00
142.B6f-5e   07:58:00  07:58:00
143.+B4bx2d  07:58:00  07:58:00
144.N5g-4i+  07:58:00  07:58:00

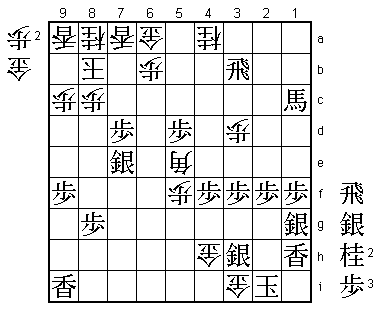
145.G3ix4i?  07:58:00  07:58:00

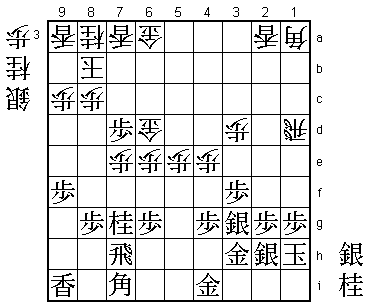
Only here the game is being decided. Correct was 145.G3i-2h and after 146.+N3i Gx3i
+Rx3i G*2i the position is still unclear. For example, +R7i +Bx1c +Rx7e N*6g is
good or black.

146.+R6ix4i  07:58:00  07:58:00
147.G*3i     07:58:00  07:58:00
148.G*1i!    07:58:00  07:58:00

The decisive move. It is possible that Kubo overlooked this move under time pressure.

149.K1hx1i   07:59:00  07:58:00

No choice: 149.K2h is answered by +Rx3i Gx3i S*1h and the white attack is too strong.

150.N*2g     07:59:00  07:58:00
151.G3hx2g   07:59:00  07:58:00
152.+R4ix3i  07:59:00  07:58:00
153.G*2i     07:59:00  07:58:00
154.S*3h     07:59:00  07:58:00
155.G2ix3i   07:59:00  07:58:00
156.S3hx2g+  07:59:00  07:58:00
157.L*1h     07:59:00  07:58:00

If only 157.G*2h would work, black would have been alright. However, 158.P*1h K2i
G*1i K3i G*2i is very heavy but here it wins for white.

158.+S2gx3g  07:59:00  07:58:00
159.+B2dx1c  07:59:00  07:58:00
160.S*3h     07:59:00  07:58:00
161.R*3b     07:59:00  07:58:00
162.P*6b     07:59:00  07:58:00
163.G3ix3h   07:59:00  07:58:00
164.+S3gx3h  07:59:00  07:58:00
165.S*2i     07:59:00  07:58:00
166.+S3hx2i  07:59:00  07:58:00
167.K1ix2i   07:59:00  07:58:00
168.G*4h     07:59:00  07:58:00
169.S*3i     07:59:00  07:58:00
170.S*3h     07:59:00  07:58:00
171.S3ix3h   07:59:00  07:58:00
172.G*3i     07:59:00  07:58:00
Resigns      07:59:00  07:58:00

No mate after 173.K1i, but there is no defense after 174.G4h-3h next and black has
no attack (175.S*7c Nx7c Px7c+ Lx7c is nothing), so Kubo resigned here. An up and
down game that could have gone either way, but Toyoshima's positive play with the
white pieces is rewarded. He wins the first title match game of his career and this
is very important after being blown away in the first game. The match is even and
Toyoshima will feel much better about the rest of the match. Kubo misses a golden
opportunity to put his young opponent in a deep psychological hole, but he seemed
to be in good spirits after the game nonetheless. In any case, this Osho match has
suddenly become much more interesting.
