60th Osho Match Game 1
[Black "Toyoshima Masayuki, Challenger"]
[White "Kubo Toshiaki, Osho"]
[Event "60th Osho-sen, Game 1"]
[Date "January 8th and 9th 2011"]
1.P2g-2f     00:00:00  00:00:00

For the first time in 18 years, a title match is being played between two players
from the Kansai area. Then, it was also for the Osho title. More importantly, it
is the first title match for 20-year old challenger Toyoshima. He reached this stage
by winning an Osho league with the likes of Habu, Watanabe, Moriuchi and Sato which
shows his enormous potential. A first title match is never easy, but it will be highly
unlikely that it will be his last. There was some extra pressure on Toyoshima, because
the game started with 7 of the former Osho title holders sitting at the side of the
board. Because this is the 60th Osho title match, Habu, Moriuchi, Sato, Tanigawa,
Minami, Yonenaga, Nakamura and Kato had all come to the venue for some special events.

2.P3c-3d     00:00:00  00:00:00
3.P7g-7f     00:01:00  00:00:00
4.P5c-5d     00:01:00  00:03:00
5.P2f-2e     00:10:00  00:03:00
6.R8b-5b     00:10:00  00:05:00
7.S3i-4h     00:10:00  00:05:00
8.P5d-5e     00:10:00  00:09:00
9.K5i-6h     00:10:00  00:09:00
10.B2b-3c    00:10:00  00:16:00
11.P3g-3f    00:10:00  00:16:00
12.K5a-6b    00:10:00  00:22:00
13.S4h-3g    00:10:00  00:22:00
14.K6b-7b    00:10:00  00:24:00
15.S3g-4f    00:10:00  00:24:00
16.S3a-3b    00:10:00  00:52:00

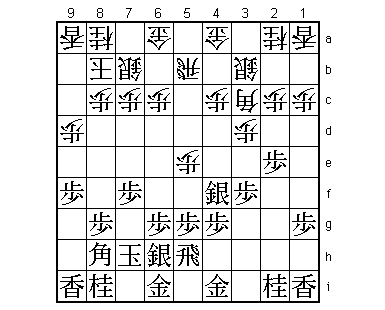
It was widely expected that Kubo would play the Gokigen Nakabisha, but 16.S3b is a
move that is not often played. After the game, Kubo admitted that he had prepared
it for this game. He has played it before and the light formation is well-suited
to the style of the Sabaki Artist.

17.K6h-7h    00:29:00  00:52:00
18.K7b-8b    00:29:00  01:25:00
19.S7i-6h    00:46:00  01:25:00
20.S7a-7b    00:46:00  01:30:00
21.P9g-9f    02:00:00  01:30:00
22.P9c-9d    02:00:00  01:36:00
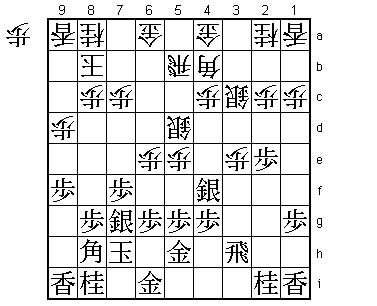
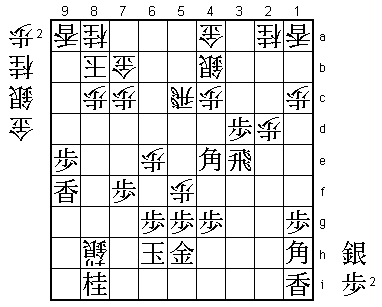
23.R2h-5h!?  02:09:00  01:36:00

This is the move that Toyoshima had prepared. It looks very defensive, only defending
against the pawn exchange P5f, but it also threatens S7g followed by S6f and black
wins the pawn on the fifth file. White can defend against this, but at a cost and
that is where Toyoshima's real intention becomes clear.

24.P6c-6d    02:09:00  01:59:00
25.S6h-7g    02:11:00  01:59:00
26.S7b-6c    02:11:00  02:16:00
27.S7g-6f    02:58:00  02:16:00
28.S6c-5d    02:58:00  02:23:00
29.P3f-3e    03:34:00  02:23:00
30.P3dx3e    03:34:00  02:30:00
31.R5h-3h    03:34:00  02:30:00

White has been forced to move the silver out of the castle formation to save the
pawn on 5e. Now black switches the rook back to start a fight at the head of the
bishop while the white king is still exposed.

32.P6d-6e    03:34:00  02:59:00
33.S6f-7g    03:35:00  02:59:00
34.B3c-4b    03:35:00  02:59:00
35.G4i-5h    03:38:00  02:59:00
36.S3b-3c    03:38:00  03:23:00

37.R3hx3e?!  04:16:00  03:23:00

Toyoshima immediately seizes the opportunity to seal the move for the first time
in his shogi career. However, probably better is 37.Sx3e, which is unclear after
38.B6d P4f P5f. For example S6h P6f Px5f P*3d S2f Bx4f S3g Px6g+ Gx6g B6d. Kubo
said after the game that he had expected the silver here.

38.G6a-7b    04:16:00  03:43:00
39.N2i-3g    04:18:00  03:43:00
40.B4b-6d    04:18:00  03:57:00
41.P2e-2d?!  04:54:00  03:57:00

Giving up a pawn here is another small but important mistake that gives white the
opportunity to grab the advantage. 41.B9g immediately would have been better here.

42.P2cx2d    04:54:00  03:58:00
43.B8h-9g    05:17:00  03:58:00
44.B6dx9g+   05:17:00  04:02:00
45.L9ix9g    05:17:00  04:02:00
46.P9d-9e    05:17:00  04:14:00
47.P9fx9e    05:18:00  04:14:00
48.P*9f      05:18:00  04:17:00
49.L9gx9f    05:18:00  04:17:00
50.B*6c      05:18:00  04:17:00

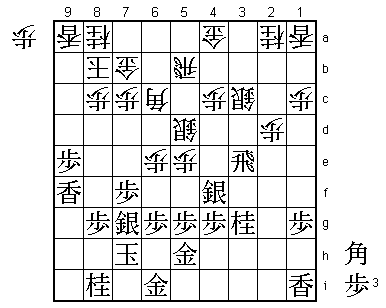
Now it becomes clear why 41.P2d was not so good. Because of the extra pawn, white
can directly start an edge attack, draw out the lance to 9f and drop the bishop on
6c here and black cannot defend the lance. Toyoshima knows that when you are behind
in material, you need to attack because then material becomes less important than
king danger.

51.S4f-4e    05:59:00  04:17:00
52.B6cx9f    05:59:00  04:58:00
53.P*3d      06:04:00  04:58:00
54.S3c-4b    06:04:00  05:17:00

Kubo believes that he has the upper hand, so he plays it quietly. He could also have
tried to win immediately with 54.L*8d. For example, 55.Px3c+ Lx8g+ K6h Sx4e +Px4c P5f
+Px5b +Lx7g Nx7g Px5g+ Gx5g P*5f and it was not immediately clear if this is a mating
threat. In the post-mortem analysis the conclusion was that white indeed has a mate
so black cannot go for the king with S*6a. This being said, the variations are long
and complicated and because the variations are so sharp, it is very easy to make a
mistake that could have grave consequences. Kubo's decision to play 54.S4b is therefore
the right one.

55.B*1h?     06:13:00  05:17:00

Toyoshima was quite pessimistic about his own position here and decides to throw all
caution to the wind. However, in reality the position is still close. If black would
have played 55.Sx5d Rx5d S*9g B6c P*2b here, the white plan is not so easy, while black
threatens Px2a+ followed by N*7e (if then B7d, B*1h is very strong). Kubo had seen all
this, but thought that after P*2b he could play S*4d R3f R8d which looks like a strong
rook switch because the bishop is attacking the rook on 3f, but after R1f it doesn't
seem like white is making significant progress.

56.S5dx4e    06:13:00  05:45:00
57.N3gx4e    06:13:00  05:45:00
58.L*8d      06:13:00  05:45:00
59.S7g-8h    06:26:00  05:45:00
60.S*9h      06:26:00  06:16:00
61.K7h-6h    07:09:00  06:16:00
62.L8dx8g+   07:09:00  06:22:00
63.G6i-7i    07:30:00  06:22:00
64.+L8gx8h   07:30:00  06:36:00
65.G7ix8h    07:30:00  06:36:00
66.S9h-8g+   07:30:00  06:36:00
67.L*9g      07:35:00  06:36:00
68.+S8gx8h   07:35:00  06:43:00
69.L9gx9f    07:35:00  06:43:00
70.P5e-5f    07:35:00  06:48:00
71.N4e-5c+   07:51:00  06:48:00
72.R5bx5c    07:51:00  06:49:00
73.B*4e      07:51:00  06:49:00

The two bishops look threatening, but Kubo knows how to keep them in check.

74.N*6c      07:51:00  07:02:00
75.S*5d      07:51:00  07:02:00
76.S*4d      07:51:00  07:05:00

This closes the white position and decides the game. Kubo said after the game that he
 was sure of victory after playing 74.N*6c. Toyoshima keeps on struggling a little bit,
but in vain.

77.R3e-3h    07:55:00  07:05:00
78.S4dx4e    07:55:00  07:07:00
79.B1hx4e    07:56:00  07:07:00
80.R5cx5d    07:56:00  07:10:00
81.B4ex5d    07:56:00  07:10:00
82.S*4i      07:56:00  07:10:00
83.S*6a      07:56:00  07:10:00
84.B*8f      07:56:00  07:11:00
85.N8i-7g    07:56:00  07:11:00
86.G*7h      07:56:00  07:11:00
87.K6h-5i    07:56:00  07:11:00
88.S4ix3h+   07:56:00  07:11:00
Resigns      07:56:00  07:11:00

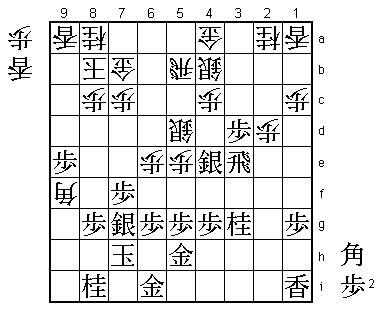
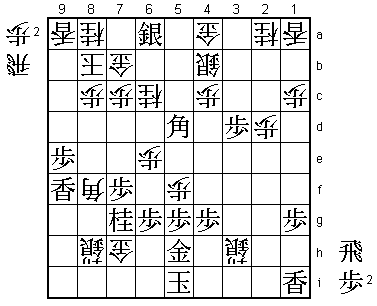
A classic hisshi position. Even though Toyoshima is known for fighting back strongly
from worse position, there is nothing he can do about this, so he resigned. A little
baptism for the young challenger but the man who knows a little about suffering in
his first title match appearances. Still, after the game Toyoshima didn't give the
impression of being rattled. I think he will need to win the second game with the
white pieces to keep this match interesting.
