60th Meijin Match Game 4
Black: Maruyama Tadahisa, Meijin
White: Moriuchi Toshiyuki, Challenger
60th Meijin-sen, Game 4, May 16th and 17th 2002
1.P7g-7f     00:00:00  00:00:00
2.P3c-3d     00:00:00  00:02:00
3.P2g-2f     00:01:00  00:02:00
4.P4c-4d     00:01:00  00:02:00
5.P2f-2e     00:01:00  00:02:00
6.B2b-3c     00:01:00  00:02:00
7.S3i-4h     00:01:00  00:02:00
8.P9c-9d     00:01:00  00:02:00
9.K5i-6h     00:01:00  00:02:00
10.S3a-3b    00:01:00  00:07:00
11.K6h-7h    00:01:00  00:07:00
12.R8b-4b    00:01:00  00:09:00

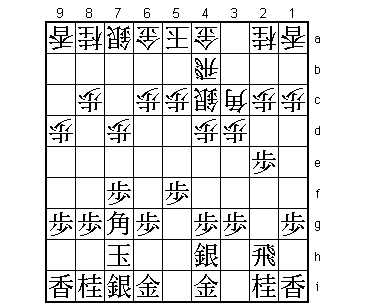
As expected, Moriuchi tries different things with white against
Maruyama. In game 2 he fought Maruyama's specialty (Kakugawari)
head-on and in the top ranking group of the Ryu-O tournament (played
between two Meijin match games) he even used the Kondo-style Nakabisha
quick attack. In this game he opts for the more conservative Shikenbisha,
but despite not being a natural Furibisha player, he shows in this
game that he has studied the opening deeply.

13.P5g-5f    00:01:00  00:09:00
14.S3b-4c    00:01:00  00:09:00
15.B8h-7g    00:02:00  00:09:00
16.P7c-7d!?  00:02:00  00:12:00

Looks a bit early to classic ranging rook players, but this is the
way the Fujii system is played these days. Fujii himself called the
natural 16.S7b a tepid move and preferred this early 16.P7d instead.
If black decides to move into the anaguma quickly with 17.K8h, white
can attack one move faster with 19.N7c followed by N8e. On the other
hand, if black tests the waters with 17.G4i-5h like in the game,
18.S7b leads to a normal position.

17.G4i-5h    00:04:00  00:12:00
18.S7a-7b    00:04:00  00:14:00
19.B7g-8f    00:08:00  00:14:00

Also a move often seen in this type of position. Black doesn't allow
white to play P6d early. The Fujii system also has the option of
attacking by P6d-P6e, so taking this option away is important.

20.K5a-6b    00:08:00  00:33:00
21.P6g-6f    00:08:00  00:33:00
22.P4d-4e    00:08:00  00:58:00
23.S4h-5g    00:11:00  00:58:00
24.G4a-5b    00:11:00  00:59:00
25.K7h-8h    00:16:00  00:59:00
26.S4c-4d    00:16:00  01:12:00
27.G6i-7h    00:23:00  01:12:00
28.K6b-7a    00:23:00  01:42:00
29.G5h-6g    00:25:00  01:42:00
30.S4d-3e    00:25:00  01:50:00
31.B8f-6h    01:02:00  01:50:00
32.P6c-6d    01:02:00  01:51:00
33.P5f-5e    01:03:00  01:51:00
34.S3e-4d    01:03:00  02:37:00
35.S5g-5f    01:04:00  02:37:00
36.R4b-2b    01:04:00  02:37:00
37.P4g-4f    02:19:00  02:37:00

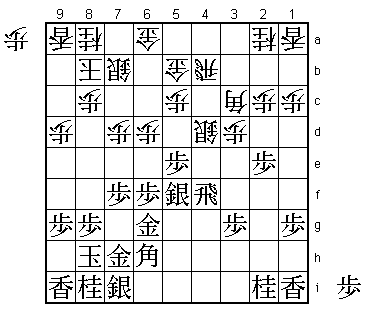
After a very professional like opening with pieces being moved out
and back to take away options for the opponent, the middle game is
finally starting.

38.R2b-4b    02:19:00  03:11:00
39.R2h-4h    02:29:00  03:11:00
40.P4ex4f    02:29:00  03:15:00
41.R4hx4f    02:29:00  03:15:00
42.K7a-8b?   02:29:00  03:38:00

Moriuchi regretted this move. Furibisha hasn't been a passive opening
for years now and moves like completing a castle formation when there
is an active way of playing the position have become suspect. Here
Moriuchi said he should have taken the chance to play actively with
42.P5d. Then, if black plays 43.Px5d, white gets the advantage after
44.P*5e S4g S4e. The critical variation is 43.B8f Px5e Bx6d Px5f and
even when black takes the lance with Bx9a+ it still looks like white
has good attacking chances. This last variation also shows why 42.K8b
is not good. In that case Bx6d is check, so white has no time to take
the silver on 5f.

43.P9g-9f    02:42:00  03:38:00
44.G5b-6c    02:42:00  04:04:00
45.R4f-4h    03:02:00  04:04:00
46.P*4e      03:02:00  04:09:00
47.P2e-2d!   03:20:00  04:09:00

A standard attack, but extremely well timed. White is in trouble.

48.P2cx2d    03:20:00  04:14:00
49.P*2b      03:21:00  04:14:00
50.B3cx2b    03:21:00  05:05:00
51.R4h-2h    03:27:00  05:05:00
52.S4dx5e    03:27:00  05:46:00

53.B6hx2d?   04:57:00  05:46:00

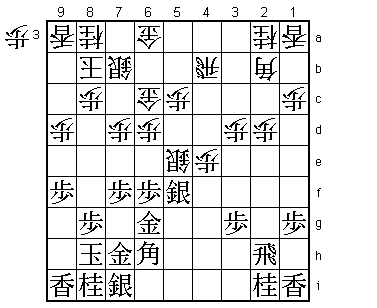
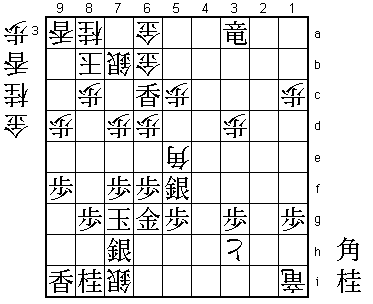
In this position there were three obvious moves: 53.Sx5e, 53.Rx2d and
53.Bx2d. Best was 53.Sx5e, which doesn't look so strong after 54.Bx5e
55.Rx2d 56.P*2b as a move like 57.P*2c is pointless because white can
ignore this move as it only leads to a rook exchange after Px2b+ Rx2b.
However, black can also strongly play 57.Rx3d! Then P*3c R2d or B3c
S*2d is good for black. Black's second best option was 53.Rx2d. After
54.Sx6f Gx6f Bx6f S*7g P*2c Rx2c+ R2b +Rx2b Bx2b R*2c G*3b R2h+ P*2c
the black promoted rook works strongly in defence. Usually Maruyama
loves this kind of position from where he can slowly cook his
opponent. It is unclear why he finally decided to play 53.Bx2d which
is the worst of the three and more or less costs him his Meijin title.

54.R4b-6b    04:57:00  05:48:00
55.S5fx5e    04:57:00  05:48:00
56.B2bx5e    04:57:00  05:48:00
57.S*5f      04:57:00  05:48:00
58.P*2g      04:57:00  06:09:00
59.R2h-4h    04:59:00  06:09:00
60.B5e-3c    04:59:00  06:36:00
61.B2dx3c+   05:00:00  06:36:00
62.N2ax3c    05:00:00  06:36:00
63.P*4d      05:00:00  06:36:00
64.R6b-2b    05:00:00  06:50:00
65.P4d-4c+   05:25:00  06:50:00
66.P2g-2h+   05:25:00  06:50:00
67.+P4cx3c   05:25:00  06:50:00
68.+P2h-3h   05:25:00  06:53:00
69.R4hx4e    05:27:00  06:53:00
70.R2bx2i+   05:27:00  07:03:00
71.R4e-4a+   05:27:00  07:03:00
72.+R2ix1i   05:27:00  07:07:00
73.N*5e      05:43:00  07:07:00

Looks like an overplay, but 73.+P4c fails to 74.B*1d +Rx1a B6i+
G6g-6h (to defend against N*8f) N*8d S6g Nx9f Lx9f S*9i Kx9i +Bx7i
and black is in serious trouble.

74.G6c-6b    05:43:00  07:21:00
75.+R4ax1a   05:45:00  07:21:00
76.B*2d      05:45:00  07:30:00
77.L*6c?     06:34:00  07:30:00

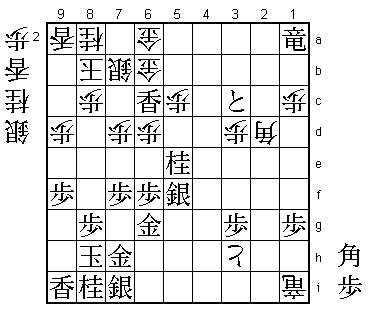
Strange decision. Forcing the attack like this is not Maruyama's style.
Better was 77.+R2b which is good for black after 78.Bx7i+ Gx7i L*8d
B*6h S*5d +P4c S*5h L*6c. Analysis showed that white still seems to
have the upper hand after 78.N*8f, but as Maruyama admitted after
the game, 77.+R2b was the only move to fight from this position.

78.N*8f!     06:34:00  07:34:00

Painful. 79.Px8f Bx7i+ Gx7i S*8g Kx8g +Rx7i easily wins for white.

79.P*5g      06:38:00  07:34:00
80.N8fx7h+   06:38:00  07:37:00
81.S7ix7h    06:49:00  07:37:00
82.B2dx3c    06:49:00  08:10:00
83.+R1a-3a   07:25:00  08:10:00
84.S*7i      07:25:00  08:10:00
85.K8h-7g    07:26:00  08:10:00
86.B3cx5e!   07:26:00  08:20:00

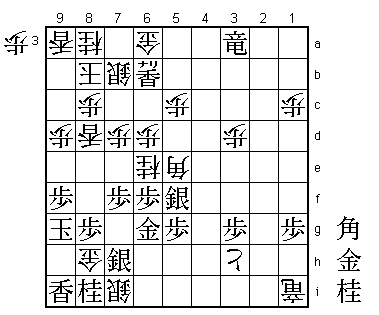
The move that wins the Meijin title. 87.Sx5e Gx6c leaves black without
any attacking hopes, so...

87.L6cx6b+   07:27:00  08:20:00
88.N*6e      07:27:00  08:22:00
89.K7g-8f    07:27:00  08:22:00
90.L*8d      07:27:00  08:30:00
91.K8f-9g    07:29:00  08:30:00
92.G*8h      07:29:00  08:30:00
Resigns      07:40:00  08:30:00

Maruyama took 11 minutes to say goodbye to his title. White threatens
mate with 94.Gx8g Sx8g S8h= Kx8h Lx8g+ etc. As there is also Gx7h
after defending against this mating threat, resigning is only
natural. Somehow it seems that the loss in game 3 has broken the
Maruyama's fighting spirit. The opening was good, but when things
got complicated he seemed to crumble. On the other hand, all credits
to Moriuchi, who played at a high level. He needed a little luck,
but a 4-0 score against a player he usually has a lot of trouble
with is no coincidence. He'll be happy to erase the nasty nickname
"Emperor without a crown": he is no longer the best shogi player
who never won a major title.
