60th Meijin Match Game 3
Black: Moriuchi Toshiyuki, Challenger
White: Maruyama Tadahisa, Meijin
60th Meijin-sen, Game 3, May 8th and 9th 2002
1.P7g-7f     00:00:00  00:00:00
2.P3c-3d     00:00:00  00:01:00
3.P2g-2f     00:01:00  00:01:00
4.P8c-8d     00:01:00  00:01:00
5.P2f-2e     00:01:00  00:01:00
6.P8d-8e     00:01:00  00:02:00
7.G6i-7h     00:01:00  00:02:00
8.G4a-3b     00:01:00  00:02:00
9.P2e-2d     00:01:00  00:02:00
10.P2cx2d    00:01:00  00:02:00
11.R2hx2d    00:01:00  00:02:00
12.P8e-8f    00:01:00  00:02:00
13.P8gx8f    00:01:00  00:02:00
14.R8bx8f    00:01:00  00:02:00
15.R2dx3d    00:01:00  00:02:00

Yokofudori as in the first game. Although Maruyama is a specialist in
this opening, Moriuchi sees no reason to avoid it. He could have opted
for the Aigakari, but Moriuchi seems to have confidence in the counter
strategies he prepared against Maruyama's favourite opening.

16.B2b-3c    00:01:00  00:02:00
17.R3d-3f    00:02:00  00:02:00
18.S3a-2b    00:02:00  00:03:00
19.G4i-3h    00:05:00  00:03:00
20.K5a-4a    00:05:00  00:03:00
21.K5i-5h    00:07:00  00:03:00
22.R8f-8d    00:07:00  00:04:00
23.P*8g      00:07:00  00:04:00
24.S7a-6b    00:07:00  00:05:00
25.R3f-2f    00:14:00  00:05:00
26.P5c-5d    00:14:00  00:05:00
27.S3i-4h    00:32:00  00:05:00
28.P5d-5e    00:32:00  00:08:00
29.S7i-6h    00:33:00  00:08:00
30.R8d-5d    00:33:00  00:12:00
31.P3g-3f    01:02:00  00:12:00
32.P7c-7d    01:02:00  00:20:00
33.P3f-3e    01:12:00  00:20:00
34.N8a-7c    01:12:00  00:40:00
35.P1g-1f    01:21:00  00:40:00
36.G6a-5a    01:21:00  02:16:00
37.G3h-3g    01:46:00  02:16:00
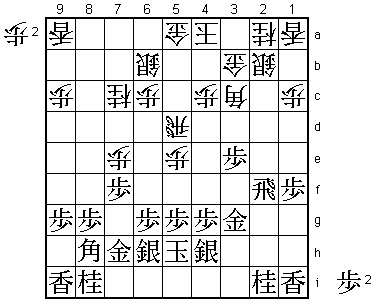
38.P7d-7e!   01:46:00  03:21:00

In his game against Matsuo in the Oi tournament on February 6th, Maruyama
played 38.P*2e instead. Even though he won that game, he thinks that
38.P7e is an improvement.

39.P7fx7e!?  03:46:00  03:21:00

A big surprise for the commentators. This was the move that black
definitely wouldn't play. It seems to make white's attack much easier
and there is also the problem of losing the rook later on. Moriuchi
took 2 hours to decide that 39.Px7e was still the right move to play.
The expected move was 39.G4f, but Moriuchi didn't like 40.R2d P*2e R7d
and because of the pawn on 2e, black doesn't have much options for attack.

40.P5e-5f    03:46:00  03:24:00
41.P6g-6f    03:46:00  03:24:00
42.P5fx5g+   03:46:00  03:56:00
43.S4hx5g    03:47:00  03:56:00
44.P*2e      03:47:00  03:59:00
45.R2f-3f    03:47:00  03:59:00
46.R5dx5g+   03:47:00  05:59:00

Maruyama decides to go for it. Having a rook in hand in this position
is in general better for white as the black position is much more
vulnerable to rook drops. Of course, Moriuchi had seen all of this
when he played 39.Px7e.

47.K5hx5g    03:51:00  05:59:00
48.S*4e      03:51:00  06:01:00
49.R*8a      03:51:00  06:01:00
50.P*7a      03:51:00  06:07:00
51.N8i-7g    04:22:00  06:07:00
52.S4ex3f    04:22:00  06:47:00
53.G3gx3f    04:23:00  06:47:00
54.P*5f      04:23:00  07:00:00
55.K5g-6g    04:42:00  07:00:00
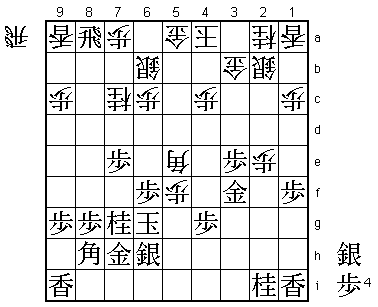
56.B3c-5e!   04:42:00  07:20:00

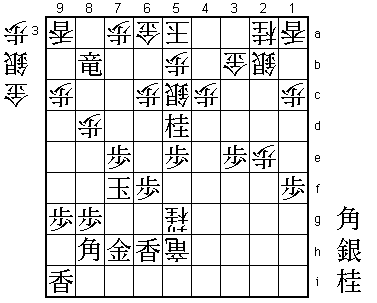
But this move Moriuchi overlooked. The point is that 57.N3g is
answered by 58.R*4h and black is stuck for a good defence against
Rx4g+ next. Also 57.P*5b is bad for black after 58.G6a G4f Bx4f
Px4f R*2g K7f P5g+ B*8c Gx5b P*5c Gx5c.

57.P7e-7d    05:06:00  07:20:00

No choice. The mutual attack is dangerous, but the only way for
black to try and stay in the game.

58.B5ex1i+   05:06:00  07:20:00
59.G3f-3g    05:50:00  07:20:00
60.L*7b!     05:50:00  08:11:00

A typical Maruyama move. 60.Px7c+ Lx7c cuts off black's escape route.
Most commentators favoured white's position here, but Maruyama himself
said he didn't have much confidence in his position here.

61.P*5b      06:57:00  08:11:00
62.G5a-6a    06:57:00  08:11:00
63.S*5a      06:57:00  08:11:00
64.S6bx5a    06:57:00  08:28:00
65.P5bx5a+   06:58:00  08:28:00
66.K4ax5a    06:58:00  08:28:00
67.P*5d      06:58:00  08:28:00
68.P5f-5g+   06:58:00  08:45:00
69.S6hx5g    06:59:00  08:45:00
70.P*5b      06:59:00  08:45:00
71.N7g-6e    07:26:00  08:45:00
72.R*7e      07:26:00  08:50:00

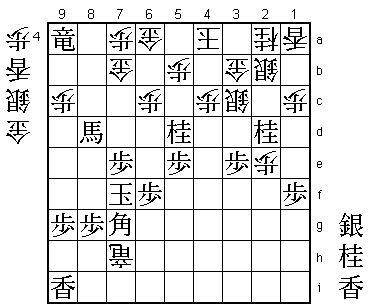
A rather unexpected rook drop, which seems to have caught Moriuchi
by surprise.

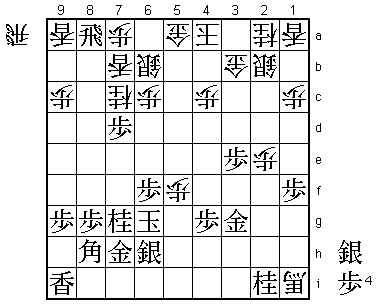
73.R8a-8f+?  07:59:00  08:50:00

A mistake that turns the game in white's favour. Correct was 73.Px7c+.
This looks very dangerous after 74.S*5h K6h +Bx3g Nx3g G*6i Kx5h Rx7h+,
but after N*6h white's attack runs out of steam and black will win
with his extra material.

74.R7ex7d    07:59:00  08:54:00
75.P*7e      08:00:00  08:54:00
76.R7dx5d    08:00:00  08:54:00

White has picked up two important pawns that formed that base of
black's attack. Black basically has to start from zero, which gives
white time to build a decisive attack.

77.P*5e      08:02:00  08:54:00
78.R5d-4d    08:02:00  08:54:00
79.N6ex7c=   08:02:00  08:54:00
80.L7bx7c    08:02:00  08:54:00
81.N*5d      08:02:00  08:54:00
82.S*5c      08:02:00  08:56:00
83.+R8f-8b   08:08:00  08:56:00
84.N*4e      08:08:00  08:56:00
85.S5g-4f    08:13:00  08:56:00
86.L7cx7e    08:13:00  08:57:00
87.P*7f      08:20:00  08:57:00
88.N4ex3g+   08:20:00  08:58:00
89.N2ix3g    08:20:00  08:58:00
90.+B1ix3g   08:20:00  08:59:00

White is now in byoyomi. This is going to have a big impact later on,
as Moriuchi continues to find moves to make it difficult for white.

91.S4fx3g    08:28:00  08:59:00
92.R4dx4g+   08:28:00  08:59:00
93.N*5g      08:28:00  08:59:00
94.N*4e      08:28:00  08:59:00
95.S3g-4h    08:29:00  08:59:00
96.N4ex5g+   08:29:00  08:59:00
97.S4hx5g    08:29:00  08:59:00
98.N*4e      08:29:00  08:59:00
99.P7fx7e    08:32:00  08:59:00
100.N4ex5g+  08:32:00  08:59:00
101.K6g-7f   08:32:00  08:59:00
102.+R4g-5h  08:32:00  08:59:00
103.L*6h     08:38:00  08:59:00
104.P*8d?    08:38:00  08:59:00

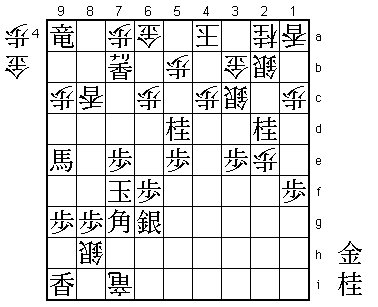
Here Maruyama had his easiest chance to win. 104.G*7b +Rx9a and only
then P*8d leaves black with no hope.

105.B*7c     08:40:00  08:59:00
106.K5a-4a   08:40:00  08:59:00
107.B7cx8d+  08:40:00  08:59:00

Picking up this pawn and creating a promoted bishop to defend the escape
up the board is an important improvement of black's position.

108.G*7b     08:40:00  08:59:00
109.P*4b     08:55:00  08:59:00
110.S5cx4b   08:55:00  08:59:00
111.+R8bx9a  08:55:00  08:59:00
112.+N5gx6h  08:55:00  08:59:00
113.G7hx6h   08:57:00  08:59:00
114.+R5hx6h  08:57:00  08:59:00
115.N*2d     08:57:00  08:59:00
116.+R6h-7h  08:57:00  08:59:00
117.B8h-7g   08:57:00  08:59:00
118.S4b-3c?  08:57:00  08:59:00

A second chance missed. Here 118.S*6g K8f and only then S4b-3c would
have won easily. Still, Maruyama still has a winning position, but
Moriuchi is getting closer and closer.

119.S*6g     08:58:00  08:59:00
120.+R7h-7i  08:58:00  08:59:00
121.L*7d     08:58:00  08:59:00
122.L*8c     08:58:00  08:59:00
123.+B8d-9e  08:58:00  08:59:00
124.S*8h     08:58:00  08:59:00
125.L7dx7b+  08:58:00  08:59:00

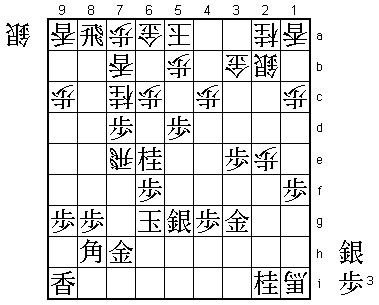
126.G6ax7b?? 08:58:00  08:59:00

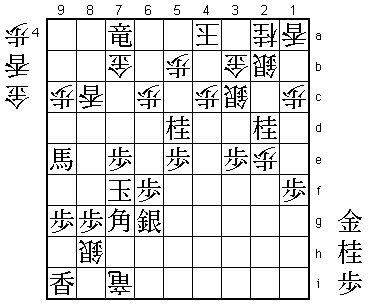
The blunder that will go down in history. Winning was 126.Sx7g+ +Bx7g
G*8e K6e B*3h S5f Gx7e Kx7e +Rx7g G*7f Bx5f+ which is a mating threat
that defends against the black mating threat.

127.+R9ax7a  08:58:00  08:59:00
Resigns      08:58:00  08:59:00

After this move, Maruyama immediately realised what he had done. Black
has mate after 128.Gx7a P*4b Sx4b Nx3b+ Kx3b N*2d K2c G*3d K1d G*1e.
He had a long look at the ceiling and resigned. The shogi gods seem
to be smiling on Moriuchi in this match. However, even though this was
a game that Maruyama lost instead of one that Moriuchi lost, one has to
take into account that Moriuchi kept on fighting in a hopeless position.
This in the end brought him the victory that made him go 3-0 up with
four games to play. He is now very close to his first major title, as
no player has ever come back from 3-0 down in a best-of-seven match.
