60th Meijin Match Game 2
Black: Maruyama Tadahisa, Meijin
White: Moriuchi Toshiyuki, Challenger
60th Meijin-sen, Game 2, April 24th and 25th 2002
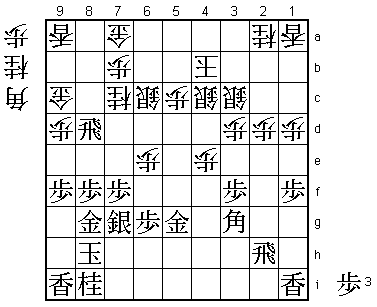
1.P7g-7f 00:00:00 00:00:00
2.P8c-8d 00:00:00 00:02:00
3.P2g-2f 00:01:00 00:02:00
4.G4a-3b 00:01:00 00:02:00
5.G6i-7h 00:03:00 00:02:00
6.P8d-8e 00:03:00 00:02:00
7.B8h-7g 00:03:00 00:02:00
8.P3c-3d 00:03:00 00:02:00
9.S7i-8h 00:04:00 00:02:00
10.B2bx7g+ 00:04:00 00:02:00
11.S8hx7g 00:05:00 00:02:00
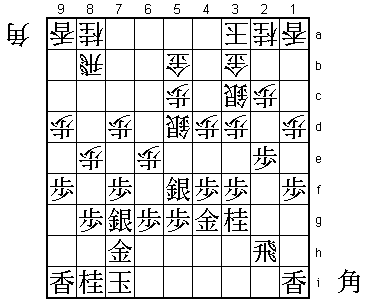
A brave decision to play the Bishop Exchange opening. Before the game
there were three opening scenarios discussed by the commentators.
Moriuchi would either play Shikenbisha, the Chuza variation of the
Yokofudori or defend against the Kakugawari (Bishop Exchange). The
Shikenbisha seemed most likely. In the Chuza variation of the
Yokofudori, white is expected to attack first and this is quite
dangerous against Maruyama, who is extremely good at stopping the
opponent's attack. The Kakugawari seemed to be even more risky, as
Maruyama is (together with Tanigawa) the leading expert in this
opening. In the last three years, Maruyama has had an overwhelming
record of 14 wins against only two losses with this opening when he
played black. Still, Moriuchi decides to meet it head on. A choice
that was made a little bit easier by his win in the first game, but
he must have felt that it would be hard to become Meijin if he
couldn't beat Maruyama in his specialty.
12.S3a-4b 00:05:00 00:02:00
13.P9g-9f 00:07:00 00:02:00
14.S7a-7b 00:07:00 00:02:00
15.S3i-3h 00:07:00 00:02:00
16.P9c-9d 00:07:00 00:06:00
17.P4g-4f 00:09:00 00:06:00
18.P6c-6d 00:09:00 00:09:00
19.S3h-4g 00:10:00 00:09:00
20.S7b-6c 00:10:00 00:09:00
21.K5i-6h 00:11:00 00:09:00
22.P1c-1d 00:11:00 00:11:00
23.P1g-1f 00:12:00 00:11:00
24.K5a-4a 00:12:00 00:12:00
25.K6h-7i 01:06:00 00:12:00
26.G6a-5b 01:06:00 00:16:00
27.P3g-3f 01:21:00 00:16:00
28.S6c-5d 01:21:00 00:38:00
29.G4i-5h 01:30:00 00:38:00
30.P6d-6e 01:30:00 00:53:00
31.S4g-5f 01:38:00 00:53:00
32.P4c-4d 01:38:00 00:56:00
33.N2i-3g 01:51:00 00:56:00
34.K4a-3a 01:51:00 00:58:00
35.G5h-4g 01:51:00 00:58:00
36.S4b-3c 01:51:00 01:07:00
37.P2f-2e 01:52:00 01:07:00
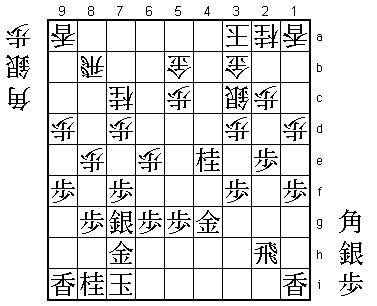
38.P7c-7d 01:52:00 01:38:00
Positive play. If black allows B*6d next, it will be hard to attack,
so it is now or never. Still, opening the diagonal to the rook is
risky and this is why most games continue with 38.G5b-4c followed by K2b.
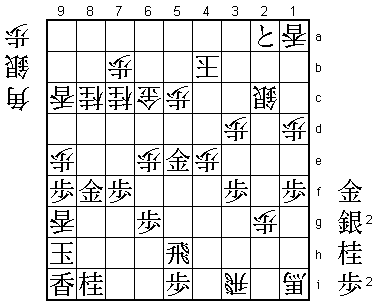
39.P4f-4e 02:31:00 01:38:00
40.P4dx4e 02:31:00 02:07:00
41.S5fx4e 02:32:00 02:07:00
42.S5dx4e 02:32:00 03:15:00
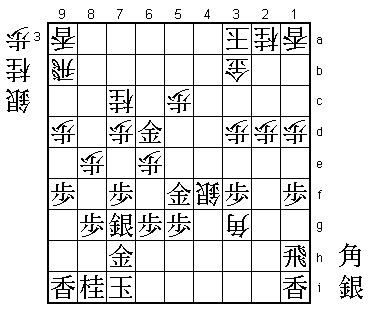
43.B*5e! 03:04:00 03:15:00
Subtle move. Black forces the knight to 7c, allowing to play a strong
attack later on. Black has the advantage here.
44.B*7c 03:04:00 03:18:00
45.B5ex7c+ 03:05:00 03:18:00
46.N8ax7c 03:05:00 03:18:00
47.N3gx4e 03:05:00 03:18:00
48.B*6d 03:05:00 04:09:00
The point of 43.B*5e. If white plays 48.S4d here, black has 49.S*6d
with attack on the knight. White has no good defence against that.
49.P*4f 03:19:00 04:09:00
50.S3c-4d 03:19:00 04:09:00
51.B*6a 05:09:00 04:09:00
52.S4dx4e 05:09:00 04:38:00
In the press room 52.S*6c was expected, but Moriuchi pointed out
after the game that 53.S*7a R8d Bx5b+ Sx5b S6b+ is good for black.
53.P2e-2d 05:12:00 04:38:00
54.P2cx2d 05:12:00 04:40:00
55.B6ax5b+ 05:12:00 04:40:00
56.R8bx5b 05:12:00 04:40:00
57.G*6c 05:12:00 04:40:00
58.R5b-9b 05:12:00 04:42:00
59.G6cx6d 05:12:00 04:42:00
60.S4ex4f 05:12:00 04:42:00
61.G4g-5f 05:13:00 04:42:00
61.G4h or 61.Gx4f also look good for black. Still, 61.G5f is not a
bad move.
62.B*3g 05:13:00 05:33:00
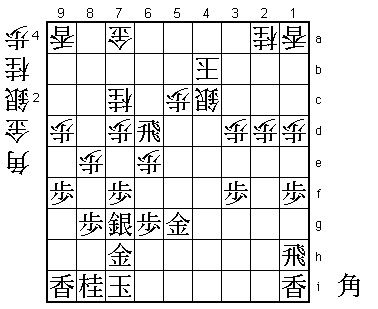
63.R2h-1h? 06:09:00 05:33:00
This is an important mistake which turns the tables. As Habu pointed
out 63.Rx2d P*2c R2g Bx1i+ Gx7c L*2d P*2e +B1h Px2d +Bx2g Gx4f R*4i
K8h Rx4f+ L*2i would have been good for black as white can't move
the promoted bishop without allowing Px2c+.

64.S4fx5g+   06:09:00  05:59:00
65.G5fx5g    06:53:00  05:59:00
66.B3gx6d+   06:53:00  06:02:00
67.B*6a      07:00:00  06:02:00
68.R9b-4b    07:00:00  06:42:00
69.S*4c      07:01:00  06:42:00
70.G3bx4c    07:01:00  06:42:00
71.S*5a      07:01:00  06:42:00
72.R4b-4a    07:01:00  06:42:00
73.B6ax4c+   07:01:00  06:42:00
74.R4ax4c    07:01:00  06:42:00
75.G*4b      07:12:00  06:42:00
76.R4cx4b    07:12:00  06:42:00
77.S5ax4b+   07:12:00  06:42:00
78.K3ax4b    07:12:00  06:42:00
79.R*4d      07:12:00  06:42:00
80.S*4c      07:12:00  06:44:00
81.R4dx6d    07:12:00  06:44:00
82.G*7a!     07:12:00  06:45:00
Good move. This not only defends against the rook promotion on 6b,
it also aims at capturing the rook. The more natural looking 82.G*5a
would be answered with 82.R6c+ and it is almost impossible to kill
the dragon.
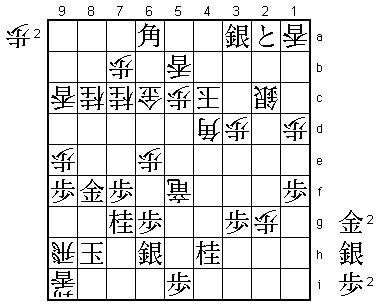
83.B*4f!? 07:38:00 06:45:00
83.R6c+ fails to S*7b +Rx7d G*6c, and both 83.B*6b G*5d R6c+ S*7b
+Rx5d Gx6b and 83.B*8b Gx8b R6b+ S*5b +Rx8b B*9c are also winning
for white, so most commentators thought the game would be over soon
here. 83.B4f is a very hard move to play, as this is black's final
piece and using a major piece for a drop outside the enemy camp
seems to be a terrible waste. However, it is a tribute to Maruyama's
strength that he still plays this brave move, which is the only way
to try and hang in there.
84.S*5d 07:38:00 07:19:00
85.R1h-2h 07:57:00 07:19:00
86.S*3c 07:57:00 07:33:00
87.R6dx7d 08:05:00 07:33:00
88.P*7b 08:05:00 07:36:00
89.K7i-8h 08:12:00 07:36:00
90.P8e-8f 08:12:00 07:45:00
91.P8gx8f 08:13:00 07:45:00
92.P*4e 08:13:00 08:02:00
93.B4f-3g 08:16:00 08:02:00
94.P*8g 08:16:00 08:15:00
95.G7hx8g 08:29:00 08:15:00
96.S5d-6c 08:29:00 08:17:00
97.R7d-8d 08:31:00 08:17:00
98.G*9c? 08:31:00 08:28:00
By carefully filling all the holes in his camp with piece drops,
Moriuchi has built a winning position. However, 98.G*9c is a mistake.
White would have won quickly after 98.G*7d R8c+ P*8b.

99.P*4d      08:33:00  08:28:00
100.S4c-3b   08:33:00  08:29:00
101.R8d-6d   08:33:00  08:29:00
102.G7a-6b   08:33:00  08:33:00
103.P*2e     08:39:00  08:33:00
104.S6cx6d   08:39:00  08:38:00
105.B3gx6d   08:42:00  08:38:00
106.R*3i?    08:42:00  08:38:00

Better was the simple 106.S4d.

107.P2ex2d   08:44:00  08:38:00
108.P*2g     08:44:00  08:39:00
109.R2h-5h   08:46:00  08:39:00
110.S3cx4d   08:46:00  08:39:00
111.P2d-2c+  08:48:00  08:39:00
112.S3bx2c   08:48:00  08:41:00
113.P*2b     08:48:00  08:41:00
114.G6b-6c   08:48:00  08:44:00
115.B6d-7e   08:48:00  08:44:00
116.P*8e     08:48:00  08:46:00
117.P*5i     08:50:00  08:46:00
118.P8ex8f   08:50:00  08:46:00
119.S7gx8f   08:50:00  08:46:00
120.N*8c     08:50:00  08:48:00
121.B7ex9c+  08:51:00  08:48:00
122.L9ax9c   08:51:00  08:49:00
123.P2bx2a+  08:51:00  08:49:00

With this promoted pawn near the king, black suddenly has good chances
for attack. It can be called only luck that white still has a way to
win in this position.

124.B*5e     08:51:00  08:49:00
125.K8h-9h   08:51:00  08:49:00
126.P*8e     08:51:00  08:55:00
127.S8f-7g   08:51:00  08:55:00
128.P9d-9e   08:51:00  08:55:00
129.G5g-5f   08:54:00  08:55:00
130.B5ex1i+  08:54:00  08:55:00
131.N*5e     08:54:00  08:55:00
132.S4dx5e   08:54:00  08:55:00
133.G5fx5e   08:54:00  08:55:00
134.N*8f     08:54:00  08:55:00
135.S7gx8f   08:54:00  08:55:00
136.P8ex8f   08:54:00  08:56:00
137.G8gx8f   08:54:00  08:56:00
138.L*9g!    08:54:00  08:56:00
Moriuchi must have been very happy that he found this move, which is
the only way for white to win. Simply 138.Px9f G4d S*9g Nx9g Px9g+ K8i
N*7g K7i is winning for black. Without a pawn drop on the 7th file,
white has no way to get to the king.

139.K9h-8h   08:54:00  08:56:00

No choice. After 139.Nx9g or 139.Kx9g, the white attack gains decisive
speed after 140.Px9f.

140.+B1ix5e  08:54:00  08:56:00
141.R5hx5e   08:54:00  08:56:00
142.B*4d     08:54:00  08:56:00
143.B*7g     08:55:00  08:56:00
144.S*6h     08:55:00  08:58:00
145.R5ex4e   08:56:00  08:58:00
146.S6hx7g=  08:56:00  08:58:00
147.N8ix7g   08:56:00  08:58:00
148.B*5e     08:56:00  08:58:00
149.S*6h     08:57:00  08:58:00
150.L9gx9i+  08:57:00  08:58:00
151.K8h-7h   08:59:00  08:58:00
152.R3ix3f+  08:59:00  08:58:00
153.R4ex4d   08:59:00  08:58:00
154.B5ex4d   08:59:00  08:58:00
155.B*6a     08:59:00  08:58:00
156.L*5b     08:59:00  08:58:00
157.S*3a     08:59:00  08:58:00
158.K4b-4c   08:59:00  08:58:00
159.P*3g     08:59:00  08:58:00
160.+R3f-5f  08:59:00  08:58:00
161.N*4h     08:59:00  08:58:00
162.G*8h     08:59:00  08:58:00
163.K7hx8h   08:59:00  08:58:00
164.R*9h     08:59:00  08:58:00
Resigns      08:59:00  08:58:00
White wins after both 165.K8g Rx6h+ or 165.K7i +L8i Kx8i Rx6h+. A huge
win for Moriuchi, who now defeated Maruyama in his two favourite
openings. Still, in this second game it was not Maruyama's opening
that was the cause for his defeat, so if he is able to win game three,
it will still be Moriuchi who has to come up with something new in
game 4. Maruyama has a very important game coming up. Going 3-0 down
will almost certainly mean the loss of his Meijin title...