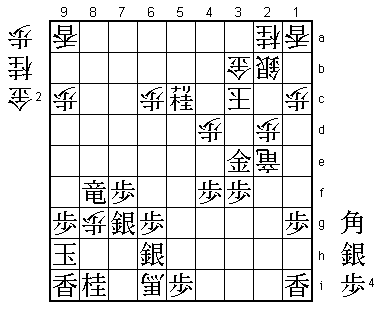
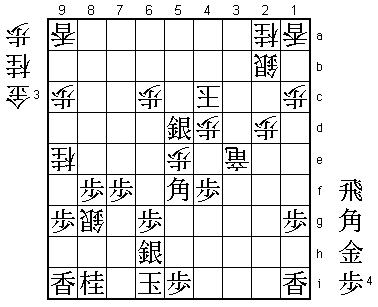
59th Oza Match Game 3
[Black "Watanabe Akira, Challenger"]
[White "Habu Yoshiharu, Oza"]
[Event "59th Oza-sen, Game 3"]
[Date "September 27th 2011"]
1.P7g-7f     00:00:00  00:00:00

Habu has won 19 consecutive Oza titles and won the last six Oza matches in straight
games, but he must win this game to stay in the match. The last time that he was
in this a must-win situation in the Oza match was eight years ago. His opponent
then: Watanabe.

2.P3c-3d     00:00:00  00:00:00
3.P2g-2f     00:01:00  00:00:00
4.P8c-8d     00:01:00  00:01:00
5.P2f-2e     00:01:00  00:01:00
6.P8d-8e     00:01:00  00:04:00
7.G6i-7h     00:02:00  00:04:00
8.G4a-3b     00:02:00  00:05:00
9.P2e-2d     00:03:00  00:05:00
10.P2cx2d    00:03:00  00:06:00
11.R2hx2d    00:03:00  00:06:00
12.P8e-8f    00:03:00  00:08:00
13.P8gx8f    00:04:00  00:08:00
14.R8bx8f    00:04:00  00:08:00
15.R2dx3d    00:06:00  00:08:00
16.B2b-3c    00:06:00  00:09:00
17.R3d-3f    00:07:00  00:09:00
18.R8f-8d    00:07:00  00:10:00
19.R3f-2f    00:09:00  00:10:00
20.S3a-2b    00:09:00  00:10:00
21.P*8g      00:10:00  00:10:00
22.K5a-5b    00:10:00  00:11:00
23.K5i-5h    00:12:00  00:11:00
24.P7c-7d    00:12:00  00:15:00
25.G4i-3h    00:19:00  00:15:00
26.S7a-6b    00:19:00  00:17:00
27.S3i-4h    00:21:00  00:17:00
28.G6a-5a    00:21:00  00:19:00
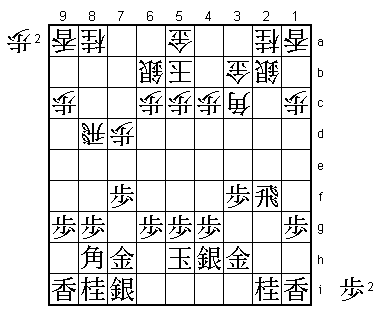
29.P3g-3f    00:35:00  00:19:00

This move decides how the opening will play out. No slow build-ups, after this move
both players force themselves into a sharp fight.

30.P*8f      00:35:00  01:03:00

"Allowing P3e would be a strategic defeat" (Habu).

31.P8gx8f    00:36:00  01:03:00
32.R8dx8f    00:36:00  01:03:00

Threatens to take the side pawn on 7f.

33.P3f-3e    00:37:00  01:03:00

Defends the side pawn, but this leaves white with another attack.

34.R8f-8e?!  00:37:00  01:08:00

Unclear if this was a real mistake. The obvious attack here is 34.Rx8h+ Sx8h B*5e
which sets the board on fire. Habu tries to make this variation more appealing for
white. If black answers 34.R8e with 35.R3f, then 36.Rx8h+ Sx8h B*5e is even better,
because after N7g Bx1i+ the promoted bishop on 1i attacks the knight on 2i (which
is now undefended) and can also move to 1h, attacking the black rook (which is now
on 3f instead of 2f). However, Watanabe has come prepared.

35.S4h-3g!   00:50:00  01:08:00

Lures the rook away from the 8th file.

36.R8ex3e    00:50:00  01:18:00
37.P*8b      01:02:00  01:18:00

Uses the undefended 8th file to make a promoted pawn. Actually, the white attack
is still quite strong, so it is not clear whether Watanabe's plan is good, but as
he pointed out after the game: "P*8b is the only way to play here. If it is bad,
the whole black strategy is bad".

38.N8a-7c    01:02:00  01:41:00
39.P8b-8a+   01:03:00  01:41:00
40.B3cx8h+   01:03:00  01:42:00
41.S7ix8h    01:03:00  01:42:00
42.P*8g      01:03:00  01:42:00
43.S8h-7g    01:30:00  01:42:00
44.B*4d      01:30:00  01:46:00
45.R2f-4f    01:42:00  01:46:00
46.R3e-2e    01:42:00  01:56:00

With B*4d and R2e, white has used the major pieces effectively and is set up for
a strong attack.

47.S3g-2h    01:55:00  01:56:00

This is no really a safe way to play, but black has no choice. After 47.P*2f R8e
the tokin on 8a is attack and white also threatens N6e or P8h+.

48.B4d-5e    01:55:00  02:06:00
49.+P8a-8b   02:57:00  02:06:00

Watanabe is determined to live or die with this tokin. If it can be used in attack
in time, he will win the game. If not, he will lose. Actually, Habu was surprised
that Watanabe pulled back the tokin here.

50.N7c-6e    02:57:00  03:13:00
51.+P8b-7b   02:58:00  03:13:00
52.B5ex4f    02:58:00  03:14:00
53.P4gx4f    02:58:00  03:14:00
54.N6ex5g+   02:58:00  03:15:00
55.K5hx5g    02:58:00  03:15:00
56.R*5i      02:58:00  03:15:00
57.K5g-4g    03:13:00  03:15:00
58.R2e-5e    03:13:00  03:42:00
59.G7h-6h    03:43:00  03:42:00
60.P*2g      03:43:00  03:46:00
61.S2hx2g    03:51:00  03:46:00
62.R5i-4i+   03:51:00  03:50:00
63.B*4h      03:53:00  03:50:00
64.+R4ix2i   03:53:00  03:51:00

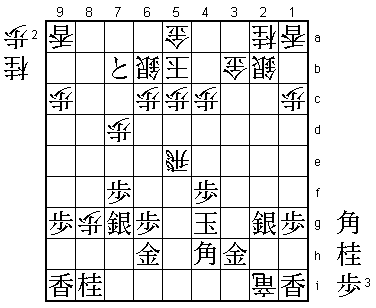
65.P*5f?     03:53:00  03:51:00

Watanabe said after the game that he should have played 65.P*3f instead. For example,
66.P*2f Sx2f N*5f B6f +R4i K3g and it is not easy to catch the black king.

66.N*3e!     03:53:00  03:59:00

Watanabe had underestimated this knight drop. He expected white to move the rook,
after which P*3f would have lead to a perfectly safe king position. After N*3e, the
position becomes very sharp again, something Watanabe was hoping to avoid.

67.K4g-5h    04:09:00  03:59:00
68.R5ex5f    04:09:00  04:00:00
69.G6h-5g    04:09:00  04:00:00
70.R5f-5d    04:09:00  04:09:00
71.N*6f      04:22:00  04:09:00
72.R5d-3d    04:22:00  04:18:00
73.B*5f      04:24:00  04:18:00
74.N3ex2g+   04:24:00  04:34:00
75.G3hx2g    04:24:00  04:34:00
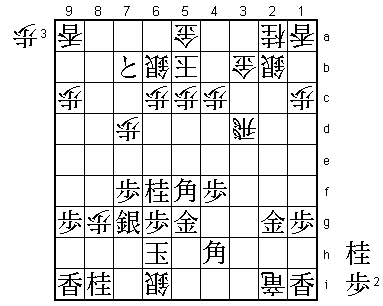
76.S*6i?     04:24:00  04:42:00

This is a mistake. Correct was 76.S*4i K6h S3h+ B5i R2d which removes the threats to
both rooks while keeping the attack going. However, even in that case Watanabe showed
great resilience in the post-mortem analysis and no clear path to victory for white
was found.

77.K5h-6h    04:24:00  04:42:00

78.+R2i-4i?  04:24:00  04:48:00

In the press room 78.R3i+ 79.Bx3i 80.+Rx3i was analyzed. This is not a mating threat,
but moves like B*5i are very strong, so the general opinion was that this position
would be very hard to defend for black. In the post-mortem analysis the following
variations appeared: 81.+Px6b Gx6b R*8a G3a N*3d (threatens mate after S*4a Gx4a
Rx4a+ Kx4a G*4b) B*5a K7i B1e+ (attack and defense, because this bishop covers the
mating square 4b) G*2f (this gold cannot be taken because of the previous mate) +B5a
and white still has a lot to play for.

79.+P7bx6b   04:44:00  04:48:00
80.G5ax6b    04:44:00  04:48:00
81.B5fx3d    04:44:00  04:48:00
82.+R4ix4h   04:44:00  04:49:00
83.K6hx6i    04:44:00  04:49:00
84.B*1d!     04:44:00  04:51:00

This bishop looks out of place, but it defends against the mating threat N*4d K4b
Nx3b+ Kx3b S*2c etc.

85.P*2e      04:48:00  04:51:00
86.P8g-8h+   04:48:00  04:51:00
87.G5g-5h    04:52:00  04:51:00

88.+P8h-7h?  04:52:00  04:51:00

Habu is going all in, but 88.+R3i was probably better. For example, 89.P*5i +Rx3d
Sx8h +Rx2e N*2f and because the white attack has lost some steam, it is not an easy
variation to play. However, both players agreed that this position is far from clear.

89.K6ix7h    04:52:00  04:51:00
90.+R4hx5h   04:52:00  04:51:00
91.S*6h      04:52:00  04:51:00
92.P*8f      04:52:00  04:54:00
93.N*4d      04:53:00  04:54:00
94.K5b-4b    04:53:00  04:54:00
95.R*8b      04:53:00  04:54:00
96.P8f-8g+   04:53:00  04:55:00
97.R8bx8g+   04:54:00  04:55:00
98.P4cx4d    04:54:00  04:57:00
99.+R8g-8b   04:54:00  04:57:00
100.G*5a     04:54:00  04:57:00
101.N6fx7d   04:57:00  04:57:00
102.G6b-5b   04:57:00  04:57:00
103.P*5i     04:59:00  04:57:00
104.+R5h-3h  04:59:00  04:57:00
105.B3dx5b+  04:59:00  04:57:00
106.G5ax5b   04:59:00  04:57:00
107.N7d-6b+  04:59:00  04:57:00
108.B1dx2e   04:59:00  04:57:00
109.+N6bx5b  04:59:00  04:57:00
110.K4b-3c   04:59:00  04:57:00
111.P*3f     04:59:00  04:57:00
112.P*8f     04:59:00  04:57:00
113.G*3e     04:59:00  04:57:00
114.B*8g     04:59:00  04:58:00
115.K7h-8h   04:59:00  04:58:00
116.+R3hx2g  04:59:00  04:59:00
117.+R8bx8f  04:59:00  04:59:00
118.B8g-6i+  04:59:00  04:59:00
119.+N5bx5c  04:59:00  04:59:00
120.P*8g     04:59:00  04:59:00
121.K8h-9h   04:59:00  04:59:00
122.P*2d     04:59:00  04:59:00
123.G3ex2e   04:59:00  04:59:00
124.+R2gx2e  04:59:00  04:59:00
125.G*3e     04:59:00  04:59:00

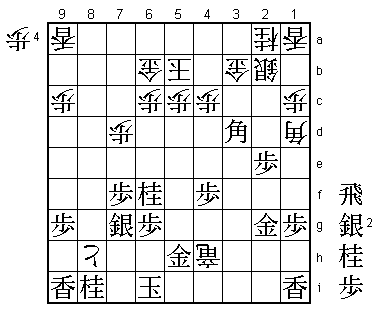
This required a lot of guts, because it is not a mating threat and the white attack
still looks quite dangerous. Watanabe admitted after the game that he wasn't really
sure that this was good and that maybe the tables could have been turned here. Still,
no good way was found for white to give the attack decisive strength.

126.G*7h     04:59:00  04:59:00

Habu is giving it everything he's got. This is another mating threat.

127.+R8fx8g  04:59:00  04:59:00

Watanabe, renowned for his attacking skills, brings the game home with some stingy
defense.

128.G7hx6h   04:59:00  04:59:00
129.S7gx6h   04:59:00  04:59:00
130.+B6ix8g  04:59:00  04:59:00
131.K9hx8g   04:59:00  04:59:00
132.R*8e     04:59:00  04:59:00
133.P*8f     04:59:00  04:59:00
134.N*9e     04:59:00  04:59:00
135.K8g-7h   04:59:00  04:59:00
136.S*8g     04:59:00  04:59:00
137.K7h-6i   04:59:00  04:59:00
138.R8ex3e   04:59:00  04:59:00
139.P3fx3e   04:59:00  04:59:00
140.+R2ex3e  04:59:00  04:59:00
141.B*5f     04:59:00  04:59:00
142.P*5e     04:59:00  04:59:00
143.G*4c     04:59:00  04:59:00
144.G3bx4c   04:59:00  04:59:00
145.+N5cx4c  04:59:00  04:59:00
146.K3cx4c   04:59:00  04:59:00
147.S*5d     04:59:00  04:59:00
Resigns      04:59:00  04:59:00

Finally, Habu succumbs. After 148.Kx5d R*5b K4c (G*5c B*6e K6d G*7d) G*5c K3c R4b+
it is mate. And just like that, Habu's 19-year reign as Oza has come to an end.
Watanabe finally adds a second crown to the Ryu-O title he has held for so long.
Watanabe has been so dominant in this Oza match that one cannot help but feel that
we witnessed the moment of passing the torch, going from the Habu-era to the
Watanabe-era.
