59th Oza Match Game 2
[Black "Habu Yoshiharu, Oza"]
[White "Watenabe Akira, Challenger"]
[Event "59th Oza-sen, Game 2"]
[Date "September 20th 2011"]
1.P2g-2f     00:00:00  00:00:00
2.P8c-8d     00:00:00  00:01:00
3.P2f-2e     00:03:00  00:01:00
4.P8d-8e     00:03:00  00:01:00
5.G6i-7h     00:04:00  00:01:00
6.G4a-3b     00:04:00  00:01:00
7.P2e-2d     00:07:00  00:01:00
8.P2cx2d     00:07:00  00:01:00
9.R2hx2d     00:07:00  00:01:00
10.P*2c      00:07:00  00:01:00
11.R2d-2f    00:07:00  00:01:00

For this second game, Habu has selected the Aigakari opening. After the game, candid
as always, Watanabe admitted that this was a big surprise and that he was almost
completely unprepared for this opening.

12.S7a-7b    00:07:00  00:04:00
13.S3i-3h    00:12:00  00:04:00
14.P6c-6d    00:12:00  00:06:00
15.P7g-7f    00:17:00  00:06:00
16.P8e-8f    00:17:00  00:09:00
17.P8gx8f    00:17:00  00:09:00
18.R8bx8f    00:17:00  00:09:00
19.P*8g      00:18:00  00:09:00
20.R8f-8b    00:18:00  00:10:00
21.K5i-5h    00:21:00  00:10:00
22.S7b-6c    00:21:00  00:14:00
23.P3g-3f    00:25:00  00:14:00
24.P3c-3d    00:25:00  00:14:00
25.P3f-3e    00:28:00  00:14:00
26.P3dx3e    00:28:00  00:16:00
27.S3h-3g    00:32:00  00:16:00
28.B2bx8h+   00:32:00  00:27:00
29.S7ix8h    00:33:00  00:27:00
30.S3a-2b    00:33:00  00:27:00
31.P*3d      00:41:00  00:27:00
32.G6a-5b    00:41:00  00:31:00
33.S3g-4f    00:47:00  00:31:00
34.S6c-5d    00:47:00  00:35:00
35.G4i-3h    00:55:00  00:35:00
36.P4c-4d    00:55:00  00:38:00
37.P7f-7e    01:03:00  00:38:00
38.K5a-4b    01:03:00  00:42:00
39.N8i-7g    01:13:00  00:42:00
40.P1c-1d    01:13:00  01:06:00

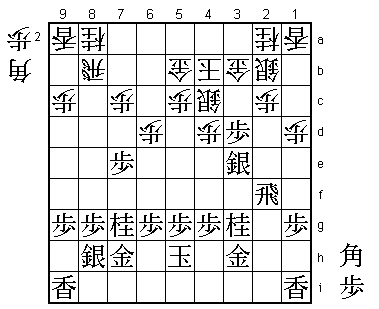
In the Nakagawa Style of this opening, the pawns on the first file are not pushed.
However, at some point white has no choice but to play P1d. Watanabe plays it here,
admitting that it maybe a little passive, but he didn't like having to worry about
a bishop drop on 1e at some point. Black uses the extra tempo gained by avoiding P1f
to strengthen his attacking position.

41.S4fx3e    01:45:00  01:06:00
42.S5d-4c    01:45:00  01:06:00
43.N2i-3g!?  01:48:00  01:06:00

An aggressive knight sacrifice, but it is unclear if it is good. If it turns out
that 43.N3g is not good, black can also try 43.P8f here. Watanabe had planned to
answer this with 44.P*3c Px3c+ Sx3c P8e P1e R8f B*6c! and now white can answer P8d
with P*8e and also threatens P1f Px1f P*1h. According to Watanabe, this position
is playable for both sides.

44.B*5d      01:48:00  01:32:00

White has no choice but to go for the knight, because the black attacking formation
with two knights on 7g and 3g is getting too strong. However, the bishop on 5d is
going to be a target. Combined with not having the bishop in hand anymore, black
probably has enough compensation for the knight.

45.R2f-6f    02:03:00  01:32:00
46.P2c-2d    02:03:00  01:54:00
47.R6fx6d    02:32:00  01:54:00
48.P*6c      02:32:00  01:56:00
49.R6d-6f    02:32:00  01:56:00
50.P*3f      02:32:00  01:56:00
51.P5g-5f    02:35:00  01:56:00
52.P3fx3g+   02:35:00  02:11:00
53.G3hx3g    02:35:00  02:11:00

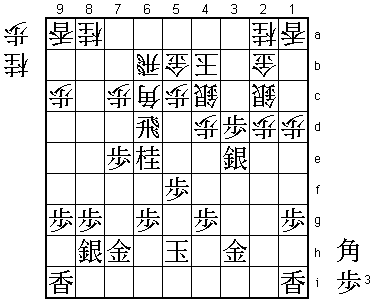
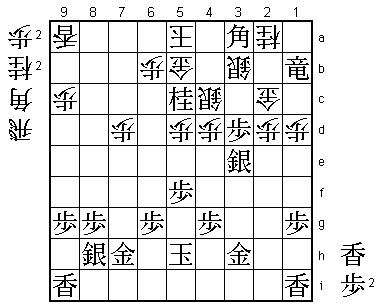
Surprisingly, Watanabe said after the game that he was quite happy with his position
here, being a knight up. He added that the problem was something he played after that,
but in the post-mortem analysis it did not become clear what his mistake was.

54.P6c-6d    02:35:00  02:24:00
55.R6fx6d    02:36:00  02:24:00
56.B5d-6c    02:36:00  02:24:00
57.G3g-3h    02:42:00  02:24:00
58.S2b-2c    02:42:00  02:26:00
59.P*2b      02:49:00  02:26:00
60.G3bx2b    02:49:00  02:27:00
61.N7g-6e    02:50:00  02:27:00
62.R8b-6b    02:50:00  03:21:00

This move carries a nasty threat. For example, 63.Sx4d is a blunder because of 64.N*6f
Px6f B8e and black loses.

63.P7e-7d    03:01:00  03:21:00

This is the light way to respond, closing the diagonal of the bishop and thus defending
against B8e. In the press room the more aggressive 63.Nx7c+ was analyzed. The point is
that because this knight no longer blocks the rook, this rook now defends the square 6f,
so the knight drop on 6f is no longer possible. For example, 64.Nx7c P*7d and now B2g+
looks very strong, but after Rx6b+ Gx6b Gx2g N6e P7c+ R*3h B*4h G5b R*6a black has the
better position. In the post-mortem analysis both players were lukewarm to the suggestion.
Watanabe said that sacrificing two knights is not something black wants to do, but that
the variation above showed that it might be playable. Habu just said that 63.P7d was
the natural move to play in this position. Hard to disagree here, because also after
P7d black gets the advantage.

64.P7cx7d    03:01:00  03:29:00
65.B*8d      03:16:00  03:29:00
66.P*6a      03:16:00  03:39:00
67.N6e-7c+   03:43:00  03:39:00
68.N8ax7c    03:43:00  03:39:00
69.B8dx7c+   03:43:00  03:39:00
70.B6c-5d    03:43:00  03:40:00
71.+B7cx6b   03:51:00  03:40:00
72.P6ax6b    03:51:00  03:41:00
73.N*3c      03:55:00  03:41:00

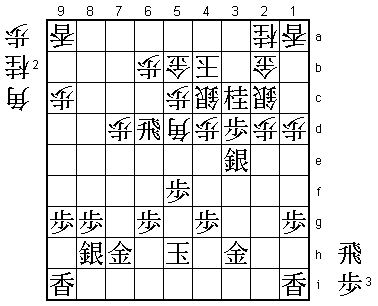
A surprise to the professionals in the press room. This knight drop allows the
white wall gold to get back into play, so this is a usually a move that a professional
would try to avoid. Therefore, in the press room moves like N*5e and R*6a were
analyzed. However, both players agreed that N*3c was black's best move and Watanabe
wasn't at all surprised by it.

74.N2ax3c    03:55:00  03:48:00
75.P3dx3c+   03:55:00  03:48:00
76.G2bx3c    03:55:00  03:48:00
77.R*2a      03:58:00  03:48:00

This is the point of 73.N*3c. Opening space for a rook drop here is very strong.

78.N*4a      03:58:00  04:00:00

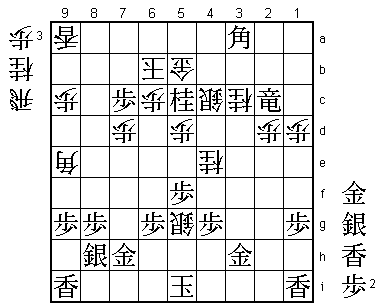
79.R6dx5d?   04:20:00  04:00:00

Based on a miscalculation. This time the press room got it right as there was general
surprise after this rook sacrifice was played. The position was thoroughly analyzed,
but no winning variation for black was found. Here Habu should have played 79.Rx1a+
and after 80.P*3g G2h! he can keep his advantage. For example, G6c R6f B*3i N*4f and
Watanabe said that white has no chance here.

80.P5cx5d    04:20:00  04:20:00
81.B*3a      04:21:00  04:20:00
82.K4b-5a    04:21:00  04:20:00
83.N*5c      04:21:00  04:20:00

It seems like this was the move that Habu had high hopes for.

84.S2c-3b!   04:21:00  04:29:00

A strong defense against the checking threat. Black's attack now fizzles out and white
takes over.

85.N5cx4a+   04:21:00  04:29:00
86.S3bx4a    04:21:00  04:29:00
87.N*5c      04:22:00  04:29:00
88.S4a-3b    04:22:00  04:29:00
89.R2ax1a+   04:28:00  04:29:00
90.N*2a      04:28:00  04:29:00
91.P*3d      04:38:00  04:29:00
92.G3c-2c    04:38:00  04:30:00
93.+R1a-1b   04:39:00  04:30:00

94.P6b-6c!   04:39:00  04:41:00

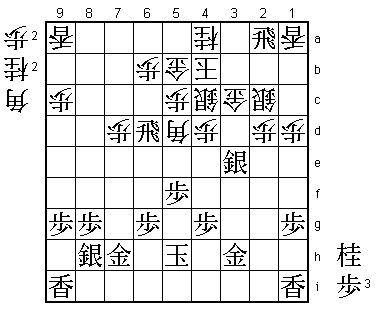
Opening an escape route for the king is the decisive move. It looks very risky, because
95.+Rx2c threatens mate in one move on 6a, but after 96.N*6f Px6f B*9e white defends
the square 6a with check and can take the rook on 2c next.

95.S3ex4d    04:45:00  04:41:00

Habu decides to try and keep some pressure on the white king, but it is not enough.

96.N*4e      04:45:00  04:42:00

Painful drop. The silver drop on 5g cannot be properly defended.

97.P3d-3c+   04:50:00  04:42:00
98.N2ax3c    04:50:00  04:48:00
99.S4dx4c=   04:55:00  04:48:00
100.S3bx4c   04:55:00  04:48:00
101.+R1bx2c  04:55:00  04:48:00
102.K5a-6b   04:55:00  04:58:00
103.P*7c     04:56:00  04:58:00
104.S*5g     04:56:00  04:59:00
105.K5h-5i   04:56:00  04:59:00
106.B*9e     04:56:00  04:59:00
Resigns      04:57:00  04:59:00

If 107.K6i or 107.K4i then R*5i is mate. Best is 107.L*7g, but after 108.Bx7g+ Gx7g
R*5h K4i N*3g K3i R5i+ K2h +R2i it is also mate, so Habu resigned here. Habu dropped
a big game here after putting a lot of pressure on Watanabe early. He is now in a 2-0
hole and suddenly he is in a lot of danger to lose the Oza title he has held for 19
consecutive years. Can he fight back in game 3?
