59th Osho Match Game 3
[Black "Kubo Toshiaki, Challenger"]
[White "Habu Yoshiharu, Osho"]
[Event "59th Osho-sen, Game 3"]
[Date "February 10th and 11th 2010"]
1.P7g-7f     00:00:00  00:00:00
2.P3c-3d     00:00:00  00:00:00
3.P7f-7e     00:04:00  00:00:00
4.P5c-5d     00:04:00  00:04:00
5.P6g-6f     00:08:00  00:04:00
6.S3a-4b     00:08:00  00:08:00
7.R2h-7h     00:13:00  00:08:00
8.S4b-5c     00:13:00  00:13:00
9.K5i-4h     00:17:00  00:13:00
10.B2b-3c    00:17:00  00:19:00
11.S3i-3h    00:39:00  00:19:00
12.R8b-2b    00:39:00  00:27:00

Against Kubo's normal Sankenbisha opening, Habu chooses a different opening strategy
than in the first game and we have the first Ai-Furibisha game of this match. Kubo
is considered one of the best (if not the best) Ai-Furibisha player in the game.

13.K4h-3i    00:41:00  00:27:00
14.P2c-2d    00:41:00  00:51:00
15.P7e-7d    00:51:00  00:51:00
16.P7cx7d    00:51:00  01:30:00
17.R7hx7d    00:51:00  01:30:00
18.P2d-2e    00:51:00  01:30:00
19.R7d-7f    00:55:00  01:30:00
20.P2e-2f    00:55:00  02:34:00

Habu plays a very positive opening here, allowing black to get a foothold by dropping
a pawn on 7d. Habu is counting on being able to attack that pawn and upgrading his
castle formation in the process. This is not a strategy without risk as we will see.

21.P2gx2f    00:59:00  02:34:00
22.R2bx2f    00:59:00  02:34:00
23.P*2g      00:59:00  02:34:00
24.R2f-2b    00:59:00  02:34:00
25.G6i-5h    01:20:00  02:34:00
26.K5a-6b    01:20:00  02:43:00
27.P*7d      01:30:00  02:43:00
28.S7a-8b    01:30:00  02:46:00
29.N8i-7g    01:45:00  02:46:00
30.G4a-5b    01:45:00  02:50:00
31.P9g-9f    02:06:00  02:50:00
32.K6b-7b    02:06:00  03:44:00
33.B8h-9g    02:25:00  03:44:00
34.G6a-6b    02:25:00  03:50:00
35.S7i-6h    02:31:00  03:50:00
36.P6c-6d    02:31:00  03:54:00

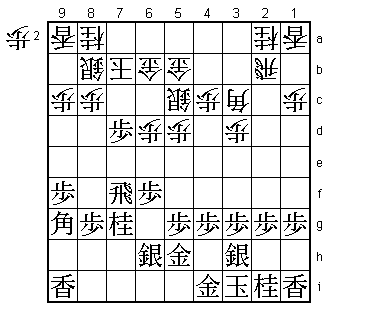
This is the first key point of the game. White wants to play G5b-6c followed by
P*7c next, which will give him a Yagura like formation with the silver on 7c,
which is stronger than the regularly Mino castle. If he can pull this off without
black doing anything, white will have won the opening. Of course, Kubo has no
intention of sitting back while Habu improves his position, but what should
black do?

37.S6h-6g!   02:45:00  03:54:00

This move doesn't look very special, but Kubo has found an ingenious way to
get compensation for the stronger white castle. The aggressive alternative was
37.P6e and after 38.G5b-6c Px6d Sx6d P*6e S5c S6g P8d S6f the black silver seems
to be marching to 6d which would be devastating for the white position. However,
white can counter with P*2f after which black has no choice but to go all out
with S7e (Px2f Rx2f is better for white) and after Px2g+ Sx2g Rx2g+ P*2h +R2e
black is a silver down although he has the option of getting the general back
with P6d. Still, after this it is unclear if black can really press his attack
home, so Kubo abandoned this idea.

38.G5b-6c    02:45:00  04:02:00
39.S6g-5f    03:36:00  04:02:00
40.P*7c      03:36:00  04:09:00
41.S5f-4e    03:40:00  04:09:00

This is the point of Kubo's plan. He uses the time that white takes to relief
the pressure of the pawn on 7d to start an attack on the other side of the board.
This causes a lot of problems for white and it seems that black has the advantage
here.

42.R2b-2d    03:40:00  04:10:00
43.P7dx7c+   03:54:00  04:10:00
44.S8bx7c    03:54:00  04:17:00
45.P6f-6e    03:55:00  04:17:00
46.P*7d      03:55:00  04:20:00
47.P2g-2f    03:59:00  04:20:00
48.B3c-5e    03:59:00  04:36:00
49.P5g-5f    04:12:00  04:36:00
50.B5e-2b    04:12:00  04:44:00
51.P5f-5e    04:34:00  04:44:00
52.B2bx5e    04:34:00  04:46:00
53.B9g-7i    04:37:00  04:46:00
54.R2d-2b    04:37:00  04:50:00
55.B7i-6h    04:37:00  04:50:00
56.P6dx6e    04:37:00  05:08:00
57.R7f-3f    04:45:00  05:08:00

58.S5c-6d?   04:45:00  05:17:00

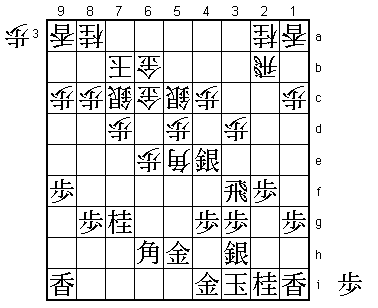
White is improving the strength of his castle even further, but this is a little
too much. Correct was 58.S4d and after 59.Sx4d (Sx3d is answered by R3b and the
black pieces are hard to move) Bx4d Rx3d P*3c Rx4d Px4d Nx6e P*2g Sx2g R*6i and
white also has attacking chances.

59.K3i-2h    04:54:00  05:17:00
60.P7d-7e    04:54:00  05:24:00
61.P*5f      05:36:00  05:24:00
62.P3d-3e    05:36:00  05:38:00
63.R3fx3e    05:36:00  05:38:00
64.B5e-3c    05:36:00  05:38:00
65.P5f-5e    05:36:00  05:38:00
66.P5dx5e    05:36:00  06:00:00
67.S4e-3d    05:48:00  06:00:00
68.B3c-4d    05:48:00  06:00:00
69.R3e-3f    05:48:00  06:00:00
70.G6b-5b    05:48:00  06:03:00
71.B6h-3e    05:54:00  06:03:00
72.B4dx3e    05:54:00  06:04:00
73.R3fx3e    05:54:00  06:04:00
74.B*4d      05:54:00  06:04:00
75.S3d-2c=   06:31:00  06:04:00
76.R2bx2c    06:31:00  06:08:00
77.R3e-3a+   06:31:00  06:08:00
78.S*5a      06:31:00  06:29:00
79.B*3b      06:34:00  06:29:00

80.R2cx2f    06:34:00  06:42:00

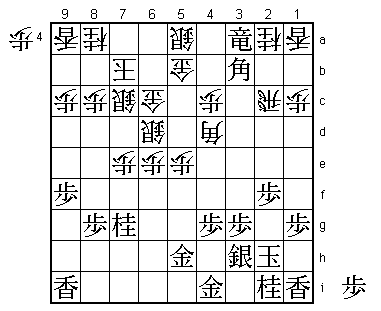
Habu didn't like how this turned out, but it is hard to find a better move. In
the post-mortem analysis moves like 82.R2d and 82.R2b were also analyzed, but no
promising variations for white were discovered.

81.P*2g      06:34:00  06:42:00
82.R2f-7f    06:34:00  06:43:00

Here 82.R6f doesn't immediately give up the rook, but after 83.Bx4c+ B*6b +Bx2a
P*2f P*6h (P*6g can be answered with R7f) P7f P6g R5f Nx6e which threatens P*5g next,
it seems the rook will be lost anyway.

83.G5h-6g    06:41:00  06:43:00
84.S7c-6b    06:41:00  06:44:00
85.B3bx2a+   06:45:00  06:44:00
86.P5e-5f    06:45:00  06:44:00
87.G6gx7f    07:11:00  06:44:00
88.P7ex7f    07:11:00  06:44:00
89.N7gx6e    07:11:00  06:44:00
90.S6dx6e    07:11:00  06:44:00
91.N*7e      07:13:00  06:44:00
92.G6c-5c    07:13:00  06:48:00
93.P*6c      07:19:00  06:48:00
94.S6b-7c    07:19:00  06:51:00
95.R*4a      07:26:00  06:51:00
96.G*6a      07:26:00  06:53:00

All Habu can do is to keep dropping pieces in defense. The two rooks are too strong.

97.+B2ax1a   07:26:00  06:53:00
98.B4dx1a    07:26:00  06:53:00
99.+R3ax1a   07:26:00  06:53:00
100.B*6d     07:26:00  07:09:00
101.L*6b     07:30:00  07:09:00
102.S7cx6b   07:30:00  07:23:00
103.P6cx6b+  07:30:00  07:23:00
104.K7bx6b   07:30:00  07:23:00
105.N7ex8c+  07:33:00  07:23:00
106.P5f-5g+  07:33:00  07:24:00
107.B*8d     07:37:00  07:24:00
108.K6b-6c   07:37:00  07:26:00
109.B8dx5g   07:37:00  07:26:00
110.N*3f     07:37:00  07:26:00
111.K2h-1h   07:37:00  07:26:00
112.P*2h     07:37:00  07:26:00
113.+R1a-3a! 07:41:00  07:26:00

Very cool defense. Habu has found a way to put some pressure on the black king
with little resources, but Kubo has judged correctly that he can snuff out the
white attack if he gets the knight on 3f. At the same time, a promoted rook also
works well to the left side of the board which is important because the white
king will soon be forced up the board.

114.P*5f     07:41:00  07:31:00
115.B5g-8d   07:44:00  07:31:00
116.P2hx2i+  07:44:00  07:37:00
117.+R3ax3f  07:44:00  07:37:00
118.+P2ix1i  07:44:00  07:37:00
119.K1hx1i   07:44:00  07:37:00
120.L*1d     07:44:00  07:37:00
121.N*7e     07:47:00  07:37:00
122.K6c-7d   07:47:00  07:38:00
123.R4ax5a+  07:49:00  07:38:00
124.G5bx5a   07:49:00  07:38:00
125.S*8e?    07:52:00  07:38:00

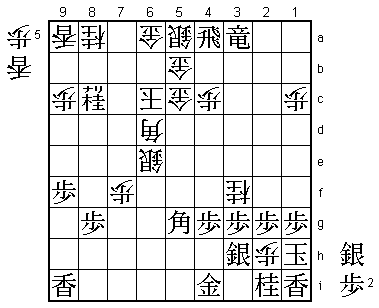
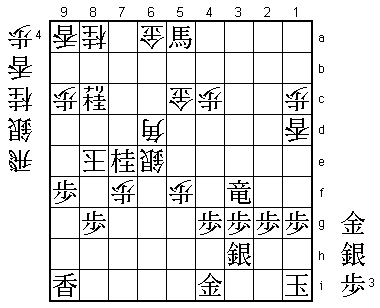
Kubo wants to finish with a flourish, but this is a mistake that could have been
costly. If he plays Bx5a+ immediately, there would have been nothing for Habu
to resign.

126.K7dx8e   07:52:00  07:38:00
127.B8dx5a+  07:52:00  07:38:00

After 128.Gx5a it is simple mate after S*8f followed by G*8e, so Habu has noting
but to resign here, right?

128.B6dx3g+! 07:52:00  07:38:00

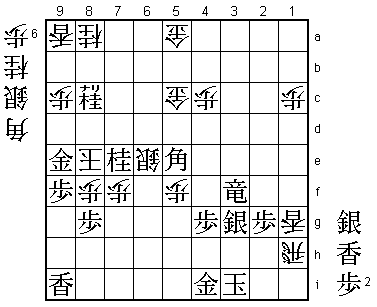
Habu has one more trick up his sleeve. This bishop sacrifice opens an escape route
on 6d, which gives white the chance to capture the bishop on 5a. Fortunately for
Kubo, it is just not enough to magically turn the tables.

129.S3hx3g   07:53:00  07:38:00
130.G6ax5a   07:53:00  07:38:00
131.B*5e?!   07:54:00  07:38:00

Kubo is a little rattled. If he would have thought about this position rationally,
he would have found that 131.B*6d is winning easy. White can take this bishop by
Gx6d or Lx1g= P*1h Lx1h+ Kx1h R*1d, but as soon as he closes of the escape to 6d,
black again has the mate with S*8f and G*8e. Kubo actually saw 131.B*6d, but he
thought that white could fight with 132.Lx1g= P*1h Lx1h+ Kx1h R*8h followed by
Rx8g+ but Habu pointed out that this would not be good enough. Kubo is lucky
again, because B*5e is still winning.

132.L1dx1g=  07:54:00  07:48:00
133.P*1h     07:54:00  07:48:00
134.L1gx1h+  07:54:00  07:48:00
135.K1ix1h   07:54:00  07:48:00
136.L*1g     07:54:00  07:48:00

Here Habu could have tried 136.R*1e P*1g Rx5e but after S4f black wins, because
the black king is safe and the white king cannot escape.

137.K1h-2h!  07:57:00  07:48:00

Looks dangerous, but the black king cannot be mated.

138.R*1h     07:57:00  07:48:00
139.K2h-3i   07:57:00  07:48:00
140.P*8f     07:57:00  07:52:00
141.G*9e     07:58:00  07:52:00
Resigns      07:58:00  07:52:00

Mate after 142.K7d +N8d Kx7e G8e or 142.Kx7e S*8d K7d +N7c Nx7c Bx7c+, so Habu
resigned here. Again a game that was played very well by Kubo, although he had
to survive a little scare at the end. However, he still won the game after
Habu's endgame trickery, which might be the difference between the Kubo of the
past and the Kubo of the present. The pressure is now on Habu again to keep
serve with the black pieces in game 4.
