59th Osho Match Game 1
[Black "Kubo Toshiaki, Challenger"]
[White "Habu Yoshiharu, Osho"]
[Event "59th Osho-sen, Game 1"]
[Date "January 15th and 16th 2010"]
1.P7g-7f     00:00:00  00:00:00
2.P3c-3d     00:00:00  00:00:00
3.P7f-7e     00:03:00  00:00:00
4.K5a-4b     00:03:00  00:08:00
5.P6g-6f     00:13:00  00:08:00
6.S7a-6b     00:13:00  00:14:00
7.R2h-7h     00:14:00  00:14:00

The furigoma for this match resulted in four tokins, giving Kubo the black pieces.
The third file rook was generally expected. Kubo is not one to experiment much
with his favorite Furibisha openings. It is almost a year since Kubo took the
Kio title, but in that time the two players haven't met. Kubo hasn't had much
success against Habu, because this is the fifth time they meet in a title match
and Habu has won all previous matches and has an overwhelming lead of 13-3 overall
in title match games. However, coming into this match as a title holder may be an
important psychological difference for Kubo. Before the match, he emphasized that
he wanted to enjoy playing this match rather than worry about its outcome.

8.P6c-6d     00:14:00  00:16:00
9.K5i-4h     00:25:00  00:16:00
10.S6b-6c    00:25:00  00:20:00
11.S3i-3h    00:56:00  00:20:00
12.G6a-5b    00:56:00  00:45:00
13.K4h-3i    01:05:00  00:45:00
14.P8c-8d    01:05:00  01:00:00
15.S7i-6h    01:27:00  01:00:00

Many players consider this a risky a move because of the attack that Habu plays
here. If black doesn't want to allow a quick attack, leaving the silver on 7i for
a little while longer is the safer option.

16.P8d-8e    01:27:00  02:00:00
17.R7h-7f    01:30:00  02:00:00
18.P6d-6e    01:30:00  02:01:00

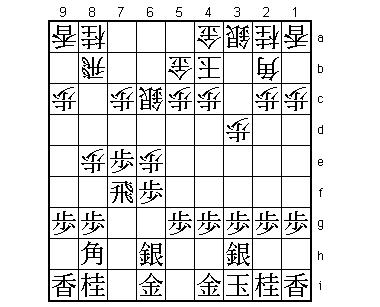
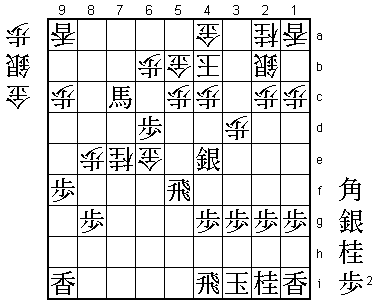
This is the ultra quick attack that white can play when black moves the silver
up to 6h. However, Kubo sees no reason to avoid this line. He actually has some
experience with this type of position because Maruyama played P6e against him
last June as well as Sugimoto in November. The position on the king side was
slightly different (both kings had moved further in the castle), but the position
at the side of the board where the rooks are was identical. Kubo won both of
these games, so he felt confident enough that black had enough chances. One could
say that Kubo, as the only titleholder to play Furibisha, has some responsibility
towards all the Furibisha fans out there to show that the white attack is nothing
to be feared. If white wins convincingly here, it will immediately become important
opening theory and limit the black options considerably.

19.S6h-6g    01:52:00  02:01:00
20.P6ex6f    01:52:00  02:05:00
21.S6gx6f    01:52:00  02:05:00
22.S6c-5d    01:52:00  02:45:00
23.G6i-7h    01:54:00  02:45:00
24.R8b-6b    01:54:00  02:45:00
25.P*6g      02:02:00  02:45:00

From here, it is possible to lead the game into less sharp territory and just improve
the respective positions for a while. However, both players don't seem to have any
attention of taking a breather, because they keep the position very sharp.

26.R6b-6d    02:02:00  02:54:00
27.P7e-7d    02:34:00  02:54:00
28.P7cx7d    02:34:00  02:59:00
29.P9g-9f    02:40:00  02:59:00
30.P*6e      02:40:00  03:10:00
31.S6f-7g    02:40:00  03:10:00
32.S5d-5e    02:40:00  03:11:00
33.S7g-6h    02:56:00  03:11:00
34.P6e-6f    02:56:00  03:26:00
35.P6gx6f    02:58:00  03:26:00
36.N8a-7c    02:58:00  03:29:00
37.P6f-6e    03:23:00  03:29:00
38.R6d-5d    03:23:00  03:40:00
39.P5g-5f    03:33:00  03:40:00

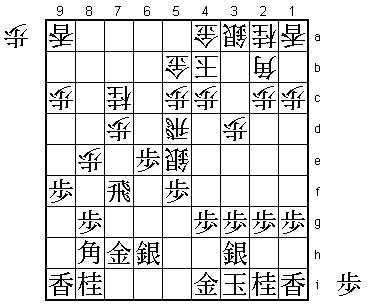
Kubo was having so much fun that he played this move more or less by accident.
It is the correct move, but it was also close to the end of the first day and
Kubo said after the game that he should have sealed this move here to keep Habu
guessing about what was coming next. Instead, he got caught up in the moment
and played 39.P5f before the time control. The next sequence is forced, so
Kubo missed the chance here to have extra knowledge about the way the game
would continue on the second day.

40.S5ex5f    03:33:00  03:44:00
41.B8hx2b+   03:56:00  03:44:00
42.S3ax2b    03:56:00  03:47:00
43.P*5e      03:59:00  03:47:00
44.R5dx5e    03:59:00  03:52:00
45.B*6d      04:03:00  03:52:00
46.R5e-5d    04:03:00  04:06:00
47.B6dx7c+   04:03:00  04:06:00

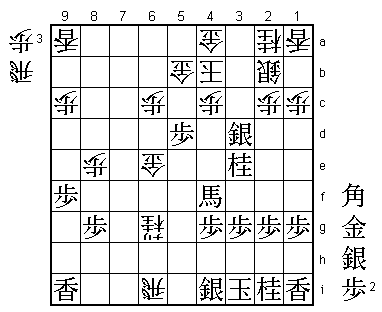
Black is a knight up, but has no pawns in hand. The position seems rather unclear
and some in the press room thought that white had the edge here. However, the way
the game develops seems to show that black might have the upper hand after all.
Because there doesn't seem to have been any obvious white mistakes, the conclusion
might be that the ultra quick attack P6e is maybe not so good for white.

48.P7d-7e    04:03:00  04:06:00
49.R7f-7g    04:15:00  04:06:00
50.P*6g      04:15:00  04:33:00

Here the analysis in the press room seemed to indicate that 50.S6e would be good
for white, but Habu didn't like it after 51.K2h S6f +Bx9a and L*5i is a strong
threat, pointing indirectly at the white king.

51.G7hx6g    04:35:00  04:33:00
52.S5fx6g+   04:35:00  05:03:00
53.R7gx6g    04:43:00  05:03:00
54.B*8h      04:43:00  05:08:00
55.P6e-6d    05:36:00  05:08:00
56.P*6b      05:36:00  05:26:00
57.N8i-7g    05:46:00  05:26:00
58.P7e-7f    05:46:00  05:32:00

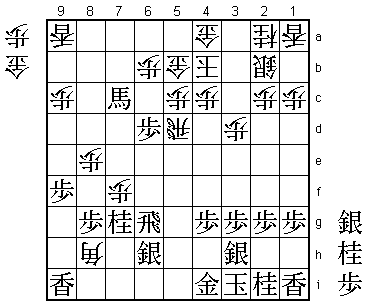
59.S*4e?     06:02:00  05:32:00

Kubo played this move with a lot of confidence, indicating that he felt he had
the better position, but this is actually a small mistake which gives Habu a
chance to turn the tables. Correct would have been 59.P*5e R4d N6e G*6f Nx5c+
Kx5c N*3f to go after the white rook. Black gets this rook anyway, but not the
way he intended it.

60.P7fx7g+   06:02:00  05:45:00
61.S6hx7g    06:02:00  05:45:00
62.N*7e      06:02:00  05:45:00
63.R6g-6e    06:40:00  05:45:00
64.R5d-5i+!  06:40:00  06:08:00

Habu magic. The point of this rook sacrifice is that white can now promote
the bishop with an attack on the gold and keep on moving this bishop in the
right direction while attacking the black pieces.

65.G4ix5i    06:40:00  06:08:00
66.B8hx7g+   06:40:00  06:08:00
67.G5i-4i    06:40:00  06:08:00
68.+B7g-7f   06:40:00  06:09:00
69.R6e-6i    06:54:00  06:09:00
70.S*5h      06:54:00  07:16:00
71.R*5f      07:00:00  07:16:00
72.S5hx4i+?  07:00:00  07:19:00

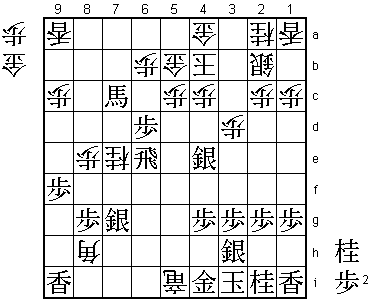
Habu misses his chance. He could have taken the advantage if he had played
72.+Bx8g. Then 73.Rx5h is of course answered by 74.+Bx6i and 73.R7i by
74.Sx4i+ Sx4i +B6e, which are both good for white. The simple looking +Bx8g
is easy to overlook for a professional player and Habu said after the game
that he never really considered it.

73.S3hx4i    07:02:00  07:19:00
74.+B7fx4i   07:02:00  07:20:00
75.R6ix4i    07:03:00  07:20:00
76.G*6e      07:03:00  07:20:00

According to Abe (8-dan), this is the type of move that makes Habu so difficult
to beat. It is a move that few players even consider and by keeping his opponents
on their toes by playing surprising moves he invites their mistakes. The reflex
move here is 77.R5f-5i, but this is answered by N6g+ followed by S*5h. However,
Kubo surprised Abe by telling in the post-mortem analysis that he fully expected
Habu to play G*6e here. Furthermore, there were many occasions where Habu and Kubo
had seen exactly the same variations. If it is really true that Kubo has managed
to understand Habu's way of thinking, this would take away an important weapon
and give Kubo a much better chance to win this match.

77.R5f-4f    07:21:00  07:20:00
78.S*5g      07:21:00  07:26:00
79.P6d-6c+   07:25:00  07:26:00
80.P6bx6c    07:25:00  07:27:00
81.P*5d      07:26:00  07:27:00
82.G*5h      07:26:00  07:30:00
83.P5dx5c+   07:31:00  07:30:00
84.G5bx5c    07:31:00  07:30:00
85.S*3h      07:34:00  07:30:00
86.N7e-6g+   07:34:00  07:42:00
87.P*5d      07:39:00  07:42:00
88.G5c-5b    07:39:00  07:43:00
89.S4ex3d    07:39:00  07:43:00
90.S5gx4f=   07:39:00  07:48:00
91.+B7cx4f   07:40:00  07:48:00
92.G5hx4i    07:40:00  07:48:00
93.S3hx4i    07:41:00  07:48:00
94.R*6i      07:41:00  07:48:00
95.N*3e!     07:49:00  07:48:00

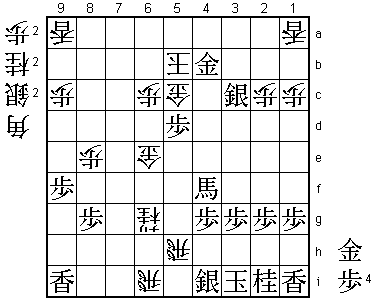
The correct mating threat (Nx4c+ Gx4c Sx4c+ Kx4c G*5c etc.). 95.N*4e is also a
mating threat (after Bx5c+ next), but then white can play 96.K3a and it is hard
to set up the next mating threat against the white king without giving up material,
which would give white the chance to mate the black king. Black may have the lead
in this endgame, but it is still very close and a slight mistake can turn victory
into defeat.

96.K4b-3a    07:49:00  07:50:00
97.N3ex4c+   07:49:00  07:50:00
98.P*4b      07:49:00  07:50:00
99.+N4cx5b   07:50:00  07:50:00
100.G4ax5b   07:50:00  07:50:00
101.B*4d     07:54:00  07:50:00

This is a mating threat as we will see and there is no defense, because black
also threatens P5c+ next. Only here Kubo felt that he had won the game.

102.R*5h     07:54:00  07:58:00
103.B4dx2b+  07:56:00  07:58:00
104.K3ax2b   07:56:00  07:58:00
105.S*3c     07:56:00  07:58:00
106.N2ax3c   07:56:00  07:58:00
107.S3dx3c+  07:56:00  07:58:00
108.K2bx3c   07:56:00  07:58:00
109.N*4e     07:56:00  07:58:00
110.K3c-3b   07:56:00  07:58:00
111.S*3c     07:56:00  07:58:00
112.K3b-4a   07:56:00  07:58:00
113.N4e-5c=  07:56:00  07:58:00
114.G5bx5c   07:56:00  07:58:00
115.G*3b     07:56:00  07:58:00
116.K4a-5b   07:56:00  07:58:00
117.G3bx4b   07:56:00  07:58:00
Resigns      07:56:00  07:58:00

Mate after 118.K6a P*6b K7a (Kx6b Px5c+ etc.) P*7b Kx7b G*7c K7a P*7b K8a G8b,
so Habu resigned here. A great start for Kubo, who not only had a terrible record
in title matches against Habu, he also never had won the first game in any of
their previous matches (actually, Kubo had started all four previous matches by
losing the first two games). Furthermore, he played an almost flawless game and
Habu will have to find a way to stop the "new" Kubo.
