59th Meijin Match Game 6
Black: Maruyama Tadahisa, Meijin
White: Tanigawa Koji, Challenger
59th Meijin-sen
Game 6
June 11th and 12th 2001
1.P7g-7f     00:00:00  00:00:00
2.P3c-3d     00:00:00  00:01:00
3.P2g-2f     00:01:00  00:01:00
4.P8c-8d     00:01:00  00:02:00
5.P2f-2e     00:01:00  00:02:00
6.P8d-8e     00:01:00  00:02:00
7.G6i-7h     00:01:00  00:02:00
8.G4a-3b     00:01:00  00:02:00
9.P2e-2d     00:02:00  00:02:00
10.P2cx2d    00:02:00  00:02:00
11.R2hx2d    00:02:00  00:02:00
12.P8e-8f    00:02:00  00:03:00
13.P8gx8f    00:03:00  00:03:00
14.R8bx8f    00:03:00  00:03:00
15.R2dx3d    00:05:00  00:03:00
16.B2b-3c    00:05:00  00:06:00

For the first time in this match, Tanigawa tries the Yokofudori.
Losing all games with white in this match so far made it a little
hard for him to play the Shikenbisha again. The Chuza-style Yokofudori
has given white an extremely high winning percentage since its
introduction three years ago. Lately, some good attacking plans for
black have been discovered, but still white is winning the majority
of games in this opening. Tanigawa needs to win only one more game to
regain the Meijin title, so the Chuza Yokofudori can be considered
his best shot at winning a game with white, finishing the match in
six games.

17.R3d-3f    00:34:00  00:06:00
18.S3a-2b    00:34:00  00:09:00
19.K5i-5h    00:36:00  00:09:00
20.K5a-4a    00:36:00  00:20:00
21.G4i-3h    00:38:00  00:20:00
22.S7a-6b    00:38:00  00:53:00
23.B8hx3c+   00:52:00  00:53:00
24.N2ax3c    00:52:00  00:56:00
25.S7i-8h    00:53:00  00:56:00

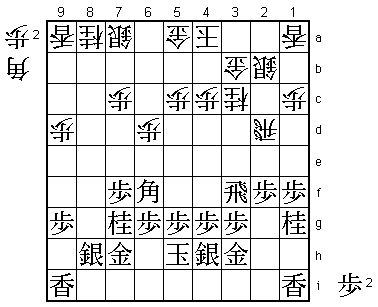
Exchanging the bishops followed by S8h is known as the Yamazaki style.
The idea is to keep the possibility of using a pawn on the 8th file
and there is also the threat of P*2c followed by B*7g.

26.R8f-8d    00:53:00  01:47:00

The more positive of the two options. White can also move the rook
back to 8b, but on 8d it can also switch to the other side of the board.

27.S3i-4h    01:16:00  01:47:00
28.G6a-5a    01:16:00  02:08:00
29.P1g-1f!?  01:44:00  02:08:00

This is Maruyama's new idea. He wants to develop both knights and
have a combined attack on the left and the right side of the board.
This pawn push gives black the chance to play the attack N1g-N2e.

30.P9c-9d    01:44:00  02:30:00
31.B*6f      02:09:00  02:30:00
32.R8d-2d    02:09:00  02:35:00
33.P*2f      02:09:00  02:35:00
34.S6b-7a    02:09:00  03:07:00
35.N8i-7g    02:22:00  03:07:00
36.P6c-6d    02:22:00  03:51:00
37.N2i-1g    02:36:00  03:51:00

38.B*7b      02:36:00  04:01:00

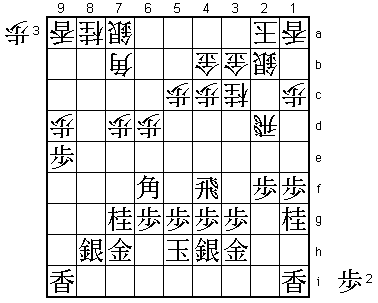
With the knight on 1g, the 3rd file is weakened. This bishop aims at
an attack on 3f. Both players have now dropped the bishop in their
own camp, so most tactical complications have now gone. What remains
is a very difficult strategic middle game battle.

39.R3f-4f    03:18:00  04:01:00
40.G5a-4b    03:18:00  04:10:00
41.P7f-7e!   03:18:00  04:10:00
42.K4a-3a    03:18:00  04:27:00
43.P7e-7d    03:36:00  04:27:00
44.P7cx7d    03:36:00  04:41:00
45.P9g-9f!   03:36:00  04:41:00

Tanigawa seems to have a reasonable position and decided to use
this quiet phase of the game to improve his king position. Maruyama
has more aggressive ideas. Knowing that he can play the attack on
the right side of the board with N2e at any time, he plans to attack
on the left side first. This edge attack looks very slow, but Maruyama
has judged it to perfection.

46.K3a-2a    03:36:00  05:18:00
47.P9f-9e    04:41:00  05:18:00

48.P7d-7e    04:41:00  05:44:00

Suddenly it becomes clear that Maruyama has been right and Tanigawa
has been wrong in strategic judgement. If white plays 48.Px9e here,
then after N8e S8b P*9b Lx9b P*9c Lx9c N2e black has the strong threat
Nx9c+ followed by Nx3c+ and L*2e. In this position white has to fight
for survival, which is not really Tanigawa's style. On the other hand,
if white doesn't defend on the edge, black has the slow but winning
plan Px9d-P9c+-P*9b-Px9a+. The question is therefore whether Tanigawa
can use these four moves to get any substantial attack going. In any
case, white has to force the position here which is not a good sign.

49.B6fx7e    05:42:00  05:44:00
50.B7b-5d    05:42:00  05:47:00
51.P*7f!     05:52:00  05:47:00

Good move. Black doesn't want to play this drop as the option of
switching the rook to the 8th file is usually very important in
this type of position. However, Maruyama has judged that this stops
white's attack and that his winning edge attack will be good enough.

52.N8a-7c    05:52:00  05:52:00
53.P9ex9d    06:10:00  05:52:00
54.P*3f      06:10:00  06:17:00
55.P3gx3f    06:25:00  06:17:00
56.R2dx2f    06:25:00  06:21:00
57.P*2g      06:25:00  06:21:00
58.R2fx1f    06:25:00  06:21:00
59.P9d-9c+   06:30:00  06:21:00
60.N3c-2e    06:30:00  06:47:00
61.P*1b      07:11:00  06:47:00
62.L1ax1b    07:11:00  06:49:00
63.P*1h      07:11:00  06:49:00
64.P*3g      07:11:00  06:51:00
65.G3h-2h    07:14:00  06:51:00

66.N2ex1g+   07:14:00  06:53:00

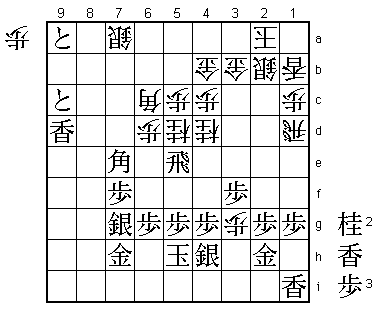
In the press room 66.Rx3f was expected, but after Rx3f Bx3f the simple
R*6a S3a Rx7a+ Nx1g+ Gx3g leaves white without any reasonable moves.

67.P1hx1g    07:14:00  06:53:00
68.R1f-1d    07:14:00  06:53:00
69.P*9b      07:15:00  06:53:00

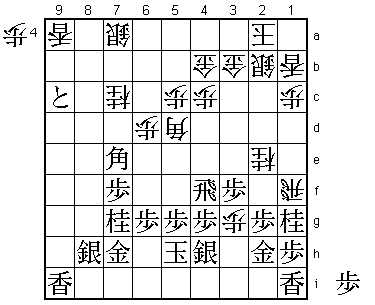
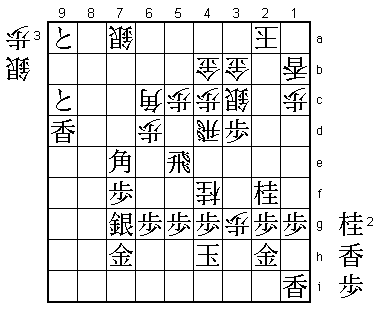
Black has defended against white's desperate attack and has found the
time to play his edge attack. The professionals following the game
didn't see any plan for white and expected a quick resignation...

70.P*9h!     07:15:00  07:27:00

The best attacker in the world finds a last straw to hold on to. It's
not enough if black plays it perfectly, but at least white keeps some hope.

71.L9ix9h    07:16:00  07:27:00
72.P*9g      07:16:00  07:27:00
73.L9hx9g    07:18:00  07:27:00
74.P*9f      07:18:00  07:27:00
75.L9gx9f    07:19:00  07:27:00
76.B5d-6c!   07:19:00  07:27:00

The point. White pulls back the bishop with attack on the lance,
making space for a double knight attack aimed at the black king
and the rook, which doesn't have much room to manoeuvre.

77.L9f-9d    07:39:00  07:27:00
78.N7c-6e    07:39:00  07:34:00
79.P9bx9a+   07:47:00  07:34:00
80.N*5d      07:47:00  07:35:00
81.R4f-5f    07:47:00  07:35:00
82.N6ex7g+   07:47:00  07:35:00
83.S8hx7g    07:47:00  07:35:00
84.N*4d      07:47:00  07:35:00
85.R5f-5e    08:06:00  07:35:00

Maruyama realizes that he must be careful and takes 19 minutes to
find the winning plan. This move followed by chasing away the rook
and the standard attack P*3c is the right way to proceed.

86.N4dx3f    08:06:00  07:35:00
87.N*2f      08:07:00  07:35:00
88.R1d-4d    08:07:00  07:39:00
89.P*3c      08:07:00  07:39:00
90.S2bx3c    08:07:00  07:52:00
91.P*3d      08:07:00  07:52:00
92.N3fx4h+   08:07:00  07:52:00
93.K5hx4h    08:08:00  07:52:00
94.N5d-4f!   08:08:00  07:52:00

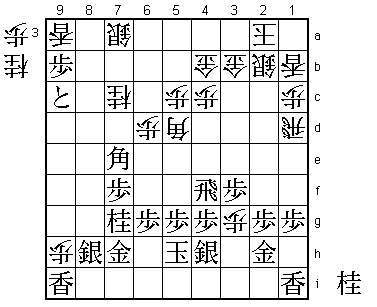
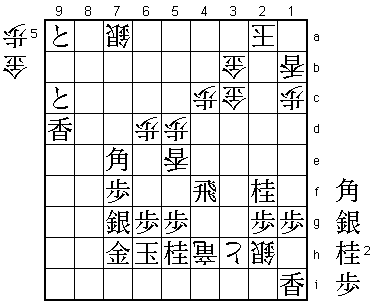
A devilish move and Tanigawa's last try. In the press room it was
thought that things had gotten complicated again, but Maruyama shows
his exceptional defending skills here.

95.P4gx4f    08:12:00  07:52:00
96.B6c-3f    08:12:00  07:52:00
97.L*4g      08:14:00  07:52:00
98.P5c-5d    08:14:00  08:07:00
99.R5e-5f    08:21:00  08:07:00
100.S*3i     08:21:00  08:15:00
101.K4h-5h   08:21:00  08:15:00
102.S3ix2h=  08:21:00  08:15:00
103.P3dx3c+  08:21:00  08:15:00
104.G4bx3c   08:21:00  08:15:00
105.P4f-4e   08:28:00  08:15:00
106.B3fx4g+  08:28:00  08:15:00
107.K5hx4g   08:29:00  08:15:00
108.R4dx4e   08:29:00  08:15:00
109.K4g-5h   08:29:00  08:15:00
110.P3g-3h+  08:29:00  08:15:00
111.K5h-6h   08:40:00  08:15:00
112.R4e-4h+  08:40:00  08:16:00
113.N*5h     08:40:00  08:16:00
114.L*5e     08:40:00  08:34:00
115.R5f-4f!  08:43:00  08:34:00

The deciding move. White can't exchange the rooks and moving the
rook away is followed by S8f and the black king safely escapes to
the left side of the board.

116.P*7d     08:43:00  08:41:00
117.P*3d     08:47:00  08:41:00
118.+R4h-3i  08:47:00  08:41:00
119.N*6i     08:49:00  08:41:00
120.P7dx7e   08:49:00  08:44:00
121.P3dx3c+  08:49:00  08:44:00
122.G3bx3c   08:49:00  08:44:00
123.N*2e     08:50:00  08:44:00
124.+P3h-4h  08:50:00  08:46:00
125.N2ex3c=  08:50:00  08:46:00
126.K2a-2b   08:50:00  08:51:00
127.B*1a     08:52:00  08:51:00
Resigns      08:52:00  08:51:00

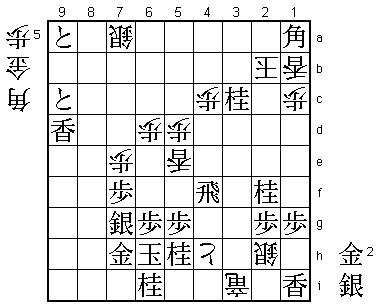
After 127.K3a N4a+ white is mated and after 127.K3b S*4a K2c G*3d
+Rx3d Nx3d white has no hope without the promoted rook. A very difficult
game that was played extremely well by both players. Tanigawa didn't
make any obvious mistakes, and it seemed that Maruyama's better
strategic judgment won the game for him. For the fourth year in a
row the Meijin match will be decided in the final game. With all
games ending in black's favor so far, the pawn toss might be very
important again.
