59th Meijin Match Game 5
Black: Tanigawa Koji, Challenger
White: Maruyama Tadahisa, Meijin
59th Meijin-sen, Game 5, May 31st and June 1st 2001
1.P7g-7f 00:01:00 00:00:00
2.P8c-8d 00:01:00 00:03:00
3.P2g-2f 00:07:00 00:03:00
4.G4a-3b 00:07:00 00:07:00
5.G6i-7h 00:07:00 00:07:00
6.P8d-8e 00:07:00 00:09:00
7.B8h-7g 00:08:00 00:09:00
8.P3c-3d 00:08:00 00:10:00
9.S7i-8h 00:08:00 00:10:00
10.S3a-4b 00:08:00 00:15:00
11.B7gx2b+ 00:14:00 00:15:00
12.G3bx2b 00:14:00 00:16:00
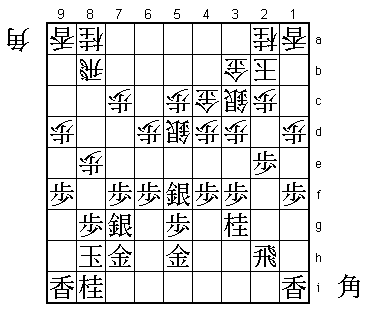
Habu, who was following this game from the press room, expected a R8e
Yokofudori game. Instead, the Kakugawari is going to be the battlefield
in this game. Both players are experts in this opening, but it is also
generally known that white has a hard time to get a reasonable position.
Especially Tanigawa is almost unbeatable in this opening with black, so
it will be interesting to see what Maruyama had prepared.
13.S8h-7g 00:14:00 00:16:00
14.S7a-6b 00:14:00 00:20:00
15.S3i-3h 00:17:00 00:20:00
16.P6c-6d 00:17:00 00:22:00
17.P4g-4f 00:21:00 00:22:00
18.S6b-6c 00:21:00 00:48:00
19.S3h-4g 00:31:00 00:48:00
20.P1c-1d 00:31:00 00:49:00
21.P1g-1f 00:32:00 00:49:00
22.S6c-5d 00:32:00 00:56:00
23.S4g-5f 00:52:00 00:56:00
24.G2b-3b 00:52:00 01:02:00
25.K5i-6h 01:01:00 01:02:00
26.S4b-3c 01:01:00 01:11:00
27.K6h-7i 01:13:00 01:11:00
28.K5a-4b 01:13:00 01:15:00
29.G4i-5h 01:25:00 01:15:00
30.K4b-3a 01:25:00 01:24:00
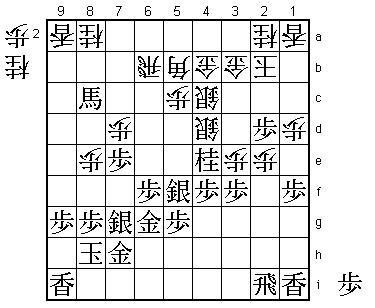
31.P9g-9f 01:39:00 01:24:00
32.P9c-9d 01:39:00 01:24:00
33.P3g-3f 01:51:00 01:24:00
34.G6a-5b 01:51:00 01:26:00
35.N2i-3g 02:02:00 01:26:00
36.P4c-4d 02:02:00 02:24:00
37.P6g-6f 02:12:00 02:24:00
38.G5b-4c 02:12:00 02:58:00
39.K7i-8h 03:03:00 02:58:00
40.K3a-2b 03:03:00 04:05:00
The sealed move. This position has been played in professional games
many times before.
41.P2f-2e 03:43:00 04:05:00
The first real decision. Black would like to keep the option of playing
N2e, as this gives his attack extra strength. However, after 41.R4h P3e
Px3e S2d white has a good counter attack and it is hard for black to get
his attack going.
42.P7c-7d 03:43:00 04:23:00
43.R2h-4h 03:49:00 04:23:00
44.G4c-4b 03:49:00 04:32:00
45.P4f-4e 04:08:00 04:32:00
46.P4dx4e 04:08:00 04:37:00
47.N3gx4e 04:10:00 04:37:00
48.S3c-4d 04:10:00 04:39:00
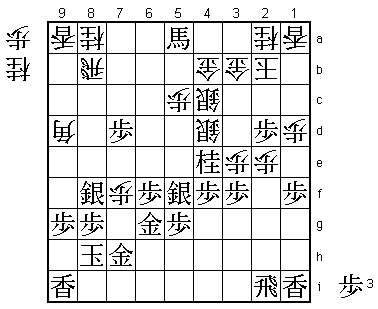
49.B*3g 04:10:00 04:39:00
50.R8b-9b 04:10:00 04:56:00
This looks a little awkward, but white plans to attack on the edge.
51.B3gx6d 04:16:00 04:56:00
52.B*6c?! 04:16:00 05:18:00
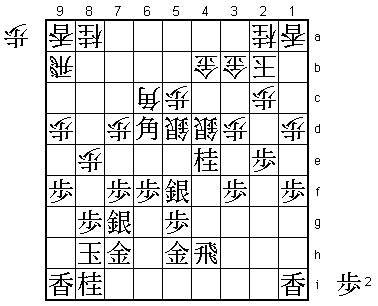
This is the move that Maruyama prepared. This bishop aims both at the
knight on 4e and also supports the attack on the edge. However, this
bishop drop isn't timed very well. Better was 52.P7e Px7e P9e Px9e
P*9f P7d (if Lx9f then B*6c followed by P8f is very strong) Rx9e and
white has its edge attack and still has the bishop in hand. It seems
black has to defend here with P*9h, but then P*4f followed by P8f looks
good for white.
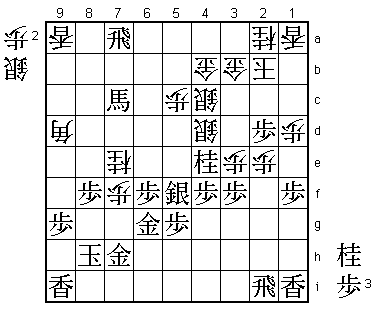
53.G5h-6g! 04:39:00 05:18:00
Indirect defense of the knight. If black plays 53.P9e Px9e P*9c Rx9c
B8b+ here, then S5dx4e Sx4e Bx4e S*5f Bx3f is possible. Black now
can't take the silver on 4d as the gold on 5h is attack by the bishop.
By moving this gold out of the way here, the rook can take the silver
on 4d in this variation.
54.P9d-9e 04:39:00 05:44:00
55.P9fx9e 04:46:00 05:44:00
56.P*9f 04:46:00 05:45:00
57.P*4f 05:38:00 05:45:00
58.R9bx9e 05:38:00 06:17:00
59.B6d-8b+! 05:38:00 06:17:00
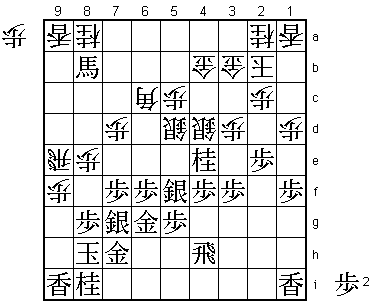
The vital move that Tanigawa had planned earlier. By not defending at
the edge with P*9h, black sacrifices a knight but white is left without
pawns and can't use the knight anywhere. Perfect judgement by Tanigawa
who gets a big advantage.
60.P9f-9g+ 05:38:00 06:17:00
61.N8ix9g 05:38:00 06:17:00
62.P*9f 05:38:00 06:22:00
63.P*9h 05:39:00 06:22:00
64.R9e-9b 05:39:00 06:25:00
65.+B8b-8c 05:45:00 06:25:00
66.P9fx9g+ 05:45:00 06:27:00
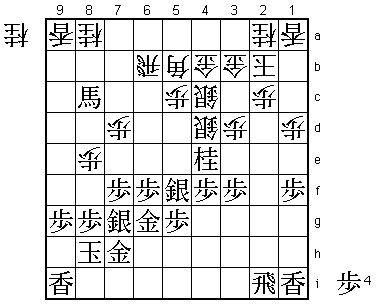
White has no choice but to take the knight. If he tries again to
exchange the rook for the horse black gets an even bigger advantage:
66.R9c +B8d R9d +B5a. This is an interesting phase of the game, as
Tanigawa is not playing his usual aggressive style, but quietly answers
all of Maruyama's moves, knowing his opponent will run out of them soon.
67.P9hx9g 05:45:00 06:27:00
68.R9b-6b 05:45:00 06:28:00
69.R4h-2h 05:52:00 06:28:00
70.B6c-5b 05:52:00 06:36:00
71.P2e-2d 06:07:00 06:36:00
72.P2cx2d 06:07:00 06:37:00
73.R2hx2d 06:07:00 06:37:00
74.P*2c 06:07:00 06:41:00
75.R2d-2i 06:07:00 06:41:00
76.S5d-4c 06:07:00 06:44:00
77.P*2d!     06:29:00  06:44:00

This move is hard to play, as black just exchanged pawns here. However,
this joining pawn attack is perfectly timed as the silver on 4c is
blocking the bishop on 5b. The alternative 77.P6e to bring the promoted
bishop into play gives white counter chances after 78.P5d +B8d R6a +B6f N7c.

78.P2cx2d    06:29:00  06:44:00
79.P*2e      06:29:00  06:44:00
80.P2dx2e    06:29:00  06:44:00
81.P*2d      06:29:00  06:44:00
82.P3d-3e    06:29:00  07:15:00

White is trying to open an escape route for his king to make an
entering king.

83.P7f-7e!   06:32:00  07:15:00
Another good move by black. If white allows black to make a tokin
here, he will lose big material as the position of the rook and bishop
is too awkward to save them both. Also, white's entering king plans
fail after 84.K1c Px7d P*7b +B8b K2d +Bx8a Px3f P*3h. "If the knight
and lance are taken, I can't win" (Maruyama).

84.P8e-8f    06:32:00  07:40:00

Maruyama has no choice but to start a mutual attack, but this attack
is not strong enough.

85.S7gx8f    06:37:00  07:40:00
86.B5b-6a    06:37:00  07:59:00
87.+B8c-8d   06:57:00  07:59:00
88.R6b-8b    06:57:00  07:59:00
89.+B8d-5a   07:00:00  07:59:00
90.B6a-9d    07:00:00  08:00:00
91.P7ex7d    07:02:00  08:00:00
92.P*7f      07:02:00  08:20:00
The alternative is 92.P*7g, but after 93.Sx7g N9c (N*7e G7f and white
has no follow-up) P7c+ R8a +Bx4b Gx4b Rx2e and white has no defense.

93.P7d-7c+   07:09:00  08:20:00
94.N8ax7c    07:09:00  08:22:00
95.+B5ax7c   07:10:00  08:22:00
96.R8bx8f    07:10:00  08:28:00
97.P8gx8f    07:11:00  08:28:00
98.N*7e      07:11:00  08:28:00

When Habu looked at this position, he thought that black might be in a
little trouble here. He didn't expect that the game would be over after
the next move...

99.R*7a!     07:40:00  08:28:00
Resigns      07:40:00  08:57:00
Maruyama took 29 minutes to resign here. The problem is that black can
take the lance on 9a next and then there is no way to stop the black
king from entering. On the other hand, the combined attack of the rook
on the back rank and the pawn on 2d is too strong for white to have a
chance to successfully defend against it. Maruyama took half an
hour to find some way to play on, but when he couldn't see any way out,
he resigned. A perfect performance by Tanigawa. Maruyama didn't make a
single real mistake; it were Tanigawa's good moves that decided the game
in his favor. Tanigawa is now only one win away from regaining the Meijin
title. However, so far in this match all games have been won by black
and Maruyama will play with the black pieces in the next game. This
match is not over yet.