59th Meijin Match Game 1
Black: Maruyama Tadahisa, Meijin
White: Tanigawa Koji, Challenger
59th Meijin-sen
Game 1
April 12th and 13th 2001
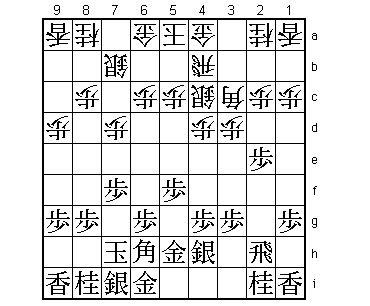
1.P7g-7f 00:00:00 00:00:00
2.P3c-3d 00:00:00 00:03:00
3.P2g-2f 00:00:00 00:03:00
4.P4c-4d 00:00:00 00:04:00
5.P2f-2e 00:00:00 00:04:00
6.B2b-3c 00:00:00 00:04:00
7.S3i-4h 00:00:00 00:04:00
8.R8b-4b 00:00:00 00:07:00
The furigoma resulted in four pawns, giving Meijin Maruyama black. The
Shikenbisha was not a big surprise. This opening and the R8e Yokofudori
are the expected openings in this match.
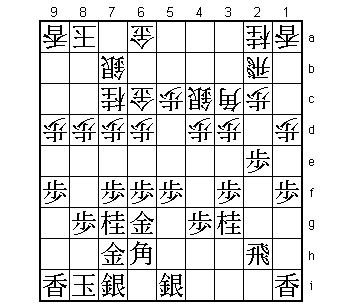
9.K5i-6h 00:00:00 00:07:00
10.S7a-7b 00:00:00 00:15:00
11.K6h-7h 00:00:00 00:15:00
12.P9c-9d 00:00:00 00:29:00
13.P5g-5f 00:04:00 00:29:00
14.S3a-3b 00:04:00 00:39:00
15.G4i-5h 00:18:00 00:39:00
16.S3b-4c 00:18:00 00:52:00
17.B8h-7g 00:23:00 00:52:00
18.P7c-7d 00:23:00 01:09:00
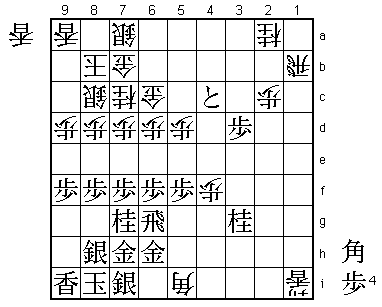
19.B7g-6h! 00:33:00 01:09:00
Maruyama seems to be better prepared than Tanigawa. This is a good move.
Because black threatens to break through on the second file, white is
forced into a defensive position.
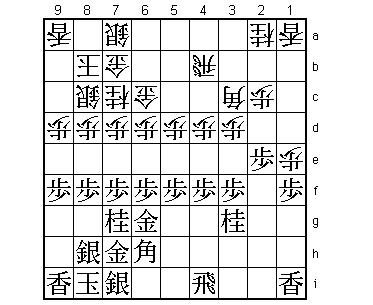
20.R4b-2b 00:33:00 01:14:00
21.P6g-6f 00:34:00 01:14:00
22.G4a-5b 00:34:00 01:22:00
23.G5h-6g 00:40:00 01:22:00
24.P6c-6d 00:40:00 01:25:00
25.P3g-3f 01:18:00 01:25:00
26.N8a-7c 01:18:00 01:42:00
27.N8i-7g 01:23:00 01:42:00
28.K5a-6b 01:23:00 01:50:00
29.K7h-8i 01:25:00 01:50:00
30.K6b-7a 01:25:00 01:53:00
31.G6i-7h 01:26:00 01:53:00
32.G5b-6c 01:26:00 02:01:00
33.P1g-1f 01:42:00 02:01:00
34.P1c-1d 01:42:00 02:32:00
35.S4h-5i 02:04:00 02:32:00
36.P8c-8d 02:04:00 02:51:00
37.N2i-3g 02:39:00 02:51:00
38.K7a-8a 02:39:00 03:30:00
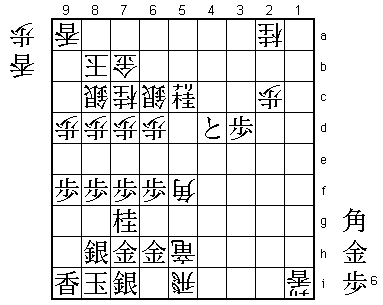
39.P9g-9f! 03:25:00 03:30:00
The exclamation mark for this move is not for the technical merit, but for
the psycholigical timing. This move was played just 8 minutes before the
time limit of the sealed move. Maruyama could well have waited a little
longer and make this the sealed move, but playing it now has an important
psychological effect. After this move, white has no options to play an
active game anymore. It would probably have been better to play P9e earlier.
By making this edge extension impossible, Maruyama gives Tanigawa until the
next morning to regret his opening strategy. This might have contributed
to what follows.
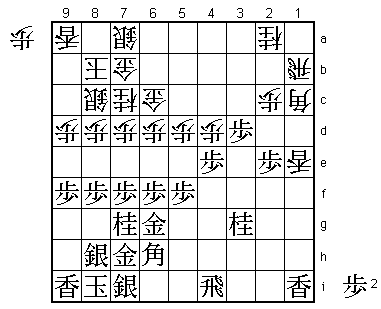
40.S7b-8c 03:25:00 03:38:00
41.B6h-4f 03:54:00 03:38:00
42.G6a-7b 03:54:00 03:39:00
43.S5i-6h 03:55:00 03:39:00
44.P5c-5d 03:55:00 03:50:00
45.P8g-8f 04:08:00 03:50:00
46.S4c-5b 04:08:00 04:04:00
47.S7i-8h 04:29:00 04:04:00
48.S5b-5c 04:29:00 04:09:00
49.S6h-7i 04:34:00 04:09:00
50.S5c-6b 04:34:00 04:12:00
51.B4f-6h 04:51:00 04:12:00
52.S6b-7a 04:51:00 04:29:00
53.P4g-4f 04:55:00 04:29:00
54.R2b-4b 04:55:00 05:02:00
55.R2h-2i 05:17:00 05:02:00
56.K8a-8b 05:17:00 05:18:00
57.R2i-4i 05:32:00 05:18:00
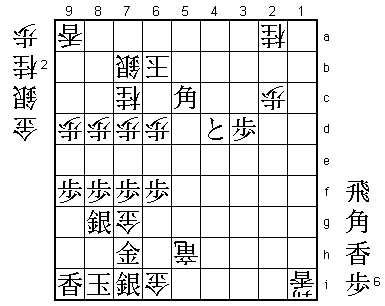
58.P1d-1e!? 05:32:00 05:43:00
Black is in complete control of the position. This is probably as bad as
things can get for Tanigawa. He is forced to wait for the axe to fall and
he doesn't have the temper to be patient forever. This edge attack is
forcing the position and most likely not very good. However, if white
wants to play something active, he has to do it now. Black's threat is
59.P4e Px4e Rx4e and black gets a big advantage.

59.P1fx1e    05:58:00  05:43:00
60.L1ax1e    05:58:00  05:43:00
61.P3f-3e    06:01:00  05:43:00
62.R4b-1b    06:01:00  06:25:00
63.P3ex3d    06:01:00  06:25:00
64.B3c-2b    06:01:00  06:27:00
65.P4f-4e    06:02:00  06:27:00
66.B2b-1c!   06:02:00  06:41:00
The only move. After 66.Lx1i+ P*1c Rx1c (Bx1c Rx1i) Bx1c+ Bx1c Rx1i black
is better.

67.P2e-2d!   06:30:00  06:41:00

Good counter. 67.Lx1e Bx6h+ Lx1b+ +Bx6g Gx6g B*5h is good for white. Black
allows the white rook to promote, but Maruyama has judged very well that his
tokin attack is stronger.

68.B1cx2d    06:30:00  06:42:00
69.P4ex4d    06:47:00  06:42:00
70.L1ex1i+   06:47:00  06:54:00
71.P4d-4c+   06:49:00  06:54:00
72.B2dx6h+   06:49:00  07:02:00
73.G6gx6h    06:49:00  07:02:00
74.P*4h      06:49:00  07:02:00

Here the natural 74.R1h+ would be successful after 75.+P5c Gx5c R4a+, but
sacrificing the promoted pawn like that is a big waste. If black plays
75.+P5b P*4h R5i instead, the threats +P6a or N4e next are very strong
and the pawn on 4h is actually bad for white, as it is blocking the promoted
rook on 1h.

75.R4ix4h    06:49:00  07:02:00
76.B*5i      06:49:00  07:12:00
77.R4h-4g    06:49:00  07:12:00
78.P*4f      06:49:00  07:30:00
79.R4g-6g    06:49:00  07:30:00
Four generals and a rook in defence. Black's castle is rock solid. N4e next
is a perfect attack. Black is winning.

80.R1b-1h+   06:49:00  07:33:00
81.N3g-4e    07:18:00  07:33:00
82.B5i-2f+   07:18:00  07:36:00
83.B*4d      07:20:00  07:36:00
84.+B2fx4d   07:20:00  07:54:00
85.+P4cx4d   07:20:00  07:54:00
86.S7a-6b    07:20:00  07:54:00

Or 86.B*2f +P5c Gx5c Nx5c+ Bx5c B*3b with the double threat Bx2a+ and B5d+
and white has no hope of winning.

87.P5f-5e    07:26:00  07:54:00
88.B*5f      07:26:00  07:55:00
89.P5ex5d    07:29:00  07:55:00
90.P4f-4g+   07:29:00  08:16:00
91.P5d-5c+   07:35:00  08:16:00
92.+P4g-5h   07:35:00  08:18:00
93.+P5cx6c   07:37:00  08:18:00
94.S6bx6c    07:37:00  08:18:00
95.N4e-5c+   07:50:00  08:18:00
96.+P5hx6h   07:50:00  08:18:00
97.R6gx6h    07:51:00  08:18:00
98.G*5h      07:51:00  08:18:00
99.R6hx5h    07:54:00  08:18:00
100.+R1hx5h  07:54:00  08:18:00
101.G*6h     07:58:00  08:18:00
102.R*5i     07:58:00  08:19:00
103.G6hx5h!  08:30:00  08:19:00

It is hard to say if black played a bad move somewhere, but what seemed to
be a two move endgame lead now only looks like a half move lead. Maruyama
took 32 minutes to make sure that he is still winning. The next moves look
quite dangerous for black, but Maruyama has seen it all from here.

104.B5fx7h+  08:30:00  08:19:00
105.K8ix7h   08:30:00  08:19:00
106.R5ix5h+  08:30:00  08:19:00
107.K7h-8i   08:30:00  08:19:00
108.G*6i     08:30:00  08:23:00
109.G*7h     08:31:00  08:23:00
110.G*6g     08:31:00  08:26:00
111.+N5cx6c! 08:32:00  08:26:00

White was not threatening mate and that makes it all clear.

112.L*8g     08:32:00  08:46:00

"Katachizukuri". Tanigawa knows he has lost and just tries to make the final
position look close. 112.Gx7i Gx7i S*7h K9h Sx7i= looks dangerous, but after
+Nx7b Sx7b S*7a Kx7a R*4a G*6a G*6b white is mated after both Kx6b B*5c and
K8b B*7a.

113.+N6cx7b  08:36:00  08:46:00
114.S8cx7b   08:36:00  08:46:00
115.S8hx8g   08:38:00  08:46:00
116.G6gx7g   08:38:00  08:46:00

This is mating threat, but black has a way to get out of this.

117.S*7a     08:38:00  08:46:00
118.K8bx7a   08:38:00  08:48:00
119.G*6b     08:38:00  08:48:00
120.K7ax6b   08:38:00  08:49:00
121.B*5c     08:38:00  08:49:00
Resigns      08:38:00  08:49:00
The only way to avoid mate is 121.Rx5c+ +Px5c Kx5c, but then R*5g loses the
gold on 7g after which white has no more attack and no defence. A perfect
performance by Maruyama. His form has been questionable in the past year,
but this game indicates that he might have found his Meijin level of play
just in time.