58th Oza Match Game 3
[Black "Habu Yoshiharu, Oza"]
[White "Fujii Takeshi, Challenger"]
[Event "58th Oza-sen, Game 3"]
[Date "September 29th 2010"]
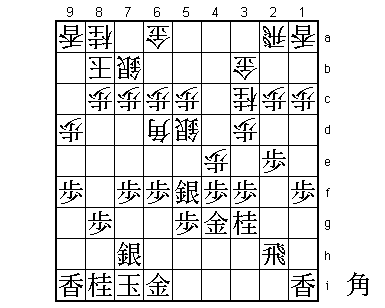
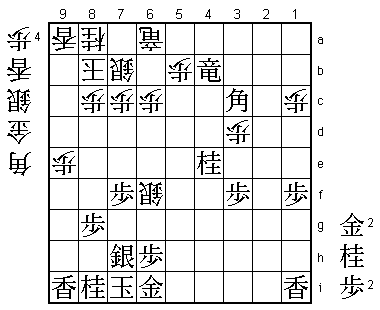
1.P7g-7f 00:00:00 00:00:00
2.P3c-3d 00:00:00 00:00:00
3.P2g-2f 00:02:00 00:00:00
4.B2b-3c 00:02:00 00:02:00
Fujii has lost the first two games with the openings he was expected to play and the
losses were quite one-sided at that. Therefore, it was not really clear what he was going
to try here, and for most people in the press room 4.B3c was a surprise, even leading
to an outburst of "Wow" when it was played. Still, Suzuki Daisuke (8-dan), who was doing
the commentary at the venue, had mentioned this opening when he was asked before the game
what Fujii might play.
5.B8hx3c+ 00:09:00 00:02:00
6.N2ax3c 00:09:00 00:03:00
7.K5i-6h 00:09:00 00:03:00
8.G4a-3b 00:09:00 00:06:00
9.P2f-2e 00:11:00 00:06:00
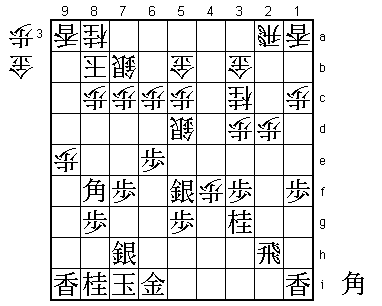
10.R8b-5b 00:11:00 00:07:00
Another reaction of surprise in the press room. Playing the Nakabisha with the pawn still
on 5c (actually, it will remain here) is not a strategy that has been played in an official
game. Again, Suzuki said that he had seen it before, so it seems like it has been studied
in unofficial training games. The point of the opening is not to build up pressure through
the center like in most Nakabisha openings, but to pull back the rook to 5a and from there
move it to 2a or 4a, depending on what black is playing.
11.S3i-4h 00:18:00 00:07:00
12.K5a-6b 00:18:00 00:08:00
13.S7i-7h 00:23:00 00:08:00
14.K6b-7b 00:23:00 00:09:00
15.P9g-9f 00:24:00 00:09:00
16.P9c-9d 00:24:00 00:09:00
17.G4i-5h 00:29:00 00:09:00
18.R5b-5a 00:29:00 00:12:00
19.P6g-6f 00:34:00 00:12:00
20.S3a-4b 00:34:00 00:13:00
21.K6h-7i 00:37:00 00:13:00
22.K7b-8b 00:37:00 00:55:00
23.P3g-3f 00:50:00 00:55:00
24.S7a-7b 00:50:00 00:57:00
25.N2i-3g 00:53:00 00:57:00
26.P4c-4d 00:53:00 01:09:00
27.P4g-4f 01:16:00 01:09:00
28.S4b-4c 01:16:00 01:38:00
29.P1g-1f 01:22:00 01:38:00
30.R5a-2a 01:22:00 01:57:00
31.S4h-4g 01:30:00 01:57:00
32.S4c-5d 01:30:00 01:59:00
33.S4g-5f 01:31:00 01:59:00
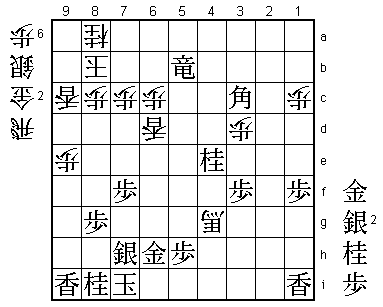
34.B*6d 01:31:00 02:38:00
35.G5h-4g 02:16:00 02:38:00
36.P4d-4e 02:16:00 02:45:00
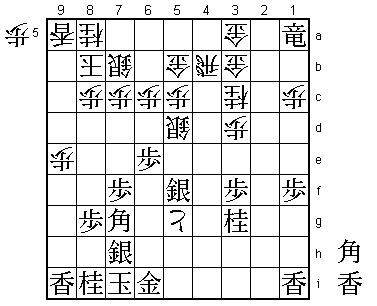
The start of the hostilities. White has dropped the bishop first and follows this with
an attack on the 4th file, which can be supported by moving the rook to 4a at any time.
The best thing that can happen here for white is for black to play 37.Px4e Sx4e Sx4e
Nx4e, but of course things are not going to be that easy.

37.P6f-6e!   02:17:00  02:45:00

Part of a very deep triple move combination which can probably only be played by Habu.

38.B6dx4f    02:17:00  02:46:00
39.B*8f!     02:21:00  02:46:00

The first point of black's counter is that if white defends the pawn on 5c with 40.G4b,
then 41.Gx4f Px4f R4h! and white cannot defend the pawn on 4f with R4a, because the gold
on 4b is blocking the file.

40.G6a-5b    02:21:00  02:56:00

Fujii cannot afford to stray from the path he has chosen, but moving up this gold
weakens the castle considerably.

41.G4gx4f    02:32:00  02:56:00
42.P4ex4f    02:32:00  02:56:00
43.P2e-2d    02:32:00  02:56:00
44.P2cx2d    02:32:00  02:57:00
45.P9f-9e    02:32:00  02:57:00
46.P9dx9e    02:32:00  02:59:00
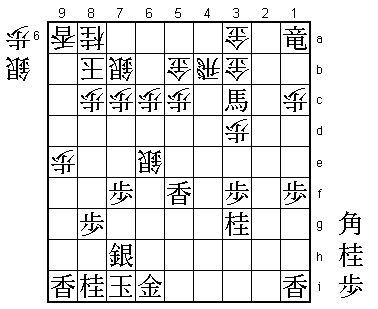
Black is a bishop against a pawn up, but has no pawns in hand and the pawn on 4f is a
thorn in the side. The position seems unclear at this point.

47.B8f-7g!   02:32:00  02:59:00

The third point of 37.P6e. It looks like black must hurry, but Habu has seen that he has
time to pull back the bishop to the main diagonal, where it is much more effective. It
seems like white can play 47.P9f here, but this is answered by the attack on the head of
the knight with 48.P3e, which is very strong.

48.R2a-4a    02:32:00  03:23:00
49.R2hx2d    02:39:00  03:23:00
50.P4f-4g+   02:39:00  04:07:00

The alternative is 50.P*2c, but after 51.Rx3d P4g+ N2e +Px5g Nx3c+ the conclusion was
that black has the better position. With pawns in hand, the sacrifice of the edge pawn
becomes a great asset because the attack P*9c Lx9c P*9b is very fast.

51.P*4b      02:48:00  04:07:00
52.R4ax4b    02:48:00  04:07:00
53.R2d-2a+   02:48:00  04:07:00
54.G*3a      02:48:00  04:07:00

Not a move that white wants to play and in the press room 54.P*4a was analyzed extensively.
The conclusion was that after 55.Sx4g G*3a +Rx3a Gx3a S5h G3b P3e is good for black.

55.+R2ax1a   02:56:00  04:07:00
56.+P4gx5g   02:56:00  04:07:00
57.L*5i      03:33:00  04:07:00

Played after 37 minutes and a surprise for the press room. It seems that black has an easy
win here after 57.Bx3c+. Habu also thought so at first and indeed black will win after
either 58.Gx3c or 58.+Px5f, but Habu started to worry about 58.P*2a here. For example,
59.+B6f +Px5f +Bx5f R4h+ and white has promoted the rook while the black rook is caught
in a corner. Habu decided to play 57.L*5i instead, but this doesn't really solve the problem.

58.+P5gx5f   03:33:00  04:16:00
59.L5ix5f    03:33:00  04:16:00
60.S5dx6e    03:33:00  04:16:00
61.B7gx3c+   03:33:00  04:16:00
62.G3bx3c?   03:33:00  04:32:00

Here again 62.P*2a would have been the best move. Then after both 63.+B5e S*6d +B4e Rx4e
Nx4e Sx5f or 63.+Bx4b G3bx4b the white defense is quite solid, despite the unusual
formation of the golds.

63.+R1ax3a   03:33:00  04:32:00
64.P*4a      03:33:00  04:32:00
65.L5fx5c+   03:45:00  04:32:00

The combination of this move and the next is what Fujii had underestimated.

66.G5bx5c    03:45:00  04:36:00
67.+R3ax4b   03:47:00  04:36:00
68.P4ax4b    03:47:00  04:36:00
69.G*6b      03:47:00  04:36:00

The black attack is now very strong, probably unstoppable. However, Fujii is giving
one last chance to make things very difficult.

70.S*7a      03:47:00  04:37:00
71.G6bx7a    04:00:00  04:37:00
72.K8bx7a    04:00:00  04:37:00
73.N3g-4e    04:02:00  04:37:00
74.G5c-5b    04:02:00  04:49:00
75.S*5c      04:14:00  04:49:00
76.B*5g      04:14:00  04:50:00
77.P*6h      04:20:00  04:50:00
78.P*5a      04:20:00  04:50:00
79.R*3a?     04:21:00  04:50:00

Uncharacteristic endgame inaccuracy by Habu. If he would have played 79.+Sx5b Px5b
first and only then R*3a, he would have won easily.

80.B5g-6f+   04:21:00  04:54:00
81.B*7g      04:26:00  04:54:00
82.R*5g      04:26:00  04:54:00
83.S5cx5b+   04:37:00  04:54:00
84.R5gx5b+   04:37:00  04:54:00

This promoted rook is very strong and the white defense is not easy to break down.

85.G*5c      04:37:00  04:54:00
86.+R5b-6a   04:37:00  04:54:00
87.R3ax3c+   04:40:00  04:54:00
88.K7a-8b    04:40:00  04:54:00
89.+R3cx4b   04:41:00  04:54:00
90.G*5b      04:41:00  04:54:00
91.G5cx5b    04:43:00  04:54:00
92.P5ax5b    04:43:00  04:54:00
93.B7gx6f    04:43:00  04:54:00
94.S6ex6f    04:43:00  04:54:00
95.B*3c      04:43:00  04:54:00
96.L*6d?     04:43:00  04:59:00

The decisive mistake. Fujii could have kept it interesting if he had played 96.P*4a
here to chase the promoted rook away and after 97.+R1b play the surprising 98.B*5e!
99.Bx5e+ 100.Sx5e. This looks bad, because the silver is pulled away from the black
king and now is floating in the middle of the board. However, the point is that if
black again puts a bishop on 3c with 101.B*3c, then after B*6d the white bishop works
both in attack and defense. Therefore, black probably has to play 101.G*5a instead
of B*3c, which can be answered strongly by 102.P9f and now 103.Gx6a Sx6a is dangerous
because it gives white the material for mate (G*8h Kx8h S*9g etc.). The conclusion of
the post-mortem analysis was that black has to play something like P*9c (after Sx6a)
Lx9c G5h which seems unclear.

97.G*5a      04:47:00  04:59:00
98.S6f-5g+   04:47:00  04:59:00
99.G5ax6a    04:48:00  04:59:00
100.S7bx6a   04:48:00  04:59:00
101.P*9c     04:49:00  04:59:00

This pawn sacrifice is standard, but particularly strong here. Black wins.

102.L9ax9c   04:49:00  04:59:00
103.R*5d     04:50:00  04:59:00
104.B*5f     04:50:00  04:59:00
105.P*5h     04:53:00  04:59:00
106.+S5gx6h  04:53:00  04:59:00
107.G6ix6h   04:53:00  04:59:00
108.B5f-4g+  04:53:00  04:59:00
109.R5dx5b+  04:53:00  04:59:00
110.S6ax5b   04:53:00  04:59:00
111.+R4bx5b  04:53:00  04:59:00
Resigns      04:53:00  04:59:00
Easy mate after 112.S*7b S*7a Kx7a G*6b etc. or 112.G*7b +Rx7b Kx7b G*6b Kx6b B4d+ K7b
S*6a etc. Even though this game was a little bit closer than the first two games, it was
clear that Fujii was out of his depth here. Maybe he can find some comfort in the fact
that he is in very good company, because no-one seems to have a clue how to wrestle
the Oza title from Habu. The statistics are astounding. Habu has now won 19 consecutive
Oza titles. Twelve of those title matches ended in 3-0, four in 3-1 and only three went
the distance. Furthermore, Habu has won the last six Oza matches without dropping a
single game and is now unbeaten in 19 consecutive Oza title match games. The last
player to take a game from Habu in the Oza was Moriuchi, who won the third game of
the Oza match in 2004. Habu is literally owning the Oza title.