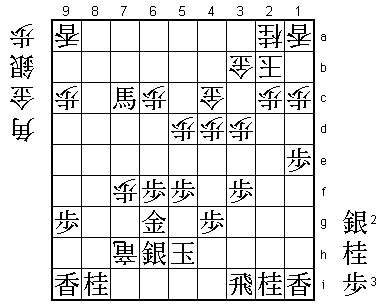
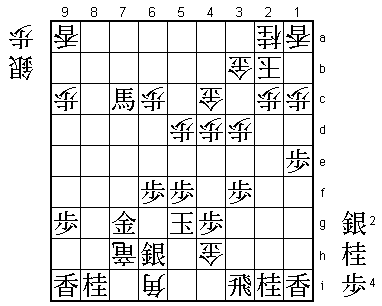
58th Oza Match Game 2
[Black "Fujii Takeshi, Challenger"]
[White "Habu Yoshiharu, Oza"]
[Event "58th Oza-sen, Game 2"]
[Date "September 22nd 2010"]
1.P7g-7f     00:02:00  00:00:00
2.P3c-3d     00:02:00  00:01:00
3.P6g-6f     00:05:00  00:01:00
4.S7a-6b     00:05:00  00:02:00
5.P5g-5f     00:06:00  00:02:00
6.P5c-5d     00:06:00  00:07:00
7.S3i-4h     00:07:00  00:07:00
8.G6a-5b     00:07:00  00:11:00
9.G4i-5h     00:08:00  00:11:00

A couple of years ago this would have been unthinkable, but most people in the press
room expected Fujii to play the Yagura with the black pieces in this second game. He has
been changing his playing style to become more of an all-round player but the step from
the Furibisha to Yagura is not so big, both being strategic openings with a rather
long build-up to the actual fighting.

10.S3a-3b    00:08:00  00:15:00
11.G5h-6g    00:18:00  00:15:00
12.P4c-4d    00:18:00  00:29:00
13.S7i-7h    00:21:00  00:29:00
14.B2b-3a    00:21:00  00:44:00
15.B8h-7i    00:24:00  00:44:00
16.P7c-7d    00:24:00  00:45:00
17.P2g-2f    00:34:00  00:45:00
18.G5b-4c    00:34:00  00:54:00
19.P3g-3f    00:34:00  00:54:00
20.B3a-6d    00:34:00  01:13:00
21.B7i-4f    00:43:00  01:13:00
22.K5a-4b    00:43:00  01:15:00
23.P2f-2e    00:44:00  01:15:00
24.S3b-3c    00:44:00  01:16:00
25.K5i-6h    00:47:00  01:16:00
26.P8c-8d    00:47:00  01:25:00
27.S4h-3g    00:57:00  01:25:00
28.G4a-3b    00:57:00  01:26:00
29.S7h-7g    01:57:00  01:26:00
30.K4b-3a    01:57:00  01:57:00
31.K6h-7h    02:00:00  01:57:00
32.S6b-7c    02:00:00  01:58:00
33.G6i-6h    02:02:00  01:58:00

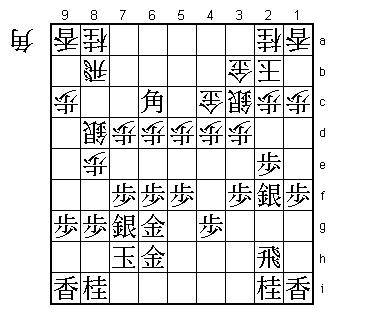
There was no comment on this move in Shukan Shogi, but considering the major consequences
of playing the gold to 6h instead of 7h, I think there should at least have been some
explanation about Fujii's possible motives for building this type of formation. This
is certainly a way to play this position, but for amateur players it is always discouraged
because one has to be very careful that the attack on the 8th file doesn't become too
strong. After all, the pawn on 8g is only defended by the king instead of by king and
gold in a normal Yagura formation.

34.P8d-8e    02:02:00  01:59:00
35.S3g-2f    02:05:00  01:59:00
36.K3a-2b    02:05:00  02:00:00
37.P1g-1f    02:06:00  02:00:00
38.S7c-8d    02:06:00  02:03:00
39.B4fx6d    02:15:00  02:03:00
40.P6cx6d    02:15:00  02:03:00
41.B*6c      02:18:00  02:03:00

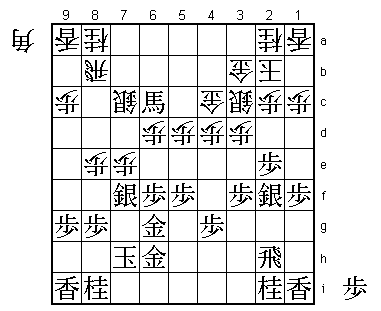
This looks good for black, because he can promote the bishop and white can only catch
this bishop at a very high cost: 41.S7c B4a+ G4c-4b +B6c (+B5a is not good, because the
promoted bishop can be trapped with B*4c) G3b-4c P7e Px7e P3e G4c-5c (Px3e Sx3e followed
by P*7d next is good for black) +Bx4c Gx4c Px3d and the white castle formation is too
weak to stop the black attack.

42.P7d-7e!   02:18:00  02:26:00

Habu had no choice, but this attack is very strong.

43.B6c-7d+   02:23:00  02:26:00

Or 43.Px7e P6e and the white attack continues. For example, B7d+ Px6f Sx6f S9e is good
for white.

44.P7ex7f    02:23:00  02:51:00
45.S7gx7f    02:23:00  02:51:00
46.S8d-7c    02:23:00  02:51:00
47.+B7d-6c   02:48:00  02:51:00
48.P*7e!     02:48:00  02:58:00

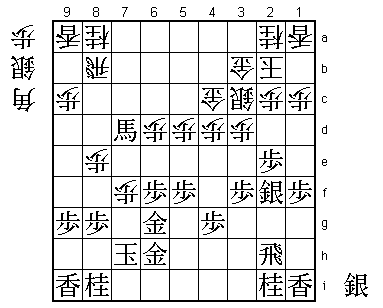
This is the move that Fujii had underestimated. He had calculated that after 48.B*7d
+Bx7d Sx7d P*7e S6c P3e the white attack is stopped while black has a strong bogin
attack against the white king.

49.P*7d      03:23:00  02:58:00
50.S7cx7d    03:23:00  03:01:00
51.+B6cx7d   03:23:00  03:01:00
52.P7ex7f    03:23:00  03:01:00

53.P2e-2d?   03:23:00  03:01:00

Played almost immediately, but the losing move. Developing the silver on 2f in this
way usually is good in this type of position, but here white can use the silver and
pawn for a devastating attack against the black king. Much better would have been
53.+Bx6d. For example, 54.B*7c +Bx7c Nx7c B*6d P8f Px8f P*6e Px6e B*3i R3h B8d+ S*7e
and it seems that black can fight in this position as well. However, in the post-mortem
analysis the opinions of the players differed about the position that would result from
+Bx7e Bx7e Nx6e Gx7f R7b next. Habu felt that his attack was too thin and it would be
very difficult to keep it going, while Fujii felt that white had been very successful
in developing his major pieces and that he had no confidence in the black position.
In any case, compared to what happened in the actual game, this would have been much
better.

54.S3cx2d    03:23:00  03:11:00
55.S2f-1e    03:29:00  03:11:00
56.S2dx1e    03:29:00  03:15:00
57.P1fx1e    03:29:00  03:15:00

From now on, this game becomes a showcase for Habu's superb endgame technique. The
black position is being hit left and right and Fujii's king has no chance to survive
the onslaught. The players didn't even bother to do a post-mortem analysis of what
happened after 53.P2d.

58.P6d-6e    03:29:00  03:15:00
59.+B7dx6e   03:40:00  03:15:00
60.P8e-8f    03:40:00  03:38:00
61.P8gx8f    03:40:00  03:38:00
62.P*8g      03:40:00  03:38:00
63.+B6e-6d   04:14:00  03:38:00
64.B*7c      04:14:00  03:45:00
65.+B6dx7c   04:15:00  03:45:00
66.N8ax7c    04:15:00  03:45:00
67.B*6d      04:28:00  03:45:00
68.S*3i!     04:28:00  03:53:00

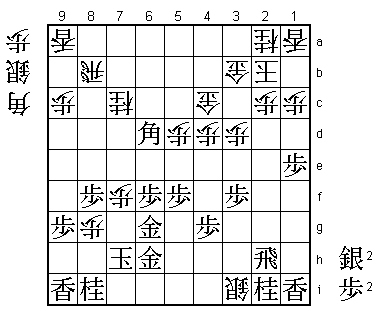
Looks like a bad place to put the silver, but here it is very good because the black
rook plays a vital role in both attack in defense. By dropping the silver on 3i,
white forces the rook to make a choice between attack and defense. Whatever black
chooses, either the attack is weakened to much or the defense is weakened to much.

69.R2h-3h    04:53:00  03:53:00
70.P*6c!     04:53:00  03:55:00

Another strong move to displace the other major black piece. White sacrifices the
knight on 7c, but being able to break through on the 8th file is much more important.

71.B6dx7c+   04:53:00  03:55:00
72.R8bx8f    04:53:00  03:55:00
73.R3hx3i    04:53:00  03:55:00
74.P8g-8h+   04:53:00  03:56:00
75.K7h-6i    04:53:00  03:56:00

No choice. 75.Kx7h fails to B*8g K7i S*8h Kx8h B6i+ and mate.

76.+P8h-7h   04:53:00  03:57:00
77.K6i-5h    04:55:00  03:57:00
78.R8f-8h+   04:55:00  03:57:00
79.G6hx7h    04:55:00  03:57:00
80.+R8hx7h   04:55:00  03:57:00
81.S*6h      04:55:00  03:57:00

82.P7f-7g+!  04:55:00  04:05:00

Another light attacking move. If 83.Nx7g then S*7f! wins for white because Gx7f
fails to G*6g.

83.G6gx7g    04:55:00  04:05:00
84.G*4h      04:55:00  04:05:00
85.K5h-5g    04:55:00  04:05:00
86.B*6i      04:55:00  04:05:00
Resigns      04:55:00  04:05:00

A nice move to end the game. 87.Gx7h leads to mate after B5h+ K4f +Bx4g and after
Rx6i +Rx6i black has no way to stop the white attack. There is no real way to sugarcoat
this, as Fujii got more or less slaughtered in this game and with the black pieces as
well. Barring a Watanabe-like comeback, there seems to be no way he can keep Habu from
winning his 19th consecutive Oza title. The only question seems to be if Habu can do
it with another 3-0 sweep or if Fujii can save some face after two bad losses.
