58th Osho Match Game 6
[Black "Habu Yoshiharu, Osho"]
[White "Fukaura Koichi, Challenger"]
[Event "58th Osho-sen, Game 6"]
[Date "March 11th and 12th 2009"]
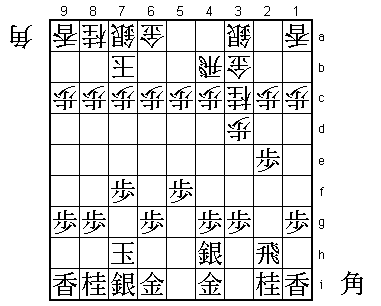
1.P7g-7f 00:00:00 00:00:00
2.P3c-3d 00:00:00 00:00:00
3.P2g-2f 00:02:00 00:00:00
4.B2b-3c 00:02:00 00:02:00
Fukaura won the second game very convincingly with this opening, so it is not a
big surprise that he wants to try it again to see if Habu has come up with anything.
5.B8hx3c+ 00:03:00 00:02:00
6.N2ax3c 00:03:00 00:02:00
7.K5i-6h 00:03:00 00:02:00
In the second game Habu played G7h followed by K6h and K7g to move into an
Anaguma, but here he moves the king out of the center quickly.
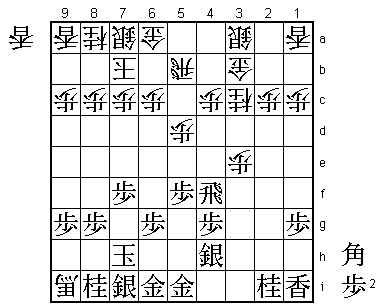
8.R8b-4b 00:03:00 00:06:00
9.K6h-7h 00:07:00 00:06:00
10.K5a-6b 00:07:00 00:09:00
11.S3i-4h 00:15:00 00:09:00
12.K6b-7b 00:15:00 00:09:00
13.P2f-2e 00:31:00 00:09:00
14.G4a-3b 00:31:00 00:19:00
15.P5g-5f 00:35:00 00:19:00
16.R4b-5b 00:35:00 01:01:00
Fukaura said after the game that he had planned the shape of G3b and R4b to
settle the position of the rook early. However, after seeing 15.P5f, he changed
his mind and moved the rook to the center file. With the knight on 3c that can
jump to 4e at any time to assist the attack in the center, this seems like a
good plan.
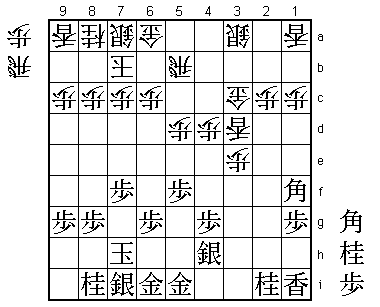
17.P3g-3f! 02:22:00 01:01:00
Because the rook has taken two moves to move to a spot where it could also go
in one move, Habu has been given an extra move. Habu took 107 minutes to decide
that this was the best chance he had to attack the head of the knight on 3d.
18.P5c-5d 02:22:00 01:38:00
19.P3f-3e 02:24:00 01:38:00
20.P3dx3e 02:24:00 01:40:00
21.P2e-2d 02:24:00 01:40:00
22.P2cx2d 02:24:00 01:40:00
23.R2hx2d 02:24:00 01:40:00
24.P*2c 02:24:00 02:06:00
A natural looking pawn drop, but in the press room 24.P3f was also analyzed.
After 35.R2a+ S2b the black rook dies, but black can also play 35.B*4a R4b
Bx3b+ Rx3b R2a+ N4e. This is not clear, but during the post-mortem analysis
no variation was found that actually gave white good chances.
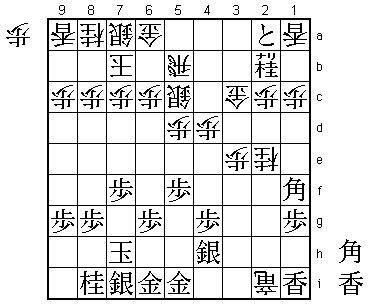
25.R2d-2f 02:32:00 02:06:00
26.P3e-3f 02:32:00 02:06:00
27.G4i-5i! 02:47:00 02:06:00

Great move showing Habu's flexible shogi sense. This defends against B*2g after
Rx3f and even though this didn't come out in the game, moving the gold to 5i
instead of 5h gives black the defensive pawn drop on 5h if the white attack
leads to a pawn on 5f. Because moving the gold to 5h is such a natural move,
only few players would be able to come up with a move like G4i-5i. Of course,
Habu had to be very careful about the variations following the bishop fork B*4d.

28.B*4d      02:47:00  03:16:00
29.R2fx3f    02:58:00  03:16:00
30.P*3e      02:58:00  03:16:00
31.R3f-4f    03:07:00  03:16:00
32.B4dx9i+   03:07:00  03:34:00
33.P*3d?!    03:26:00  03:34:00

After the game, Habu admitted that he wasn't perfectly happy with this move.
He said that it would have been better to play 33.S8h first. After 34.+B9h
black can play P*3d which is now even better than in the game. Therefore,
white has to play 34.+Bx8h or 34.+Bx8i. However, 34.+Bx8h Kx8h S*4e R1f P1d
N3g is good for black and after 34.+Bx8i Kx8i N*3d R1f L*1d R4f (which Habu
didn't like because the rook was being pushed around) R5a P5e Nx4f Px4f also
seems even better than what followed after 33.P*3d.

34.+B9i-4d   03:26:00  03:49:00
35.R4fx4d    03:50:00  03:49:00
36.P4cx4d    03:50:00  03:49:00
37.P3dx3c+   03:51:00  03:49:00
38.G3bx3c    03:51:00  03:49:00
39.B*1f!     03:52:00  03:49:00

This bishop is in a perfect position, pointing straight into the white position.
This game now becomes a clinic of how bishops can dominate rooks.

40.L*3d      03:52:00  03:53:00
Fukaura wants to close the bishop diagonal at any cost, but Habu is ready for
this.

41.P*2b!     03:56:00  03:53:00

Also possible is 41.N*4f, but this pawn drop is better. If white takes this pawn
with the rook or silver, the knight drop on 4f is much more effective, because
capturing the lance on 3d will also attack the piece on 2b.

42.R*2h      03:56:00  04:30:00

Fukaura decides to go for the counter attack, but the tokin black makes on 2a is
going to have a huge impact.

43.P2b-2a+   03:59:00  04:30:00
44.S3a-4b    03:59:00  04:30:00
45.N*4f      04:01:00  04:30:00
46.R2hx2i+   04:01:00  06:00:00
47.N4fx3d    04:01:00  06:00:00
48.S4b-5c    04:01:00  06:00:00
49.N3d-2b+   04:05:00  06:00:00
50.N*2e      04:05:00  06:02:00
Another desperate try to close the diagonal of the bishop, but again in vain.

51.B*3h!     04:28:00  06:02:00

Black chases the rook away and opens the bishop diagonal again, which is decisive.

52.+R2i-2h   04:28:00  06:14:00
53.L*2i      04:28:00  06:14:00
54.+R2hx1i   04:28:00  06:14:00
55.B1fx2e    04:28:00  06:14:00
56.P2c-2d    04:28:00  06:28:00
57.B2ex5b+   04:41:00  06:28:00
58.G6ax5b    04:41:00  06:28:00
59.+P2a-3a   04:46:00  06:28:00

Black has broken through and the march of the promoted pawn is starting. From now
on, Fukaura tries everything to make something out of nothing, but Habu doesn't
give him a chance.

60.L*7d      04:46:00  06:32:00
61.N*6h      05:06:00  06:32:00
62.S5c-6d    05:06:00  06:49:00
63.+N2bx1a   05:23:00  06:49:00
64.G5b-6b    05:23:00  06:52:00
65.R*2b      05:36:00  06:52:00
66.S6d-6e    05:36:00  07:03:00
67.L*7g      05:42:00  07:03:00
68.+R1ix1g   05:42:00  07:14:00
69.R2b-4b+   05:59:00  07:14:00
70.G3c-2c    05:59:00  07:17:00
71.+P3a-4a   06:01:00  07:17:00
72.P3e-3f    06:01:00  07:30:00
73.+P4a-5a   06:04:00  07:30:00
74.B*3c      06:04:00  07:33:00
75.+R4b-4a   06:10:00  07:33:00
76.P3f-3g+   06:10:00  07:36:00
77.S4hx3g    06:11:00  07:36:00
78.+R1gx3g   06:11:00  07:36:00
79.B3h-1f    06:11:00  07:36:00
80.P*3d      06:11:00  07:36:00
81.+P5a-5b   06:11:00  07:36:00
82.P4d-4e    06:11:00  07:36:00
83.+P5bx6b   06:19:00  07:36:00
84.S7ax6b    06:19:00  07:36:00
85.+R4a-3b   06:19:00  07:36:00
86.S*5a      06:19:00  07:42:00
87.+R3bx2c   06:27:00  07:42:00
88.B3cx1a    06:27:00  07:42:00
89.P*2b      06:35:00  07:42:00
90.P4e-4f    06:35:00  07:42:00
91.P4gx4f    06:37:00  07:42:00
92.P*4g      06:37:00  07:42:00
93.G6i-5h    06:38:00  07:42:00
94.N*8e      06:38:00  07:42:00
95.G*8f      06:43:00  07:42:00
96.N8ex7g+   06:43:00  07:47:00
97.N8ix7g    06:43:00  07:47:00
98.L*5g      06:43:00  07:47:00
99.N*4i      06:55:00  07:47:00
Resigns      06:55:00  07:47:00
After this fork on lance and promoted rook, Fukaura resigned. 100.Lx5h+ Nx3g +Lx5i
Bx3d would have been a great end of this game because it would show how the bishop
line from 1f is the theme of this game until the end. White would have no mating
threat and black can still take the silver on 6e. Habu wins in great style to
take this match to the decisive seventh game. What else could be expected from
a head to head that is now 27-26 in Habu's favor. It will be the third time Habu
and Fukaura need a seventh game in a title match. Usually the player winning
game 6 has the momentum going into the game, but in the past two Oi title matches
Habu came back from 3-1 down to force a seventh game, which Fukaura won in both
cases. What will the outcome be this time?