58th Osho Match Game 5
[Black "Fukaura Koichi, Challenger"]
[White "Habu Yoshiharu, Osho"]
[Event "58th Osho-sen, Game 5"]
[Date "February 24th and 25th 2009"]
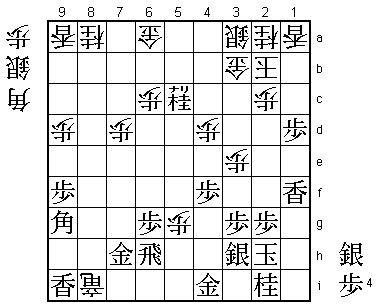
1.P7g-7f 00:00:00 00:00:00
2.P8c-8d 00:00:00 00:03:00
3.P5g-5f 00:04:00 00:03:00
Fukaura actually left the room for a while before playing this move, which is highly
unusual this early in the game. Maybe he needed a little more time to prepare himself
for the sharp opening battle that lies ahead.
4.P8d-8e 00:04:00 00:25:00
Perhaps Habu expected Fukaura to play a "normal" Yagura opening with 3.S6h and was
a little surprised by 3.P5f, because he took 22 minutes for this move. We now get
a Gokigen Nakabisha opening with an early bishop exchange, so both sides need to
be very careful not to leave any holes for a bishop drop.
5.B8h-7g 00:04:00 00:25:00
6.P5c-5d 00:04:00 00:25:00
7.R2h-5h 00:05:00 00:25:00
8.K5a-4b 00:05:00 00:29:00
9.K5i-4h 00:06:00 00:29:00
10.S7a-6b 00:06:00 00:30:00
11.K4h-3h 00:08:00 00:30:00
12.P3c-3d 00:08:00 00:52:00
13.S7i-6h 00:08:00 00:52:00
14.S6b-5c 00:08:00 01:09:00
15.K3h-2h 00:11:00 01:09:00
16.B2bx7g+ 00:11:00 01:16:00
17.S6hx7g 00:12:00 01:16:00
18.S5c-6d 00:12:00 01:16:00
19.R5h-5i 00:19:00 01:16:00
20.K4b-3b 00:19:00 01:17:00
21.G6i-7h 00:19:00 01:17:00
22.S3a-4b 00:19:00 01:21:00
23.S3i-3h 00:25:00 01:21:00
24.K3b-2b 00:25:00 01:34:00
25.P1g-1f 00:32:00 01:34:00
26.P1c-1d 00:32:00 01:35:00
27.S7g-6f 00:32:00 01:35:00
28.G4a-3b 00:32:00 01:44:00
29.N8i-7g 00:32:00 01:44:00
30.P4c-4d 00:32:00 01:44:00
31.P9g-9f 01:00:00 01:44:00
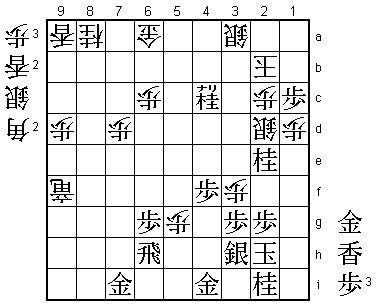
32.P3d-3e!? 01:00:00 02:24:00
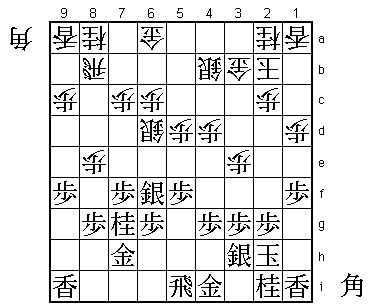
Very positive play by Habu. The plan is to change his castle into a strong Silver
Crown, but for the moment this leaves a hole on 3d for a knight drop, so this move
is not without risk. However, Habu didn't have much choice. For example, the
natural 32.P7d is met with 33.S6e and after 34.Sx6e Nx6e P6d B*4f it seems that
black gets the better position.
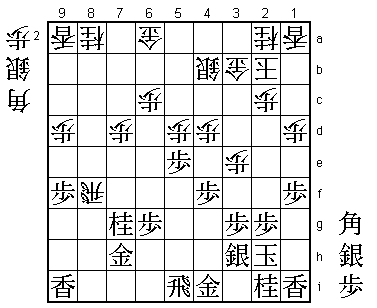
33.S6f-7e 02:01:00 02:24:00
Adds a silver to the bishop in hand for each side, giving both sides even more
options for attack. The position now becomes very complicated.
34.S6dx7e 02:01:00 03:11:00
35.P7fx7e 02:01:00 03:11:00
36.P9c-9d 02:01:00 03:27:00
This is necessary. If white plays 36.P8f directly, then 37.Px8f Rx8f is met with
B*9e R8b P*8b Rx8b S*8d followed by Sx7c+ to get a knight in hand to drop on 3d.
37.P4g-4f 02:59:00 03:27:00
38.P8e-8f 02:59:00 03:51:00
39.P8gx8f 03:00:00 03:51:00
40.R8bx8f 03:00:00 03:51:00
41.P7e-7d 03:12:00 03:51:00
42.P7cx7d 03:12:00 04:27:00
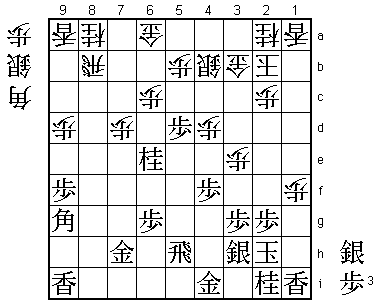
43.P5f-5e 03:13:00 04:27:00
Looks very strong, because white cannot take this pawn: 44.Px5e P*5d S*6d S*5c
S6dx5c Px5c+ Sx5c B*9g.
44.P1d-1e! 03:13:00 04:29:00
This edge attack is played with perfect timing. Now it is black who cannot take
this pawn: 45.Px1e P*1g Lx1g P*1f Lx1f Rx4f and Px5d is met with P*5h.
45.B*9g 04:07:00 04:29:00
46.R8f-8b 04:07:00 04:42:00
47.P5ex5d 04:08:00 04:42:00
48.P*5h 04:08:00 04:53:00
49.R5ix5h 04:40:00 04:53:00
50.P*5b 04:40:00 04:57:00
51.N7g-6e 04:42:00 04:57:00
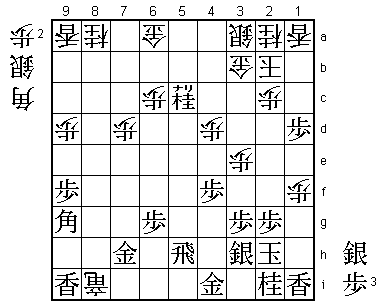
52.P1ex1f 04:42:00 05:01:00
This is a huge pawn close to the black king, so it seems like Habu has the better
position here.

53.P*1d!     04:59:00  05:01:00

Fukaura shows that the position is not so clear. This pawn is also putting pressure
on the opponent king. Taking it with 54.Lx1d is answered by 55.S*2e (interestingly,
53.Lx1f would have been met with 54.S*2e, so the square 2e is quite important here).
This looks good for black, but after the game Habu wondered if he shouldn't have
tried this instead of the mutual attack he tried in the game. The conclusion in the
post-mortem analysis was that the position is unclear after 56.P1g+ Nx1g R8i+ Sx1d
S*4g.

54.R8b-8i+   04:59:00  05:59:00
55.P5d-5c+   05:47:00  05:59:00
56.P5bx5c    05:47:00  06:00:00
57.N6ex5c+   05:47:00  06:00:00
58.S4b-3a    05:47:00  06:12:00
Pulling back this silver right away surprised the professionals in the press room.
It seemed better to play 58.P*5g Rx5g and only then S3a or 58.P*8f +Nx4b Gx4b G7i
+Rx9i Bx8f L*7e to shut out the bishop. However, looking at what follows, there
doesn't seem to be anything wrong with this move. It might even be one of those
flexible Habu moves.

59.L1ix1f    06:33:00  06:12:00
60.P*5g      06:33:00  06:35:00
61.R5h-6h    06:36:00  06:35:00
This is forced, because 61.Rx5g fails to +Rx7h. Because of the huge difference
between the ineffective rook on 6h and the promoted rook on 8i, it seems that
white is in control here.

62.P3e-3f?   06:36:00  06:56:00

This is an important mistake. Correct was 62.S*2e. For example, 63.P1c+ Nx1c P*1d
Sx1f Px1c+ Lx1c P*1d Lx1d P*1g L*4g and the white attack is unstoppable.

63.G7h-7i    06:44:00  06:56:00
64.+R8ix9i   06:44:00  07:06:00

In the press room 64.+R8e was considered better, because it strongly threatens P*1e
next. This makes use of the rank opened by 62.P3f, so this may have been what Habu
intended as well. However, after 65.S*4c P*1e Sx3b+ Sx3b +N4b Px1f Bx5c+ the black
attack doesn't look very powerful, but is surprisingly hard to stop.

65.B9g-8h    06:44:00  07:06:00
66.+R9ix9f   06:44:00  07:11:00
67.B8hx4d    06:48:00  07:11:00

This puts the bishop at a perfect spot and the game is suddenly over. The white king
is suddenly in such a tight spot that there is not even room for Habu's magical powers.

68.L*3c      06:48:00  07:25:00
69.S*1c      07:04:00  07:25:00
70.N2ax1c    07:04:00  07:25:00
71.P1dx1c+   07:05:00  07:25:00
72.L1ax1c    07:05:00  07:25:00
73.P*1d      07:05:00  07:25:00
74.L1cx1d    07:05:00  07:25:00
75.L1fx1d    07:05:00  07:25:00
76.P*1c      07:05:00  07:25:00
77.N*2e      07:14:00  07:25:00
78.P1cx1d    07:14:00  07:25:00
79.L*3e      07:17:00  07:25:00
80.S*2d      07:17:00  07:25:00
81.L3ex3c+   07:21:00  07:25:00
82.G3bx3c    07:21:00  07:25:00
83.B4dx3c+   07:23:00  07:25:00
84.S2dx3c    07:23:00  07:25:00
85.+N5c-4c   07:23:00  07:25:00
86.S3c-2d    07:23:00  07:32:00
87.P*1c      07:25:00  07:32:00
Resigns      07:25:00  07:32:00
Mate after 88.L*1a G*3c etc. or hisshi after 88.Sx1c +N3c K1b Nx1c+ Kx1c S*2d
G*3d etc. Habu may have been in control for most of this game, but it is challenger
Fukaura who takes this game and takes a 3-2 lead in the match. This gives him two
chances to take a second title from Habu in half a year. He is really turning into
a formidable foe for the best player in the game.