58th Osho Match Game 4
[Black "Habu Yoshiharu, Osho"]
[White "Fukaura Koichi, Challenger"]
[Event "58th Osho-sen, Game 4"]
[Date "February 18th and 19th 2009"]
1.P7g-7f     00:01:00  00:00:00
2.P3c-3d     00:01:00  00:00:00
3.P2g-2f     00:04:00  00:00:00
4.G4a-3b     00:04:00  00:03:00
5.P2f-2e     00:08:00  00:03:00
6.P8c-8d     00:08:00  00:07:00
7.G6i-7h     00:17:00  00:07:00
8.B2bx8h+    00:17:00  00:07:00
9.S7ix8h     00:17:00  00:07:00
10.S3a-2b    00:17:00  00:07:00
11.S3i-3h    00:32:00  00:07:00
12.S2b-3c    00:32:00  00:08:00
13.P1g-1f    00:33:00  00:08:00
14.S7a-7b    00:33:00  00:17:00
15.P1f-1e    00:35:00  00:17:00

This plan is often played in the Kakugawari with tempo loss. White allows the pawn
push on the edge, using the two moves that black plays here to create thickness in
the centre. For black, the edge pawn on 1e has the advantage that the white king is
easier to catch because there is no escape route on the edge.

16.P6c-6d    00:35:00  00:24:00
17.P4g-4f    00:39:00  00:24:00
18.S7b-6c    00:39:00  00:28:00
19.S3h-4g    00:42:00  00:28:00
20.P9c-9d    00:42:00  00:31:00
21.P9g-9f    01:04:00  00:31:00
22.K5a-4b    01:04:00  00:35:00
23.S8h-7g    01:06:00  00:35:00
24.G6a-5b    01:06:00  00:43:00
25.G4i-5h    01:13:00  00:43:00
26.K4b-3a    01:13:00  00:51:00
27.K5i-6h    01:14:00  00:51:00

With the pawn on 1e, castling on the right is also a good plan, but Habu elects to
castle his king conventionally on the left.

28.P7c-7d    01:14:00  01:34:00
29.S4g-5f    01:23:00  01:34:00
30.S6c-5d    01:23:00  01:40:00
31.P6g-6f    01:41:00  01:40:00
32.N8a-7c    01:41:00  01:54:00
33.K6h-7i    01:41:00  01:54:00
34.P3d-3e    01:41:00  02:15:00
35.S5f-4e    02:28:00  02:15:00
36.S5d-6c    02:28:00  02:52:00
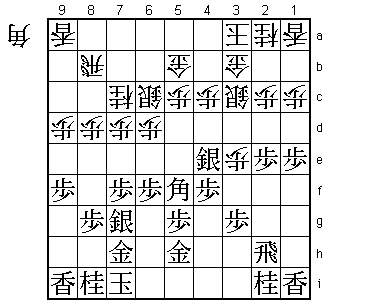
37.B*5f!     02:59:00  02:52:00

Strong move, although it may not have been Habu's first choice. Dropping the bishop
on the "wrong" diagonal is considered dubious in most cases because its mobility will
be limited. In general, the rule is that it allowing a bishop drop on the wrong
diagonal is good, even at the loss of a pawn. Habu's wrong diagonal bishop on 5f is
not even getting a pawn and the plan is very simple: exchange the attacking silver on
4e for the defending silver on 3c. After the game, Habu admitted that he wasn't really
sure that 37.B*5f was the right way to play here, but after the normal development
37.P3f P4d S5f Px3f G4g S5d Gx3f there doesn't seem to be a good way to attack for black.

38.P5c-5d    02:59:00  03:28:00
39.S4e-3d    03:07:00  03:28:00
40.S3cx3d    03:07:00  03:41:00
41.B5fx3d    03:07:00  03:41:00
42.S*3c      03:07:00  03:41:00
43.B3d-5f    03:29:00  03:41:00

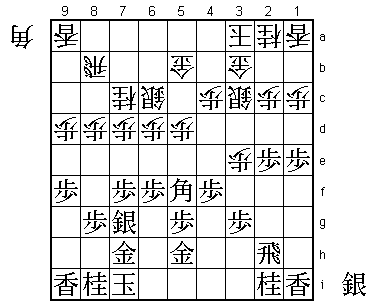
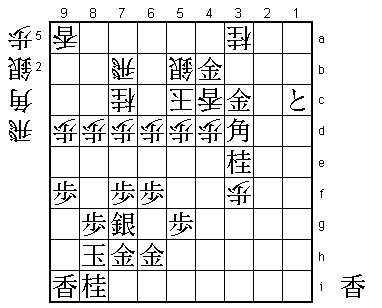
44.G5b-4b?   03:29:00  03:53:00

This was Fukauara's final move on the first day and unfortunately for him it is probably
the decisive mistake. He should have played 44.G5c immediately here. For example, after
45.G5h-6h K2b K8h G4d B6g P6e Px6e Nx6e S6f S6d white has managed to activate the knight
on 7c, which is an important difference with how the actual game went. If black tries
to neutralize this knight with N7g then Nx7g+ Sx7g N*8e N*2d Px2d Px2d Sx2d Rx2d is the
likely continuation but in this position both sides have an attack and it is hard to
predict who will win.

45.K7i-8h    03:47:00  03:53:00
46.K3a-2b    03:47:00  03:59:00
47.G5h-6h    03:52:00  03:59:00
48.G4b-5c    03:52:00  04:39:00

Fukaura is looking at the right gold manoeuvre, but the tempo loss of playing it first
to 4b is vital.

49.P3g-3f    04:27:00  04:39:00
50.B*5e      04:27:00  05:18:00

Fukaura doesn't have much else. 50.Px3f fails to S*3e and the black attack is very
strong. Also, 50.G4d Px3e Gx3e is answered with N3g and being able to use the knight
in attack is a big advantage for black. Fukaura tries to confuse the issue with 50.B*5e,
but the game now becomes a one-sided display of Habu's attacking skills.

51.N2i-3g    05:07:00  05:18:00
52.P4c-4d    05:07:00  05:34:00
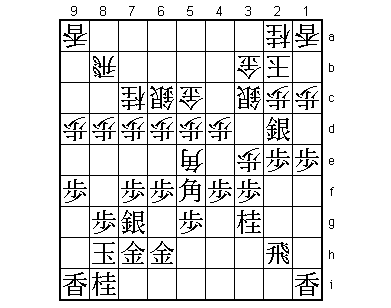
53.S*2d!     05:35:00  05:34:00

Dropping a silver at the head of the pawn looks very bold, but white cannot take it
because after 54.Px2d 55.Px2d there is no proper defence. For example 56.S*3d Px3e or
56.S*1b Bx1b+ followed by S*2c and the white position crumbles. Not taking the silver
also doesn't help white. 54.G5c-4c keeps the position together, but then Sx3e just picks
up a pawn and black can continue his attack, for example with P2d next. Also 54.Px3f is
answered by 55.Sx3c+ Gx3c P2d Px2d S*3d Gx3d Bx3d S*2c Bx2c+ Kx2c S*3e and although Habu
said after the game that he hadn't calculated this to the end, he was convinced that the
black attack was strong enough and Fukaura agreed with him.

54.B5ex4f    05:35:00  05:55:00
55.S2dx3c+   05:37:00  05:55:00
56.G3bx3c    05:37:00  06:23:00
57.P2e-2d    05:39:00  06:23:00
58.P2cx2d    05:39:00  06:23:00
59.S*3d      05:41:00  06:23:00
60.P3ex3f    05:41:00  06:31:00
61.S3dx3c+   05:49:00  06:31:00
62.K2bx3c    05:49:00  06:31:00
63.R2h-2f    05:49:00  06:31:00
64.B4fx3g+   05:49:00  06:49:00
65.G*3d      06:02:00  06:49:00
66.K3c-3b    06:02:00  06:49:00
67.R2fx2d    06:02:00  06:49:00
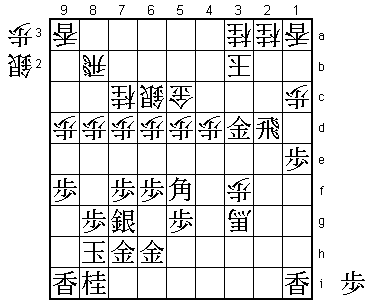
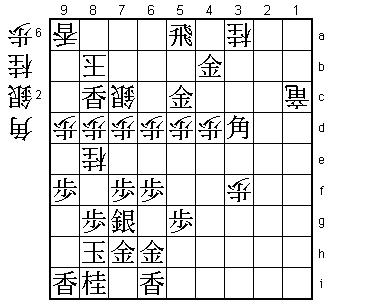
68.N*3a!     06:02:00  06:49:00

Fukaura shows why he is one of the few players who can really stand up against Habu.
This is a strong defence with the back against the wall. After the game, Habu admitted
that even though he was convinced that he had the better position here, he still thought
that it would take some work to actually win it. After 68.N*3a it is easy to make a
mistake in the attack. For example, an obvious move is 69.P*2b, but after S*3c Px2a+
Sx2d +Px3a K4b Gx2d S*4e +P3b Kx3b Bx4e Px4e G*3d it seems that the black attack continues,
but black is without pawns and the white king has a lot of space to run, which is never
easy when the attacking side has only minor pieces.

69.P1e-1d!   06:37:00  06:49:00

Habu finds the route to victory. After 69.Px1d Lx1d black gets an extra pawn in hand
which makes all the difference.

70.+B3gx1i   06:37:00  06:54:00

Fukaura decides to remove the root of the edge attack, but this only helps black to
broaden the attack.

71.P1dx1c+   06:38:00  06:54:00
72.L1ax1c    06:38:00  06:55:00
73.P*1d      06:39:00  06:55:00
74.+B1i-4f   06:39:00  07:10:00
75.P*3c      06:41:00  07:10:00
76.N2ax3c    06:41:00  07:10:00
77.P1dx1c+   06:41:00  07:10:00
78.+B4fx2d   06:41:00  07:14:00
79.G3dx2d    06:41:00  07:14:00
80.K3b-4b    06:41:00  07:14:00
81.B*7a      06:52:00  07:14:00
82.R8b-7b    06:52:00  07:17:00
83.G2dx3c    06:53:00  07:17:00
84.K4b-5b    06:53:00  07:17:00
85.B5f-3d    06:54:00  07:17:00
86.L*4c      06:54:00  07:17:00
87.B7ax5c+   06:58:00  07:17:00
88.K5bx5c    06:58:00  07:17:00
89.N*3e      06:59:00  07:17:00
90.S6c-5b    06:59:00  07:19:00
91.G*4b      07:04:00  07:19:00

Only here Habu was convinced that he would be able to push his attack home.

92.N7c-8e    07:04:00  07:22:00

Realizing there is no way to defend, Fukaura tries a last desperate attack.

93.N3ex4c+   07:09:00  07:22:00
94.S5bx4c    07:09:00  07:25:00
95.G3cx4c    07:09:00  07:25:00
96.K5c-6c    07:09:00  07:27:00
97.S*6a!     07:15:00  07:27:00

A painful drop. This rook cannot move, because after both 98.R8b L*8c or 98.R9b L*9c
taking the lance and leaving the second rank results in mate after G5c Kx5c B5b+.

98.R*1i      07:15:00  07:33:00
99.S6ax7b=   07:23:00  07:33:00
100.K6cx7b   07:23:00  07:33:00
101.G4c-5c   07:25:00  07:33:00
102.S*7c     07:25:00  07:46:00
103.L*6i     07:30:00  07:46:00

Not really the type of move that professionals like to play. They take a lot of pride
in winning in the quickest possible way, even if this includes some risk where risk
could have been avoided. However, in this position there seems to be no immediate win
for black and the white counter attack after P9e is rather nasty, but also the only
way white can attack quickly here. 103.L*6i kills this attacking plan, so it is the
easiest and quickest way to win here.

104.R1ix1c+  07:30:00  07:48:00
105.R*5a     07:31:00  07:48:00
106.K7b-8b   07:31:00  07:54:00
107.L*8c     07:34:00  07:54:00
Resigns      07:34:00  07:54:00

After 108.Kx8c R8a+ K9c (after dropping a piece on 8b, black wins after B6a+) P9e
there is no defence. A rare one-sided victory for Habu against Fukaura to level the
match at 2-2. Fukuara will be disappointed that he was unable to show his best shogi
to his fans on his hometown island of Kyushu where the game was played, but other
than that the match is still wide open. Winning game 5 will be big and Fukaura has
the black pieces in that game, although that doesn't seem to mean much anymore in
modern shogi...
