58th Osho Match Game 2
[Black "Habu Yoshiharu, Osho"]
[White "Fukaura Koichi, Challenger"]
[Event "58th Osho-sen, Game 2"]
[Date "January 28th and 29th 2009"]
1.P7g-7f     00:00:00  00:00:00
2.P3c-3d     00:00:00  00:00:00
3.P2g-2f     00:04:00  00:00:00
4.B2b-3c     00:04:00  00:01:00

The B3c-system is quite popular these days, so it wasn't a big surprise that Fukaura
picked it for his first game with white. The opening develops into a Furibisha, which
is not Fukaura's specialty, but in title matches with long thinking times it is
fashionable to pick an opening that has not been investigated in depth so that both
players are basically on their own from the start. The theoretical battle in the
Kakugawari of the first game is the exception rather than the rule nowadays.

5.B8hx3c+    00:24:00  00:01:00
6.N2ax3c     00:24:00  00:01:00
7.G6i-7h     00:25:00  00:01:00
8.R8b-4b     00:25:00  00:11:00
9.S3i-4h     00:34:00  00:11:00
10.K5a-6b    00:34:00  00:11:00
11.K5i-6h    00:37:00  00:11:00
12.K6b-7b    00:37:00  00:12:00
13.P2f-2e    00:38:00  00:12:00
14.R4b-2b    00:38:00  00:27:00
15.K6h-7g    00:42:00  00:27:00
16.S3a-4b    00:42:00  00:30:00
17.K7g-8h    00:44:00  00:30:00
18.R2b-2a    00:44:00  00:31:00
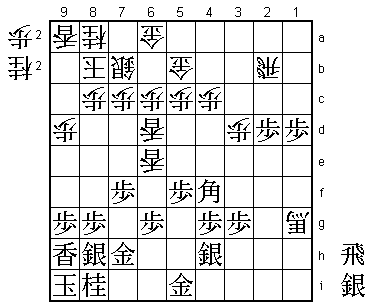
19.P1g-1f?!  01:32:00  00:31:00

This is Habu's new idea, but Fukaura quickly shows that it is questionable. The
point of the rather innocent looking 19.P1f is to play N1g next. This defends the
pawn on 2e, which is very important in this type of position because the white
threat is to take this pawn with Nx2e and then put pressure on the head of the
rook after Rx2e P2d R2h P2e because black has no pawns in hand. Ideally, black
would like to play 19.P3f here to play N3g next, which is the more natural square
for the knight, but the diagonal to the king is still open, so 19.P3f fails to the
fork B*5e. If 19.P1f is wrong here, then the best move is probably to move into the
anaguma quickly by playing 19.L9h. If then 20.Nx2e Rx2e P2d R8e P2e B*5f S8b Bx3d
and the position is unclear because black can answer P2f with P*2c and then P2g+ R2e
is good for black.

20.K7b-8b    01:32:00  00:52:00
21.L9i-9h    01:33:00  00:52:00
22.S7a-7b    01:33:00  02:00:00
23.K8h-9i    01:34:00  02:00:00
24.N3cx2e    01:34:00  02:01:00
25.R2hx2e    02:31:00  02:01:00
26.P2c-2d    02:31:00  02:01:00
27.R2e-2h    02:31:00  02:01:00
28.P2d-2e    02:31:00  02:01:00
29.N*3h      02:31:00  02:01:00
This is not necessarily a bad move and often seen in similar positions. If black
can stop the attack on the second file, he will be a knight up despite the somewhat
awkward position of this knight on 3h. However, Fukaura has seen that this position
is different and that white has a strong counter.
30.P2e-2f! 02:31:00 02:41:00
The first move of Fukaura's one-two punch. Black has to take this move, but taking
it with the rook is bad because there is still a fork with the bishop on 4d. This
is also the reason why white can only play 30.P2f here, because if he waits one
move, for example 30.S3c, then black closes the hatch on the anaguma with 31.S8h
and after 32.P2f, black can just take this pawn with the rook.
31.N3hx2f 02:32:00 02:41:00
32.S4b-3c! 02:32:00 02:41:00
This is the more difficult move that Fukaura must have seen when Habu played 19.P1f.
Now the knight on 2f cannot move anymore and despite being a full knight up, black
is in big trouble because his pieces are in each other's way.
33.S7i-8h 02:47:00 02:41:00
34.G4a-3b 02:47:00 02:53:00
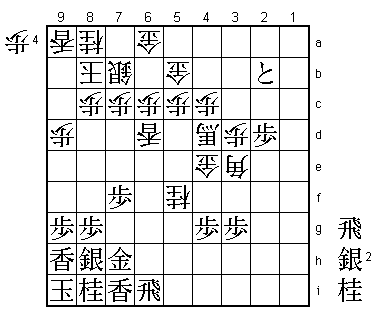
35.N2i-1g 04:49:00 02:53:00
Habu spent more than two hours on the sealed move here, a clear sign that he was
not happy with the position. The general opinion in the press room was that Fukaura
had won the opening battle. However, there is still something to play for on the
second day.
36.P1c-1d 04:49:00 03:16:00
37.G4i-5i 04:51:00 03:16:00
38.P9c-9d 04:51:00 03:45:00
39.P5g-5f 05:11:00 03:45:00
40.P1d-1e 05:11:00 04:17:00
41.P1fx1e 05:14:00 04:17:00
42.P*1f 05:14:00 04:17:00
43.P1e-1d 05:14:00 04:17:00
44.L1ax1d 05:14:00 04:34:00
45.P*1h 05:14:00 04:34:00
46.P1fx1g+ 05:14:00 04:49:00
47.P1hx1g 05:14:00 04:49:00
48.G3b-4b 05:14:00 04:49:00
49.B*4f 06:22:00 04:49:00
50.P*2g 06:22:00 05:35:00
51.R2hx2g 06:22:00 05:35:00
52.B*5d 06:22:00 05:37:00
53.R2g-2i 06:46:00 05:37:00
54.L1dx1g= 06:46:00 05:38:00
55.P*2b 06:47:00 05:38:00
56.R2a-1a 06:47:00 05:39:00
57.N2f-1d?   07:04:00  05:39:00

Better was 57.Nx3d and after Lx1g+ (Sx3d is answered by P2a+) R2c+ Sx3d +Rx3d R1h+
+R3a G4b-5b P2a+ black has the slow looking but devastating threat +P2b followed by
+P3b, so white has to hurry. But it is not easy to find a fast attack against the
black anaguma. For example, L*4d B2d Lx4g+ P*4i +Lx4h Gx4h N*6d B3c+ is far from easy.

58.P*2d!     07:04:00  05:44:00

Habu admitted that this was a very painful pawn drop, blocking both major pieces
at the same time.

59.L1ix1g    07:19:00  05:44:00
60.B5d-1h+   07:19:00  05:44:00
61.P*1b?     07:19:00  05:44:00

Habu uncharacteristically seems to have lost the will to fight, because here he
misses his final opportunity to keep things interesting. Correct was 61.P2a+ Rx2a
N2b+ Rx2b L1c+ and after R2a black has R2f, threatening the tokin attack P*2c next.
White may have no other option but to settle for sennichite after +B1g R2i +B1h
R2f etc.

62.R1ax1b    07:19:00  05:53:00
63.R2ix2d    07:21:00  05:53:00
64.S3cx2d    07:21:00  05:53:00
65.B4fx2d    07:21:00  05:53:00
66.G4b-5b    07:21:00  05:53:00
67.L*1c      07:21:00  05:53:00
68.R*2c      07:21:00  06:06:00
69.B2d-4f    07:28:00  06:06:00
70.R2cx1c    07:28:00  06:12:00
71.P2b-2a+   07:28:00  06:12:00
72.L*6d      07:28:00  06:15:00
73.+P2a-2b   07:32:00  06:15:00
74.+B1hx1g   07:32:00  06:18:00
75.P*1e      07:32:00  06:18:00
76.R1cx1d    07:32:00  06:20:00
77.P1ex1d    07:32:00  06:20:00
78.R1bx2b    07:32:00  06:20:00
79.P*2d      07:32:00  06:20:00
80.L*6e      07:32:00  06:22:00
These two lances are a very strong attack on one of the vital points of the anaguma.

81.P1d-1c+   07:32:00  06:22:00

Habu elects to try at least something. 81.G5i-6h defends the pawn on 6g, but it
is only defence and white can just keep on building up the pressure.

82.L6ex6g+   07:32:00  06:32:00
83.G7hx6g    07:32:00  06:32:00
84.L6dx6g+   07:32:00  06:32:00
85.+P1cx2b   07:32:00  06:32:00
86.+B1g-4d!  07:32:00  06:32:00

With this promoted bishop joining the attack, the black position becomes hopeless.

87.L*7i      07:33:00  06:32:00
88.N*6d      07:33:00  06:46:00
89.G5i-6i    07:35:00  06:46:00
90.N6dx5f    07:35:00  06:57:00
91.S4h-5i    07:43:00  06:57:00
92.G*4e!     07:43:00  07:01:00

Fukaura doesn't let up. Dropping this gold far away from the opponent king looks
odd, but by taking off the black bishop, white takes the last hope for a black
attack away. Also, this bishop will work very well in the white attack next.

93.B4f-6h    07:43:00  07:01:00
94.N5fx6h+   07:43:00  07:02:00
95.S5ix6h    07:43:00  07:02:00
96.+L6gx6h   07:43:00  07:05:00
97.G6ix6h    07:43:00  07:05:00
98.B*3e      07:43:00  07:05:00
99.L*6i      07:44:00  07:05:00
100.N*5f     07:44:00  07:10:00
101.G6h-7h   07:46:00  07:10:00
102.S*5h     07:46:00  07:10:00
103.R*6e     07:46:00  07:10:00
104.S5hx6i=  07:46:00  07:13:00
105.R6ex6i   07:46:00  07:13:00
106.L*6d     07:46:00  07:13:00
Resigns      07:55:00  07:13:00
Habu took 9 minutes to resign here. Black has no pawns in hand, so there seems
to be nothing else than 107.R1i here, but then 108.N6h+ wins easily. The Fukuara
Mino castle is without a scratch here, which is a testament to his complete victory
in this game. Two games, two failed opening experiments with black, two wins for
the player with the white pieces. It seems like we are in for another long match
between these two players.