58th Osho Match Game 1
[Black "Fukaura Koichi, Challenger"]
[White "Habu Yoshiharu, Osho"]
[Event "58th Osho-sen, Game 1"]
[Date "January 17th and 18th 2009"]
1.P7g-7f     00:01:00  00:00:00

This first game of the Osho match was played in a rather unusual environment: the
Sistine Hall of the Otsuka Museum of Art in Tokushima. The museum houses replicas
of more than 1000 famous works of art and this hall is completely devoted to Michelangelo's
work in the Sistine Chapel in Rome. Habu and Fukaura played their game under a full size
replica of Michelangelo's "The Last Judgment", which is about 13 by 12 meters in size.
Actually, this venue was intended for the 6th game of the 57th Osho match between Habu
and Kubo, but because Habu won the match 4-1 this game became obsolete. Last year, the
intended playing room was the "El Greco Room", which would have been closed to the public.
However, when Habu saw pictures of the museum before the match, he suggested to hold the
game in the Sistine Hall and make it open to the public for the full two days. Although
title match games are often open to the public for the last part, it is very unusual to
have a game open to the public for the full length of two days. Despite this, Fukaura
agreed that it would make this a very special occasion, so the players agreed to have a
completely open game, playing two days under the ominous images of the second coming of
Christ and the apocalypse. First judgment went to Fukaura, with four tokins giving him the
black pieces.

2.P8c-8d     00:01:00  00:04:00
3.P2g-2f     00:04:00  00:04:00
4.G4a-3b     00:04:00  00:08:00
5.G6i-7h     00:04:00  00:08:00
6.P8d-8e     00:04:00  00:14:00
7.B8h-7g     00:04:00  00:14:00
8.P3c-3d     00:04:00  00:15:00
9.S7i-8h     00:04:00  00:15:00
10.B2bx7g+   00:04:00  00:16:00

The classic Kakugawari opening. Although some expected a Yagura opening in this game,
the Kakugawari is not a surprise, because Fukaura has been quite successful with this
opening against Habu.

11.S8hx7g    00:04:00  00:16:00
12.S3a-4b    00:04:00  00:16:00
13.S3i-3h    00:08:00  00:16:00
14.S7a-7b    00:08:00  00:16:00
15.P4g-4f    00:08:00  00:16:00
16.P6c-6d    00:08:00  00:32:00
17.S3h-4g    00:08:00  00:32:00
18.S7b-6c    00:08:00  00:32:00
19.K5i-6h    00:08:00  00:32:00
20.S6c-5d    00:08:00  00:34:00
21.S4g-5f    00:14:00  00:34:00
22.P4c-4d    00:14:00  00:36:00
23.G4i-5h    00:15:00  00:36:00
24.G6a-5b    00:15:00  00:39:00
25.P9g-9f    00:20:00  00:39:00
26.P9c-9d    00:20:00  00:43:00
27.P1g-1f    00:20:00  00:43:00
28.P1c-1d    00:20:00  00:45:00
29.P3g-3f    00:20:00  00:45:00
30.K5a-4a    00:20:00  00:46:00
31.K6h-7i    00:29:00  00:46:00
32.K4a-3a    00:29:00  00:49:00
33.P6g-6f    00:30:00  00:49:00
34.P7c-7d    00:30:00  00:58:00
35.N2i-3g    00:37:00  00:58:00
36.N8a-7c    00:37:00  00:59:00
37.P2f-2e    00:59:00  00:59:00
38.S4b-3c    00:59:00  01:13:00
39.P4f-4e    01:02:00  01:13:00
40.P4dx4e    01:02:00  01:14:00
41.P2e-2d    01:03:00  01:14:00
42.P2cx2d    01:03:00  01:15:00
43.P1f-1e    01:06:00  01:15:00
44.P1dx1e    01:06:00  01:17:00
45.P7f-7e    01:07:00  01:17:00
46.P7dx7e    01:07:00  01:18:00
47.P3f-3e    01:08:00  01:18:00
48.S3c-4d    01:08:00  01:27:00
49.R2hx2d    01:27:00  01:27:00
50.P*2c      01:27:00  01:28:00
51.R2d-2f    01:28:00  01:28:00
52.G5b-6c    01:28:00  02:04:00
53.P*7d      01:51:00  02:04:00
54.G6cx7d    01:51:00  02:09:00
55.P3ex3d    01:51:00  02:09:00
56.P7e-7f 01:51:00 02:10:00
Although it seems that this opening has been analyzed to death, there is still no
definite conclusion about who is better. This position also is still a topic of
debate. 56.P7f Sx7f P8f is one of the things that has been tried here, but 56.P8f
Sx8f P*3f and 56.P*8h Kx8h P*3f have also been played often.
57.S7gx7f 01:58:00 02:10:00
58.P8e-8f 01:58:00 02:11:00
59.P8gx8f 03:44:00 02:11:00
60.P*8h 03:44:00 02:29:00
61.K7ix8h 03:52:00 02:29:00
62.R8bx8f 03:52:00 02:35:00
63.S7f-8g 03:56:00 02:35:00
64.R8f-8a 03:56:00 02:42:00
65.P3d-3c+ 04:14:00 02:42:00
66.G3bx3c 04:14:00 03:12:00
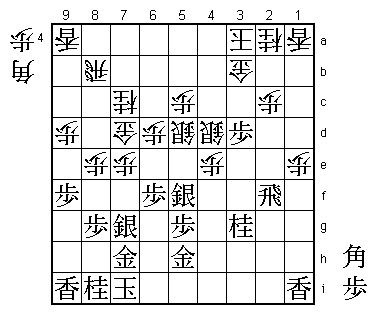
67.B*7b?! 04:16:00 03:12:00
This is Fukaura's new move, but it is unlikely that it will be played more often
as it seems to give white a clear advantage. In a game between Tanigawa and Watanabe,
black played N2e followed by P*1b, which is the kind of positive attacking play
suited to Tanigawa's style. 67.B*7b aims at making a promoted bishop that works both
in defensive and attack (in that order) and is therefore more suited for Fukaura's
style, who likes to limit his opponent's options. Still, after 68.R8a B6a+ black has
made his promoted bishop, but now it is white's turn to attack, which is not considered
a wise option in this type of position.
68.R8a-8b 04:16:00 03:22:00
69.B7b-6a+ 04:16:00 03:22:00
70.P*8f 04:16:00 03:25:00
71.S8g-9h 04:16:00 03:25:00
72.P*7g 04:16:00 03:34:00
73.K8hx7g 04:18:00 03:34:00
74.N7c-8e 04:18:00 03:35:00
75.K7g-6h 04:25:00 03:35:00
76.P*7g 04:25:00 03:37:00
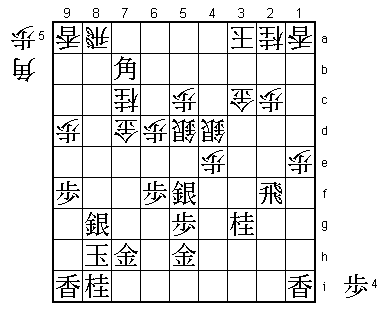
77.G7h-7i?! 05:38:00 03:37:00
This second inaccuracy makes the black position very difficult to defend. For example,
after 77.Nx7g Nx7g+ Gx7g P8g+ Sx8g P*7f G7h B*7g K6i Bx9i+ P*8c and if the white rook
moves to 9b, black has a strong attack with P*2b followed by N*3d.
78.P2c-2d 05:38:00 04:06:00
After messing up the black position, Habu calmly takes away the biggest threat N2e and
waits for the black attack. This is a very professional way of playing, inviting an
overplay in a position where there is no good attacking plan.
79.P*4b 05:56:00 04:06:00
80.P*3f 05:56:00 04:50:00
81.P*3d 06:52:00 04:50:00
Not good is 81.Rx3f because of 82.B*2g.
82.G3c-3b 06:52:00 05:29:00
83.P*2c 06:53:00 05:29:00
84.S4d-3e 06:53:00 06:04:00
85.+B6a-5a 07:06:00 06:04:00
86.G3bx2c 07:06:00 06:24:00
87.R2f-2i 07:22:00 06:24:00
88.P3fx3g+ 07:22:00 06:41:00
89.+B5a-4a 07:22:00 06:41:00
90.K3a-2b 07:22:00 06:41:00
91.+B4ax7d 07:22:00 06:41:00
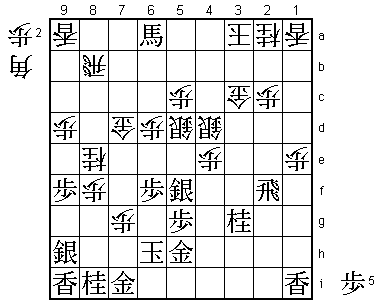
Habu has played the position to perfection. The black king is attacked from both
sides, while the black promoted bishop was forced to pick up the gold on 7d, which
moved it away from the attack. It seems like the black position will fall soon and
in the press room a quick end to the game was expected. However, one of Fukaura's
strengths is that he is very good with his back against the wall. Beating him once
is almost never enough and in this game he almost manages to turn the tables.
92.P4e-4f 07:22:00 07:10:00
93.K6h-6g 07:23:00 07:10:00
94.P4f-4g+ 07:23:00 07:11:00
95.G5h-6h 07:23:00 07:11:00
96.+P4g-4f 07:23:00 07:13:00
97.K6g-7f 07:25:00 07:13:00
98.+P4fx5f 07:25:00 07:14:00
99.P5gx5f 07:25:00 07:14:00
100.P7g-7h+! 07:25:00  07:18:00

This move was praised by Abe (8-dan). It seems to just repair the bad gold on 7i,
but Habu has judged correctly that the only way to attack the black king is with
pawn drops on the 7th file.

101.G7ix7h   07:25:00  07:18:00
102.P*7e     07:25:00  07:19:00
103.+B7dx7e  07:29:00  07:19:00
104.B*3h     07:29:00  07:23:00
105.R2i-5i   07:34:00  07:23:00
106.+P3g-4h  07:34:00  07:23:00
107.+B7ex6d  07:40:00  07:23:00
108.R8b-8a   07:40:00  07:32:00
109.R5i-7i   07:40:00  07:32:00
110.B3hx5f+  07:40:00  07:37:00
111.G7h-6g   07:41:00  07:37:00
112.P*7e     07:41:00  07:40:00
113.K7fx7e   07:41:00  07:40:00
114.P*7d     07:41:00  07:40:00
115.K7ex8f   07:43:00  07:40:00
116.N8e-7g+  07:43:00  07:54:00
117.P*8b     07:43:00  07:54:00

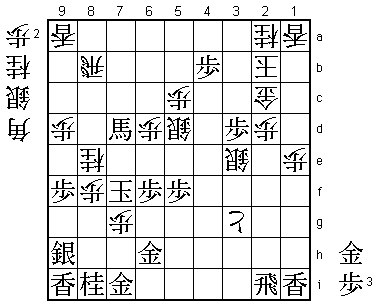
118.R8ax8b!  07:43:00  07:54:00

The path to victory is very narrow, but Habu finds it.

119.+B6dx8b  07:50:00  07:54:00
120.+N7gx6g  07:50:00  07:54:00
121.P4b-4a+  07:52:00  07:54:00
122.G*8d     07:52:00  07:54:00
123.+B8b-6d  07:54:00  07:54:00
124.S*8e     07:54:00  07:55:00
125.K8f-9g   07:54:00  07:55:00
126.P9d-9e   07:54:00  07:55:00

The difficult thing was to decide before 118.Rx8b that this move was winning,
despite the fact that it is not a mating threat. Black seems to have all kinds
of attacking threats, but none of them is sufficiently strong enough to mate the
white king in time.

127.R*8b     07:57:00  07:55:00

The alternative is 127.R*6b, because 128.P*3b (like in the game) loses to +Bx5c.
However, after 128.K1c P*1d Kx1d +Bx3g black is threatening mate, but white is one
move earlier with Sx9f K8h P*8g Sx8g Sx8g+ Kx8g N*7e Rx7e P*8f and mate.

128.P*3b     07:57:00  07:57:00
129.+B6dx5c  07:58:00  07:57:00
130.P9ex9f   07:58:00  07:57:00
131.K9g-8h   07:58:00  07:57:00
132.+B5fx6f  07:58:00  07:57:00
133.N8i-7g   07:58:00  07:57:00
134.P9f-9g+  07:58:00  07:57:00
135.S9hx9g   07:58:00  07:57:00
136.L9ax9g+  07:58:00  07:57:00
137.K8hx9g   07:59:00  07:57:00
138.P*9f     07:59:00  07:57:00
139.K9g-9h   07:59:00  07:57:00
140.N*8f     07:59:00  07:57:00
Resigns      07:59:00  07:57:00
Mate after 141.K8i S*7h or 141.K8h P*8g etc. The only way to avoid mate is to take
the knight with 141.+Bx8f, but after 142.Sx8f there is no longer a mating threat
against the white king while there is no defence for black. A good start for Habu
in this match, winning the first game with the white pieces. However, for Fukaura
this loss is as good as they come, because he played very well in this game, losing
only because of a failed opening idea. Despite this, losing the second game with the
white pieces would spell trouble, so he really wants to strike back immediately.