58th Meijin Match Game 7
Black: Maruyama Tadahisa, Challenger
White: Sato Yasumitsu, Meijin
58th Meijin-sen, Game 7, June 26th and 27th 2000
1.P2g-2f 0/0 0/0
Aono, who comments the game for Shukan Shogi, says that he did not think that
it would make much difference who would be black in this all-deciding 7th
game. I still think that Maruyama was happy that he could start the most
important game of his shogi career with the black pieces. "Not only a game
that will decide the Meijin title, but also a game that will change the lives
of both players" (Aono).
2.P8c-8d 0/0 9/9
3.P7g-7f 1/1 0/9
4.G4a-3b 0/1 1/10
5.G6i-7h 0/1 0/10
6.P8d-8e 0/1 1/11
7.B8h-7g 0/1 0/11
8.P3c-3d 0/1 0/11
9.S7i-8h 0/1 0/11
10.S3a-4b 0/1 1/12
11.B7gx2b+ 0/1 0/12
12.G3bx2b 0/1 0/12
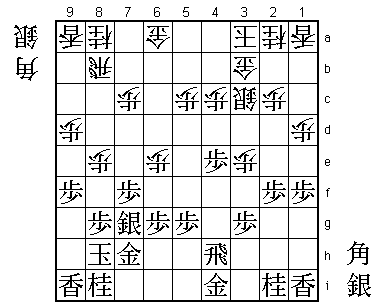
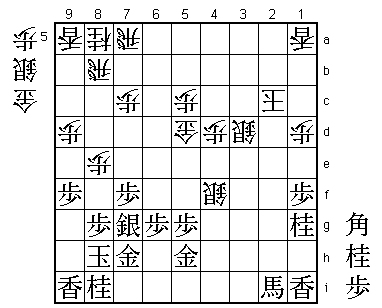
A Kakugawari game for the fourth time in this match. Maruyama sticks to his
game plan and he has every reason to. He has won two of the three previous
Kakugawari games and Sato still has a horrible score against this opening,
despite winning game four in this match.
13.S3i-3h 0/1 0/12
14.S7a-7b 0/1 1/13
15.P4g-4f 1/2 0/13
16.P6c-6d 0/2 9/22
17.S8h-7g 0/2 0/22
18.S7b-6c 0/2 0/22
19.S3h-4g 0/2 0/22
20.K5a-4a 0/2 6/28
21.K5i-6h 1/3 0/28
22.K4a-3a 0/3 0/28
23.P9g-9f 16/19 0/28
24.P9c-9d 0/19 3/31
25.P1g-1f 4/23 0/31
26.P1c-1d 0/23 1/32
27.K6h-7i 9/32 0/32
28.S6c-5d 0/32 14/46
29.S4g-5f 1/33 0/46
30.P6d-6e 0/33 21/67
31.K7i-8h 35/68 0/67
32.G2b-3b 0/68 3/70
33.S5f-4e 12/80 0/70
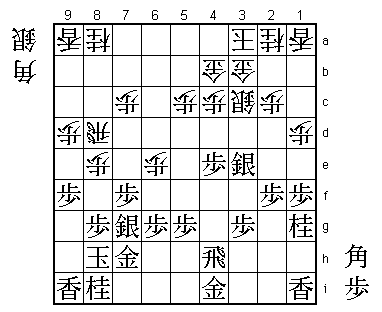
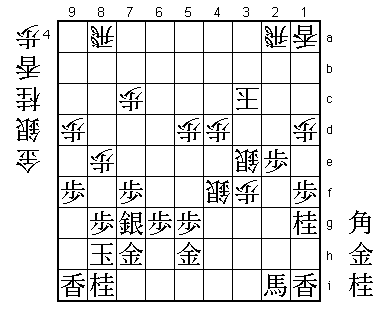
This game develops in the same way as the second game. The only difference is
that white's gold is still on 6a. Aono's comment on 33.S4e is that this move
should not be seen as just a new attack in this type of position, but even
as a new way of thinking about the game. I am not really sure what he means
by this, but 33.S4e is definitely a Maruyama special and he has good results
with it.
34.S5dx4e 0/80 140/210
35.P4fx4e 0/80 0/210
36.S4b-3c 0/80 3/213
37.R2h-4h 5/85 0/213
38.P3d-3e 0/85 6/219
If Sato would have played 38.G5b, the position would have been identical to
game 2. It is likely that 38.P3e is the move that Sato prepared for this game.

39.S*4f      122/207   0/219
40.G6a-5b    0/207     18/237
41.S4fx3e    11/218    0/237
42.R8b-8d    0/218     1/238
43.N2i-1g    8/226     0/238
44.G5b-4b    0/226     9/247
45.S3e-4f!?  109/335   0/247
A surprise. Maruyama did not like the natural follow-up 39.N2e after 40.S2d
(40.S3d Sx3d Rx3d P4d Px4d P3f Rx3f B*1h is good for black) Sx2d Px2d B*5e
which does not look so bad for black. The combination of the aggressive
43.N1g with this defensive retreat of the silver does not look very good,
but Maruyama has judged correctly that leaving the initiative to his
opponent is not bad for him.

46.S3c-3d    0/335     51/298
47.P3g-3f    20/355    0/298
48.P2c-2d    0/355     6/304
49.P2f-2e    2/357     0/304
50.B*2g      0/357     5/309
51.P2ex2d    30/387    0/309
52.B2gx3f+   0/387     0/309
53.B*5f!     1/388     0/309

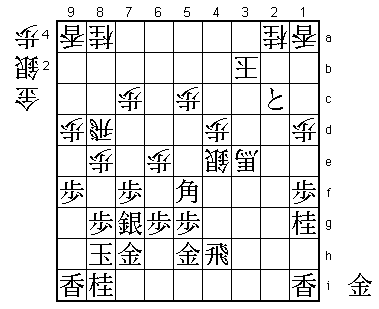
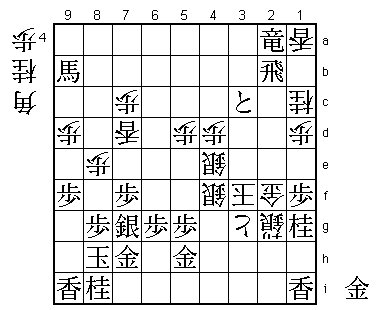
White seems to be doing well, using the pressure on the head of the knight to
make a promoted bishop. 53.B*5f might have been a cold shower for Sato. It
keeps the white horse under control, defends against a silver drop on 4g and
this bishop also has its eye on the weak point 2c.

54.G4b-3c    0/388     25/334
55.G4i-5h!   6/394     0/334

Aono was very impressed by this move. Again Maruyama leaves the initiative
to his opponent, but the strong threat of G4g to hassle the promoted
bishop followed by the strong attack P*3e is very hard to defend against.
It seems that Sato completely overlooked this quiet development of the gold.

56.+B3f-2f   0/394     110/444
57.P*3e      5/399     0/444
58.S3dx3e    0/399     0/444
59.S4fx3e    0/399     0/444
60.+B2fx3e   0/399     0/444
61.S*2c      0/399     0/444
62.G3cx2d    0/399     5/449
63.S2cx3b+   10/409    0/449
64.K3ax3b    0/409     0/449
65.P4e-4d    0/409     0/449
66.P4cx4d    0/409     0/449
67.P*2e      12/421    0/449
68.G2d-2c    0/421     1/450
69.G*2d      0/421     0/450
70.G2cx2d    0/421     6/456
71.P2ex2d    0/421     0/456
72.S*4e      0/421     1/457
73.P2d-2c+   9/430     0/457
74.K3bx2c    0/430     20/477

Black has the advantage, but it is only very small. Putting the king on the
same diagonal as the bishop is quite frightening, but Sato has seen that it
is the only way to stay in the game.

75.G*4f      1/431     0/477
76.+B3ex4f   0/431     0/477
77.R4hx4f    0/431     0/477
78.S*3d      0/431     0/477
79.B5fx6e    47/478    0/477
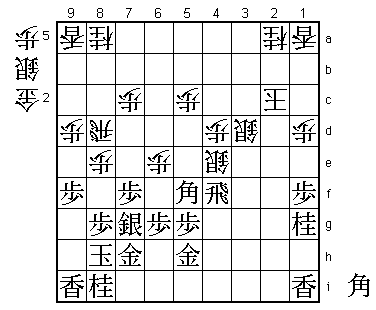
In the press room only 79.Bx4e Px4e R5f G*4c B*7e was analysed, which seems
good for black. However, Maruyama saw that after B*7e, white has the strong
R5d! Rx5d Px5d and the bishop on 7e has become an idle piece.

80.S4ex4f    0/478     20/497
81.B6ex2a+   0/478     0/497
82.R*7a!     0/478     0/497

It is not often that Sato drops back a rook in his own camp, but here it is
strong.

83.+B2a-6e   2/480     0/497
84.G*5d      0/480     0/497
85.+B6e-2i   4/484     0/497
86.R8d-8b?   0/484     7/504
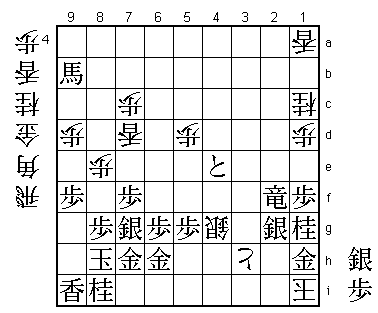
So far Sato has played very well to stay in the game, but this might have been
the move that lost him his Meijin title. No alternative is given in Shukan
Shogi, but this move leads to disaster.

87.N*8c      3/487     0/504

This takes two potentially attacking pieces on the black king side. After this,
black does not have to fear a white counter attack anymore and can take his
time to go for the white king.

88.R7a-2a    0/487     9/513
89.N8cx9a+   0/487     0/513
90.P*3f      0/487     0/513
91.P*2e      6/493     0/513
92.K2c-3c    0/493     2/515
93.L*5f      3/496     0/515
94.S3d-3e    0/496     0/515
95.L5fx5d    4/500     0/515
96.P5cx5d    0/500     0/515
97.+N9ax8a   1/501     0/515
98.R8bx8a    0/501     4/519
99.+B2i-5f?  1/502     0/519
This prolongs the game. 99.G4g would have been correct after black wins
quickly. It might be that Maruyama feared the counter attack 99.N*8f and
wanted to make absolutely sure of victory. Or maybe he just became a little
nervous at the prospect of becoming Meijin...

100.S*4e     0/502     0/519
101.+B5f-9b  0/502     0/519
102.R8a-3a   0/502     0/519
103.N*2g     0/502     0/519
104.S3e-2f   0/502     1/520
105.B*2d     11/513    0/520
106.K3c-3d   0/513     4/524
107.B2d-4b+  1/514     0/524
108.S2fx2g+  0/514     0/524
109.G*3b     1/515     0/524
110.R3ax3b   0/515     6/530
111.+B4bx3b  0/515     0/530
112.G*2b     0/515     0/530
113.+B3bx2a  4/519     0/530
114.G2bx2a   0/519     0/530
115.R*2d     0/519     0/530
116.K3d-3e   0/519     0/530
117.R2dx2a+  0/519     0/530
118.P3f-3g+  0/519     0/530
119.P2e-2d   0/519     0/530
120.K3e-3f   0/519     0/530
121.P2d-2c+  0/519     0/530
122.L*7d     0/519     2/532
123.+P2c-3c  0/519     0/532
124.N*1c     0/519     2/534
125.R*2b     0/519     0/534
126.G*2f     0/519     5/539
127.+P3c-4c! 1/520     0/539

Coolly played. Maruyama does not panic at the prospect of his opponent getting
an entering king. He just counts the pieces, knows that he has enough points
to win anyway and uses this promoted pawn to grab some extra security points.
Tempting was 127.G*2e, but after 128.Gx1f things are far from easy.

128.S4f-4g=  0/520     0/539
129.G5h-6h   1/521     0/539
130.+P3g-3h  0/521     0/539
131.+P4cx4d  0/521     0/539
132.K3f-3g   0/521     0/539
133.+P4dx4e  0/521     0/539
134.K3g-2h   0/521     0/539

This was probably a deliberate choice by Sato. Rather than play on for a long
time in which almost all of his pieces will be taken before both players get
an entering king, he decides to let himself be mated.

135.R2bx2f+  5/526     0/539
136.+S2gx2f  0/526     0/539
137.+R2ax2f  0/526     0/539
138.K2hx1i   0/526     0/539
139.G*1h     1/527     0/539
140.K1ix1h   0/527     0/539
141.S*2g     1/528     0/539
142.K1h-1i   0/528     0/539
143.G*1h     1/529     0/539
Resigns      0/529     0/539
Time:        08:49:00  08:59:00
144.K2i Sx3h leads to a simple mate. For the third time in a row the Meijin
match is decided in the final game, but this time Sato is on the wrong end
of the score. Maruyama becomes the 11th Meijin since the introduction of
the tournament Meijin in 1937, winning the most important title of them
all as his first ever major title. Not bad for a player who flunked the
Shoreikai entrance exam in his first try and had to spent a year in the
Kenshukai (a kind of shogi study group for young players who want to
prepare for the Shoreikai) before finally being allowed on the road to
professional shogi. It was a long but steady climb and now Maruyama stands
at the top of the mountain!