58th Meijin Match Game 6
Black: Maruyama Tadahisa, Challenger
White: Sato Yasumitsu, Meijin
58th Meijin-sen, Game 6, June 14th and 15th 2000
1.P2g-2f     0/0       0/0
2.G4a-3b     0/0       7/7
3.P7g-7f     1/1       0/7
4.P8c-8d     0/1       2/9
5.G6i-7h     0/1       0/9
6.P8d-8e     0/1       2/11
7.B8h-7g     0/1       0/11
8.P3c-3d     0/1       0/11
9.S7i-8h     0/1       0/11
10.B2bx7g+   0/1       11/22
11.S8hx7g    0/1       0/22

A do or die game for Maruyama, as he must win this game to take the match to
a deciding seventh game. Despite his loss in game 4, he was not expected to
change his game plan and indeed chose the Kakugawari again.

12.S3a-4b    0/1       0/22
13.S3i-3h    0/1       0/22
14.S7a-7b    0/1       0/22
15.P9g-9f    0/1       0/22
16.P1c-1d    0/1       4/26
17.P1g-1f    0/1       0/26
18.P9c-9d    0/1       0/26
19.P4g-4f    1/2       0/26
20.P6c-6d    0/2       1/27
21.S3h-4g    0/2       0/27
22.S7b-6c    0/2       0/27
23.K5i-6h    0/2       0/27
24.K5a-4a    0/2       13/40
25.S4g-5f    9/11      0/40
26.K4a-3a    0/11      1/41
27.K6h-7i    0/11      0/41
28.S6c-5d    0/11      9/50
29.P6g-6f    76/87     0/50
30.K3a-2b    0/87      117/167
31.P3g-3f    41/128    0/167
32.R8b-6b    0/128     60/227

Like in game 4, Sato is aiming for a quick attack.

33.P2f-2e    79/207    0/227

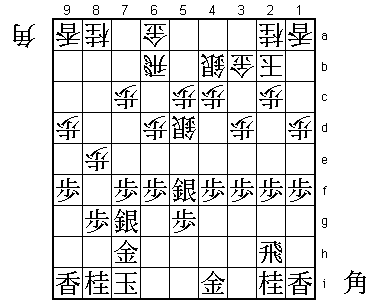
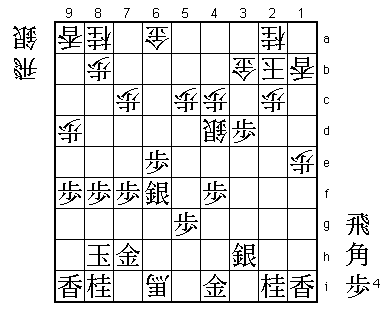
The sealed move and a surprise. Commentators expected 33.P7e to make it hard
for white to use the knight on 8a. With 33.P2e Maruyama shows that he
believes that Sato's attack is not strong enough and that his counter attack
will be stronger.

34.P6d-6e?!  0/207     37/264

A decision that was probably influenced by the success of the quick attack in
game 4. Sato himself had the feeling that this might be an overplay, but he
could not help himself and played it anyway. The simple 34.S3c is probably
better.

35.P6fx6e    112/319   0/264
36.S5dx6e    0/319     0/264
37.S5fx6e    1/320     0/264
38.R6bx6e    0/320     0/264
39.P*6f      0/320     0/264
40.R6e-6b    0/320     31/295
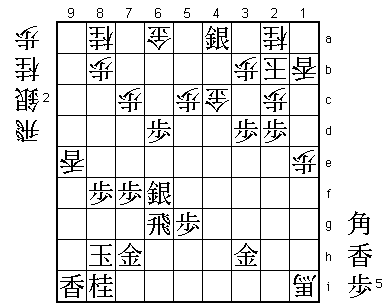
41.P1f-1e!   8/328     0/295

There is Maruyama's counter attack. It is very strong indeed.

42.P1dx1e    0/328     86/381
43.P2e-2d    1/329     0/381
44.P2cx2d    0/329     0/381
45.R2hx2d    0/329     0/381
46.P*2c      0/329     0/381
47.R2dx3d    14/343    0/381
48.P8e-8f    0/343     4/385
49.P*1b      36/379    0/385
50.L1ax1b    0/379     24/409

51.P8gx8f?   15/394    0/409

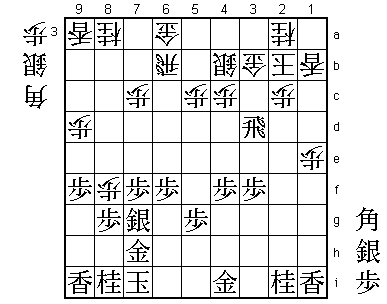
Here Maruyama misses a very good chance. After 51.P*1c! Lx1c B*1a K3a S*2b
K4a R8d black has a very good position. Note that P*1c is a vital pawn
sacrifice, as 51.B*1a immediately fails to Kx1a Rx3b+ S3c and black has
no good continuation.

52.S4b-3c    0/394     7/416
53.R3d-8d    3/397     0/416
54.P*8c      0/397     3/419
55.R8dx8c+   2/399     0/419
56.P*8b      0/399     0/419
57.+R8c-8e   18/417    0/419
58.P*6e!     0/417     4/423

Things have now changed in white's favour. White has to exchange the promoted
rook here, as white is threatening to win it with S*7d. With a rook in hand,
white's attack gets a lot more power.

59.+R8ex6e   8/425     0/423
60.R6bx6e    0/425     4/427
61.P6fx6e    0/425     0/427
62.B*2g      0/425     9/436
63.S*3h      0/425     0/436
64.B2gx3f+   0/425     3/439
65.P*3d      0/425     0/439

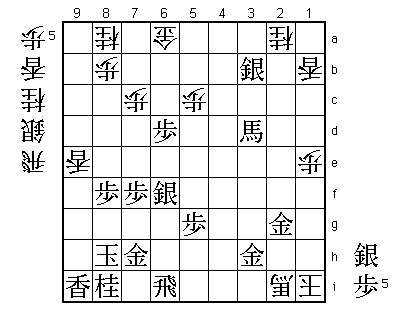
Maruyama realises that he is in trouble and tries to complicate the position.

66.S3c-4d?!  0/425     35/474

Hard to judge, but taking the pawn might have been better. 66.Sx3d R*6d is a
double attack on silver and gold, but after R*6i K8h P*6f Rx3d P6g+ Rx3f
+Px7h Kx7h G*7i K8h Gx8i K7h G7i K8h and now white has to give up the
initiative with P*3c. This is a very tough position, but it seems easier for
white to play the attack as R6g+ next is devastating.

67.K7i-8h    27/452    0/474

Here Sato feared that the game would end in sennichite after 67.B*4g +Bx4g
(+Bx4f P*1c is good for black) Sx4g B*2g S3h B3f+ B*4g. It seems that
Maruyama never gave this possibility any thought.

68.P*6f      0/452     4/478
69.S7gx6f    6/458     0/478
70.+B3f-6i?  0/458     15/493

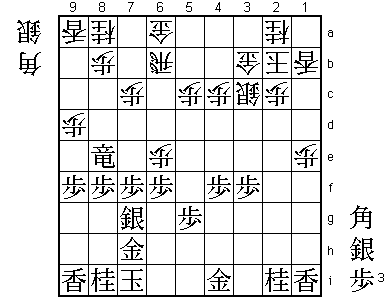
A clear mistake that changes the game again in Maruyama's favour. After 70.R*6i
S7g P9e Px9e Lx9e Lx9e P*6f L*6h S*6g white has a strong attack.

71.R*6g!     1/459     0/493

It seems that Sato overlooked this move. He now has to retreat the bishop and
never gets a good attack going anymore.

72.+B6i-3f   0/459     0/493
73.P6e-6d    6/465     0/493
74.+B3fx4f   0/465     11/504
75.S6f-7g    1/466     0/504
76.P9d-9e    0/466     3/507
77.P9fx9e    3/469     0/507
78.P*6f      0/469     3/510
79.S7gx6f    0/469     0/510
80.+B4fx1i   0/469     0/510
81.N2i-3g    3/472     0/510
82.L*3f      0/472     22/532
83.P*4e      2/474     0/532
84.L3fx3g+   0/474     5/537
85.P4ex4d    3/477     0/537
86.+L3gx3h   0/477     0/537
87.S*4a      1/478     0/537
88.G3b-4b    0/478     1/538
89.P4dx4c+   1/479     0/538
90.G4bx4c    0/479     0/538
91.P*2d      0/479     0/538
92.P*3b      0/479     1/539
93.G4ix3h    0/479     0/539
94.L9ax9e    0/479     0/539

95.B*1a!     6/485     0/539

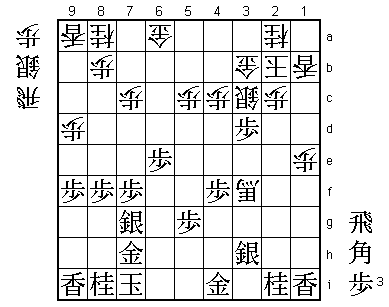
The deciding move. Of course 95.Lx9e was impossible because of N*9f, but this
bishop sacrifice has been calculated very deep. White can get an entering king,
but Maruyama has judged correctly that he will have no trouble to mate the
king in the black camp.

96.K2b-1c    0/485     0/539

White can not take the bishop. 96.Kx1a P2c+ and there is no defence.

97.S4ax3b=   0/485     0/539
98.G4cx3d    0/485     0/539
99.B1a-2b+   2/487     0/539
100.K1cx2d   0/487     0/539
101.+B2bx2c  0/487     0/539
102.K2d-2e   0/487     0/539
103.P*2f     0/487     0/539
104.K2ex2f   0/487     0/539
105.+B2cx3d  0/487     0/539
106.S*2g     0/487     0/539
107.L*2i     1/488     0/539
108.+B1ix2i  0/488     0/539
109.G*3g     1/489     0/539
110.K2f-1g   0/489     0/539
111.G3gx2g   0/489     0/539
112.K1g-1h   0/489     0/539
113.P*1i     0/489     0/539
114.K1hx1i   0/489     0/539
115.R6g-6i   3/492     0/539
Resigns      0/492     0/539
Time:        08:12:00  08:59:00

A nice way to finish. The rook that first worked well in defence, now plays
a deciding role in attack. There is no defence against S*2h next, so Sato
resigned. The meijin match is going the full stretch for the third year in
a row. Sato is perhaps the favourite still, as he has experience with this
situation and won the seventh game in the previous two years. However, one
feels that the furigoma will be watched with more than average anticipation
as both players seem to be hard to beat with black.
