58th Meijin Match Game 4
Black: Maruyama Tadahisa, Challenger
White: Sato Yasumitsu, Meijin
58th Meijin-sen, Game 4, May 18th and 19th 2000
1.P7g-7f     0/0       0/0
2.P8c-8d     0/0       5/5
3.P2g-2f     0/0       0/5
4.G4a-3b     0/0       1/6
5.G6i-7h     0/0       0/6
6.P8d-8e     0/0       1/7
7.B8h-7g     0/0       0/7
8.P3c-3d     0/0       0/7
9.S7i-8h     0/0       0/7
10.S3a-4b    0/0       1/8
11.B7gx2b+   0/0       0/8
12.G3bx2b    0/0       0/8
13.S3i-3h    0/0       0/8
14.G2b-3b    0/0       5/13
15.S8h-7g    0/0       0/13
16.S7a-7b    0/0       1/14
17.P9g-9f    0/0       0/14
18.P9c-9d    0/0       4/18
19.P4g-4f    1/1       0/18
20.P1c-1d    0/1       2/20
21.P1g-1f    1/2       0/20
22.P6c-6d    0/2       4/24
23.S3h-4g    2/4       0/24
24.S7b-6c    0/4       4/28
25.K5i-6h    2/6       0/28
26.K5a-4a    0/6       15/43
27.S4g-5f    44/50     0/43
28.K4a-3a    0/50      6/49
29.K6h-7i    39/89     0/49
30.P7c-7d    0/89      28/77

Just like the last two years, the Kakugawari opening is very important in
this Meijin match. In games for the Meijin title, Sato thus far has perfect
losing record of 0-6 against this opening. Furthermore, in game 2 he was
beaten straight from the opening by Maruyama. In that game, he played the
popular P6e strategy. Here he plays the more conventional P7d-N7c plan.

31.G4i-5h    18/107    0/77
32.N8a-7c    0/107     21/98
33.P3g-3f    9/116     0/98
34.S6c-5d    0/116     16/114
35.P6g-6f    2/118     0/114
36.G6a-6b    0/118     39/153

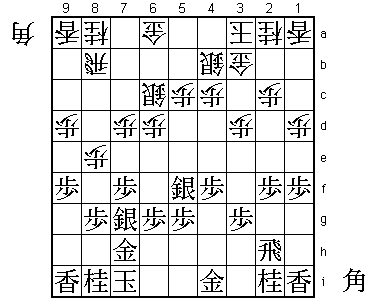
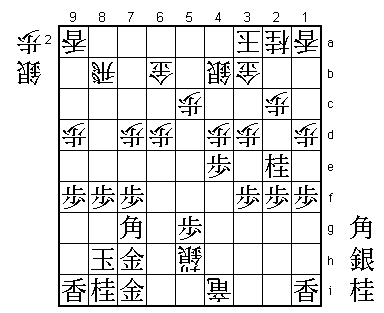
This is a little unusual, but not without significance. With the P7d-N7c
position, white's natural attack is P6e Px6e Nx6e. With the gold on 5b,
there would be a hole on 7c for a bishop drop in that case. 36.G6b covers
this hole.

37.N2i-3g    13/131    0/153
38.P6d-6e!?  0/131     117/270

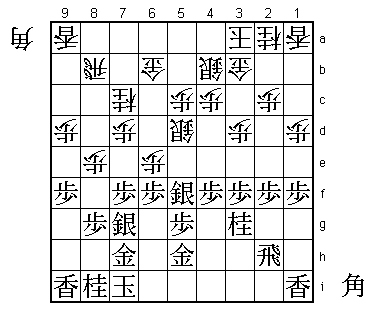
The sealed move after very long thought. Everyone, including Maruyama,
expected the game to continue for a couple of more moves on the first day,
but Sato took a really long time for this brave decision. Almost all
professionals would play 38.R8a here without much thought. The hole on 7a
is really worrying as a bishop or a silver can be dropped here. Maruyama
could not even hide his surprise when he saw Sato's sealed move on the
morning of the second day. The bravest part of the decision was that Sato
himself was far from convinced that this was the correct move.

39.P6fx6e    23/154    0/270
40.S5dx6e    0/154     3/273
41.S5fx6e    52/206    0/273
42.N7cx6e    0/206     0/273
43.S7g-6f    0/206     0/273
44.P8e-8f    0/206     4/277
45.P8gx8f    8/214     0/277
46.P*6d      0/214     2/279

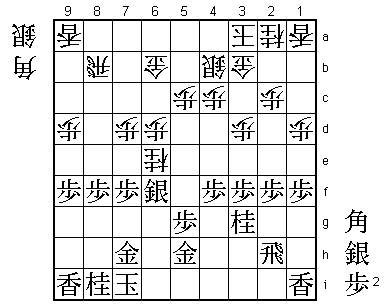
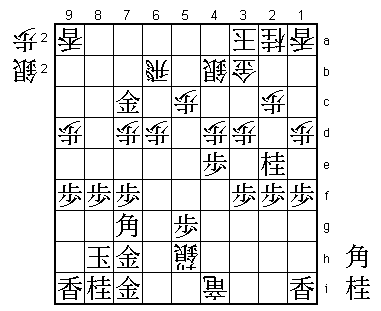
Not good is 46.Rx8f P*8g R8e S*8f R8a P*6a and white gets in big trouble
(G5b Sx6e S*3i R1h B*2i N*6d).

47.B*5e      68/282    0/279

The reason Sato dared to play 38.P6e is that 47.S*7a is looking good in this
position, but leads to a good position for white after 48.R7b Sx6b+ Rx6b
B*7c R6a Bx9a+ S*3i.

48.B*4d      0/282     10/289
49.B5ex4d    32/314    0/289
50.P4cx4d    0/314     0/289
51.P4f-4e    0/314     0/289
52.S*3i      0/314     60/349
53.R2h-2i    15/329    0/349
54.B*4i      0/329     0/349
55.S*4g      0/329     0/349
56.B4ix5h+   0/329     0/349
57.S4gx5h    0/329     0/349
58.S3i-4h+   0/329     0/349
59.R2i-2h    68/397    0/349
60.G*3h      0/397     11/360
61.R2h-1h    0/397     0/360
62.+S4hx5h   0/397     13/373
63.R1hx3h    0/397     0/373
64.N6ex5g+   0/397     3/376

65.S6fx5g?   48/445    0/376

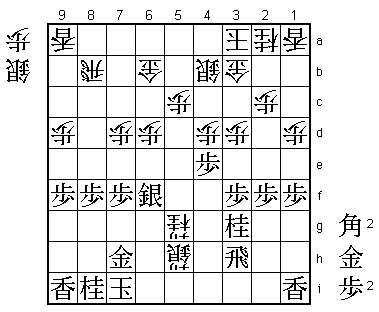
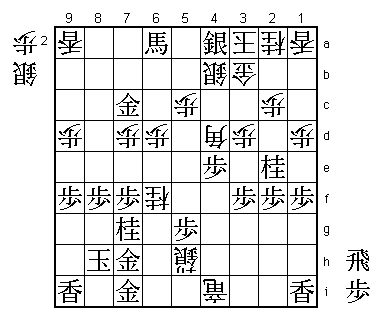
A mistake that Maruyama even called the losing move. After 65.P*5i +N5f
S7g +S5g Px4d instead, the position would have been unclear.

66.+S5hx5g   0/445     1/377
67.P*5h      0/445     0/377
68.S*4g!     0/445     18/395

The problem. After 69.R1h Sx5h= black has no good defence against S6g+ next.

69.P5hx5g    23/468    0/395
70.S4gx3h+   0/468     0/395
71.N3g-2e    0/468     0/395
72.R*4i      0/468     8/403
73.P*6i      1/469     0/403
74.+S3h-4h   0/469     9/412
75.B*7g      2/471     0/412
76.+S4h-5h   0/471     2/414
77.K7i-8h    1/472     0/414
78.R4ix6i+   0/472     21/435
79.G*7i      1/473     0/435
80.+R6i-4i!  0/473     4/439

It is tempting to take the lance, but that would be a mistake after B*5e. It
looks like +R4i is a simple retreat, but this rook also works very well in
defence on the vital fourth file, leaving Maruyama with very few attacking
options.

81.S*7a      17/490    0/439
82.R8b-7b    0/490     1/440
83.S7ax6b+   1/491     0/440
84.R7bx6b    0/491     0/440
85.G*7c      20/511    0/440

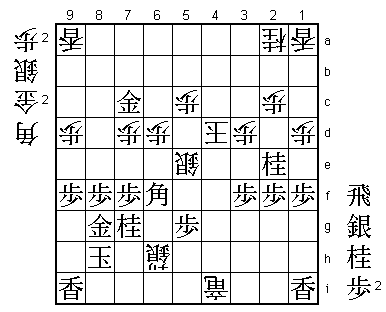
This took Sato completely by surprise. He had counted on 85.Bx4d, after which
86.S*6h G7ix6h +Sx6h Gx6h S*7i K9h Sx6h= is good for white. Maruyama, realising
that he is in trouble, is trying to get away with sennichite.

86.R6b-9b    0/511     2/442
87.G7c-8c    3/514     0/442
88.R9b-6b    0/514     1/443
89.G8c-7c    0/514     0/443
90.R6b-6a    0/514     8/451

Sato repeated the moves just to compose himself and to make sure that he
can still win even after Maruyama's next attack.

91.N*5f      9/523     0/451
92.S*6h!     0/523     11/462

The winning move. Next, Sx7i+ Gx7i P*8g is deadly, so Maruyama has to do
something desperate.

93.N5fx4d    8/531     0/462
94.S6hx7g+!  0/531     8/470

The quickest way to win is probably still 94.Sx7i+ Gx7i P*8g Kx8g +Rx7i,
but Nx3b+ followed by S*3c is very dangerous. Sato does not take any risks.

95.N8ix7g    0/531     0/470
96.B*6f      0/531     2/472

This bishop is also working in defence. A blunder would have been 96.S*6h
G7ix6h +Sx6h Gx6h B*7i K7h and the black king escapes.

97.B*5b      5/536     0/472
98.B6fx4d    0/536     6/478
99.B5bx6a+   0/536     0/478
100.N*6f     0/536     0/478
101.S*4a     3/539     0/478

Maruyama's last try does not work, but 101.Px4d Nx7h+ Kx7h P*8g P*6i +Sx6i
Gx6i P8h+ Kx8h +Rx6i +Bx3d is also winning for white.

102.N6fx7h+  0/539     0/478
103.G7ix7h   0/539     0/478
104.P*8g     0/539     0/478
105.G7hx8g   0/539     0/478
106.+S5h-6h  0/539     0/478
107.S4ax3b+  0/539     0/478
108.K3ax3b   0/539     0/478
109.G*4c     0/539     0/478
110.S4bx4c   0/539     0/478
111.+B6ax4c  0/539     0/478
112.K3bx4c   0/539     0/478
113.P4ex4d   0/539     0/478
114.K4cx4d   0/539     0/478
115.B*6f     0/539     0/478
116.S*5e     0/539     0/478
Resigns      0/539     0/478
Time:        08:59:00  07:58:00

This win must be a great relief for Sato. He has equalled the match at 2-2,
the momentum is completely his after two wins and he has black in the next
game. Most of all, he must be relieved that he finally managed to win a
Kakugawari game in the Meijin match after six failed attempts. The Meijin
title will now be decided in a best-of-three, so the next game is perhaps
the most important one of the match. Who will get to one game within the
Meijin title?
