58th Meijin Match Game 3
Black: Sato Yasumitsu, Meijin
White: Maruyama Tadahisa, Challenger
58th Meijin-sen, Game 3, May 8th and 9th 2000
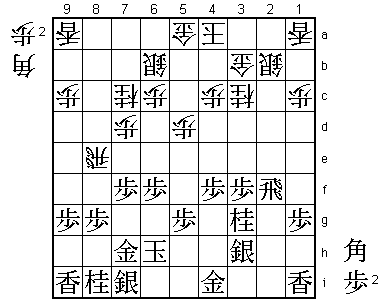
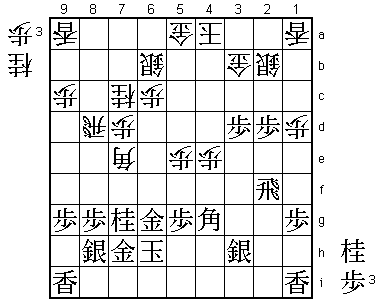
1.P7g-7f 1/1 0/0
2.P3c-3d 0/1 0/0
3.P2g-2f 2/3 0/0
4.P8c-8d 0/3 2/2
5.P2f-2e 1/4 0/2
6.P8d-8e 0/4 1/3
7.G6i-7h 1/5 0/3
8.G4a-3b 0/5 2/5
9.P2e-2d 0/5 0/5
10.P2cx2d 0/5 1/6
11.R2hx2d 0/5 0/6
12.P8e-8f 0/5 2/8
13.P8gx8f 0/5 0/8
14.R8bx8f 0/5 2/10
15.R2dx3d 0/5 0/10
16.B2b-3c 0/5 1/11
17.R3d-3f 6/11 0/11
18.S3a-2b 0/11 2/13
19.P*8g 2/13 0/13
20.R8f-8e 0/13 2/15
This is a game that Sato has to win to stay in the match as no shogi player
has ever come back from 3-0 down in a best-of-seven match. In the first game
Sato also faced the R8e Yokofudori, so this development is no surprise. Even
though Sato lost in game 1, he got a very good position after the opening, so
there is no reason to avoid this strategy.
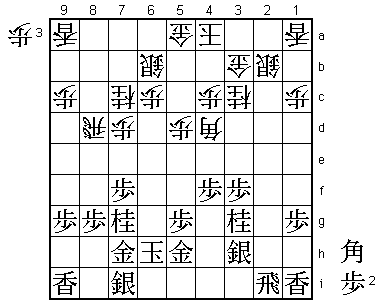
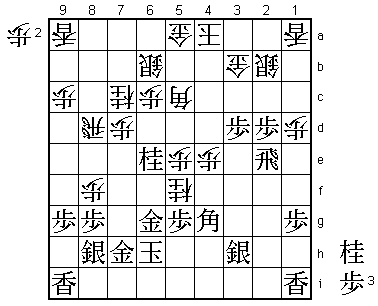
21.R3f-2f 0/13 0/15
22.K5a-4a 0/13 2/17
23.S3i-3h 21/34 0/17
24.S7a-6b 0/34 36/53
25.K5i-6h 7/41 0/53
26.G6a-5a 0/41 44/97
27.P3g-3f 7/48 0/97
28.P7c-7d 0/48 3/100
29.N2i-3g 8/56 0/100
30.N8a-7c 0/56 4/104
31.P4g-4f 2/58 0/104
32.P5c-5d 0/58 50/154
33.B8hx3c+ 37/95 0/154
34.N2ax3c 0/95 0/154
35.P6g-6f!? 1/96 0/154
A new idea. In the game between Tanigawa and Maruyama in the A class Junisen
in January this year, Tanigawa played 35.N7g and got into trouble after 36.R5e.
The weak point 5g turned out to be more important than the awkward position
of the white rook. Sato's idea is to play N7g later. If the rook still moves
to 5e, the weak point 5g can be defended with a gold move to 6g.
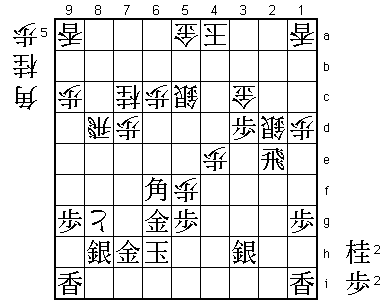
36.B*4d 0/96 31/185
37.R2f-2i 9/105 0/185
38.B4dx6f 0/105 25/210
39.N8i-7g 53/158 0/210
40.R8e-8d 0/158 2/212
41.G4i-5h 14/172 0/212
42.B6f-4d? 0/172 51/263
Looks natural, but immediately after the game Maruyama suggested 42.P*8f as
better. If 43.Px8f then 44.P7e seems good for white. If black defends with
43.S8h then 44.Px8g+ Sx8g P*8f S9h P*2h R4i N8e Nx8e Rx8e G5h-6g leads to
an unclear position with chances for both players.

43.G5h-6g    39/211    0/263
44.P1c-1d    0/211     20/283
45.P*2d      53/264    0/283
46.P*2f      0/264     4/287
47.S7i-8h    5/269     0/287
48.P5d-5e    0/269     1/288
49.B*4g!     30/299    0/288
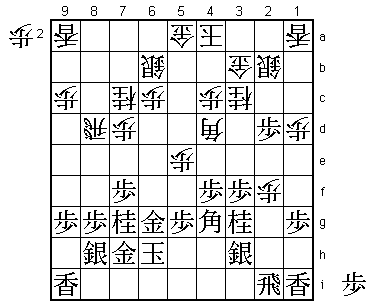
This bishop works very well. If white does nothing, the knight on 3c will get
lost after 51.P3e~P3d.
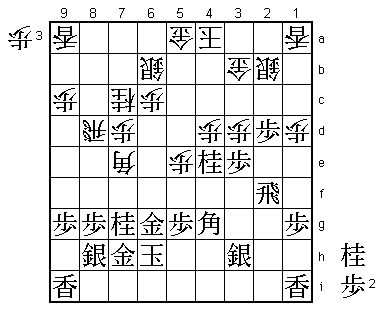
50.P*3d 0/299 25/313
Admitting a strategic defeat. Having to drop back a pawn here is very painful.
51.P4f-4e 24/323 0/313
52.B4d-5c 0/323 0/313
53.P7f-7e 0/323 0/313
The bishop on 4g is also working on the left side of the board, having its
eye on the weak point 7d.
54.B5cx7e 0/323 6/319
55.P3f-3e 1/324 0/319
56.N3cx4e 0/324 2/321
After the game, Maruyama admitted that he seriously considered resigning here.
Black has an overwhelming position and he can pick the weak spots that he want
to aim at. 56.Nx4e is the only way to get some play for the knight.
57.N3gx4e 44/368 0/321
58.P4c-4d 0/368 0/321
59.R2ix2f? 21/389 0/321
If there is too much that looks good, it is easy to get confused. Sato could
have won quickly here with 59.P*4b. If white takes this pawn, the fork N*5d
is devastating. Moving away with 60.K5b fails to 61.Px3d Px4e N*4d. This
variation is what made Maruyama consider resignation earlier.

60.P4dx4e    0/389     1/322
61.P3ex3d?   17/406    0/322
A second mistake to complicate things further. 61.P*4d G5b (to defend against
P2c+ followed by P4c+) Px3d B5c N*3e B4d P2c+ Sx2c Rx2c+ Gx2c Nx2c+ followed
by P3c+ is winning for black. Even an early escape with K5a does not help
after S*7b. Now things get a little dangerous for black.

62.B7e-5c    0/406     22/344
63.R2f-2e    4/410     0/344
64.P*8f      0/410     4/348
65.N7g-6e    40/450    0/348
66.N*5f!     0/450     27/375
This knight drop is a very good try.

67.B4gx5f?   17/467    0/375

Again a mistake by Sato. 67.Gx5f Px5f Nx5c= does not give white a bishop and
still is a safe win. Black now no longer has the advantage.

68.P5ex5f    0/467     0/375
69.N6ex5c+   0/467     0/375
70.S6bx5c    0/467     0/375
71.P2d-2c+   3/470     0/375
72.S2bx2c    0/470     1/376
73.P3d-3c+   0/470     0/376
74.G3bx3c    0/470     24/400
75.B*6f      0/470     0/400
76.S2c-2d    0/470     72/472
77.P*3d      19/489    0/472
78.P8fx8g+?  0/489     28/500
Shogi can be a tough game. Maruyama has battled back from a hopeless position
to a complicated endgame with everything to play for. However, here he throws
all of his hard work away. After 78.Gx3d Bx8d Gx2e Bx7c+ R*4h N*5h R3h+ nothing
is decided yet.

79.S8hx8g    1/490     0/500
80.S2dx2e    0/490     29/529
81.P3dx3c+   26/516    0/529
82.N*7e      0/516     0/529
83.+P3c-4c   1/517     0/529
84.G5a-4b    0/517     1/530
85.+P4cx5c   1/518     0/530
86.G4bx5c    0/518     0/530
87.B6f-3c+   1/519     0/530
88.K4a-5b    0/519     0/530
89.S*5a      2/521     0/530
90.N7ex6g+   0/521     0/530
91.G7hx6g    0/521     0/530
92.P5fx5g+   0/521     0/530
93.G6gx5g    1/522     0/530
94.B*7g      0/522     0/530
95.+B3cx7g   4/526     0/530
96.N7c-6e    0/526     0/530
97.G*4b      2/528     0/530
98.K5b-6a    0/528     0/530
99.S5a-6b+   0/528     0/530
Resigns      0/528     5/535
Time:        08:48:00  08:55:00
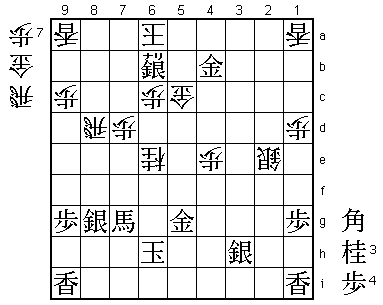
And after 100.Kx6b B*5a K7a Bx8d+ white has no mate and no good defence. Sato
got the win he desperately needed, but he got a good scare after three
mistakes in short order when he had a clearly winning position. Maruyama will
be disappointed to lose this one in the end, but his decision to play on when
he considered resigning might have some psychological significance. After all,
by playing on he showed that he is in better form than the Meijin, making
only one mistake while Sato made three. Game four will tell us more about
the impact of this.