58th Meijin Match Game 2
Black: Maruyama Tadahisa, Challenger
White: Sato Yasumitsu, Meijin
58th Meijin-sen, Game 2, April 22nd and 23rd 2000
1.P7g-7f     0/0       0/0
2.P8c-8d     0/0       3/3
3.P2g-2f     2/2       0/3
4.G4a-3b     0/2       3/6
5.G6i-7h     2/4       0/6
6.P8d-8e     0/4       1/7
7.B8h-7g     1/5       0/7
8.P3c-3d     0/5       0/7
9.S7i-8h     2/7       0/7
10.B2bx7g+   0/7       2/9
11.S8hx7g    3/10      0/9

The Kakugawari is no surprise. Maruyama is a specialist in this opening and
Sato has had big trouble with white against the Kakugawari in the previous
two Meijin matches against Tanigawa.

12.S3a-4b    0/10      0/9
13.P9g-9f    3/13      0/9
14.S7a-7b    0/13      4/13
15.S3i-3h    3/16      0/13
16.P9c-9d    0/16      5/18
17.P4g-4f    14/30     0/18
18.P6c-6d    0/30      8/26
19.S3h-4g    10/40     0/26
20.S7b-6c    0/40      2/28
21.K5i-6h    0/40      0/28
22.P1c-1d    0/40      5/33
23.P1g-1f    1/41      0/33
24.S6c-5d    0/41      22/55
25.K6h-7i    6/47      0/55
26.P6d-6e    0/47      23/78

This is most often played these days. White does not allow black the natural
development with P6f and at the same time this moves prepares for a future
bishop drop on 6d.

27.S4g-5f    14/61     0/78
28.G6a-5b    0/61      17/95
29.K7i-8h    49/110    0/95
30.K5a-4a    0/110     23/118
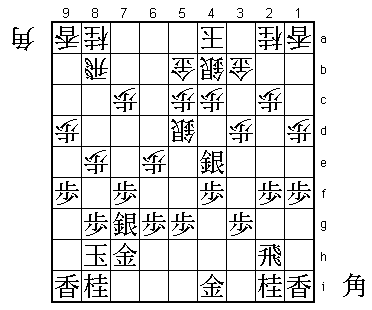
31.S5f-4e    73/183    0/118

Maruyama took a long time for his last two moves. There are many variations in
this opening where the loss of a tempo is vital and the extra move K7i-8h can
not be spared. Maruyama judged that he could improve his king position before
playing the attack S4e. This attack is not often seen, but Maruyama has played
this before, albeit in a slightly different position.

32.S5dx4e    0/183     55/173

Difficult decision. Sato thought long about 32.S5e, but did not like the
position after 33.Sx3d R8d S4e Sx4f G5h.

33.P4fx4e    1/184     0/173
34.K4a-3a    0/184     0/173
35.R2h-4h    69/253    0/173
36.S4b-3c    0/253     26/199
37.G4i-3h    14/267    0/199
38.G5b-4b    0/267     36/235
39.G3h-4g    17/284    0/235
40.K3a-2b    0/284     14/249
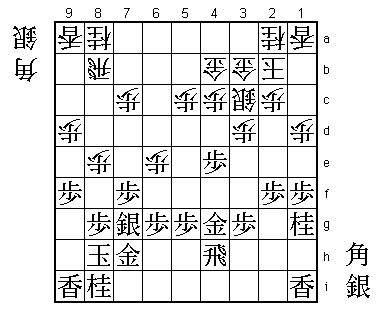
41.N2i-1g!   26/310    0/249

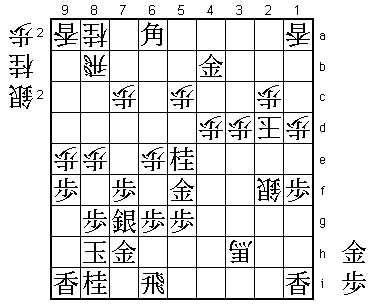
Good move. If black gives white time to build an anaguma (after L1b next) he
will be in trouble. For example, 41.P3f L1b N3g K1a and white is just in time
since N2e can be answered with S2b.

42.S3c-2d    0/310     112/361

Now 42.L1b fails to N2e and black gets a strong attack. It is very hard to
see what white can play here, and it is no wonder that Sato took almost two
hours for 42.S2d. The main alternative he spent the time on was 42.K1b. This
is a strange looking move, but after 43.G5f as in the game, white can play
B*5i followed by Bx3g+.

43.G4g-5f    13/323    0/361

Not a move to play lightly, as the gold in front of the pawn is bad shape.
However, this game is an exception to the rule. The gold will play a vital
role.

44.N2a-3c?!  0/323     39/400

White can not play 44.B*5i, since 45.B*5e defends the pawn on 3g with check,
so white loses the bishop after R5h next. However, Sato should probably have
played 44.S3c here. A difficult move to play, as the silver just moved away
from this square. Still, 44.S3c N2e B*5i R4i Bx3g+ Nx3c+ Nx3c P4d S*4h Px4c+
G4bx4c R7i "is better than what happened in the game" (Sato).

45.P4e-4d    30/353    0/400
46.S2d-3e    0/353     13/413

No choice. 46.Px4d Rx4d P*4c R6d and the rook promotes.

47.P4dx4c+   26/379    0/413
48.G4bx4c    0/379     0/413
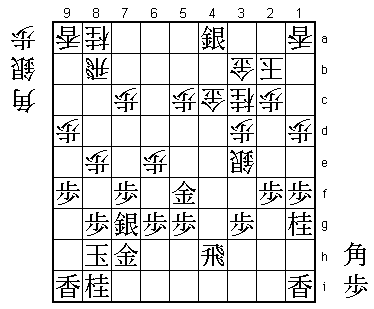
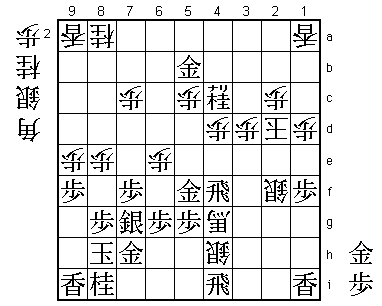
49.S*4a!     43/422    0/413

Great attack. This seriously weakens the white king.

50.P*4d      0/422     20/433

Painful, but 50.G3b-4b B*6a P*4d Bx4c+ Gx4c G*3b K1c P*4e is worse as black's
attack can not be stopped (Px4e Gx4e Nx4e Rx4e etc.).

51.S4ax3b+   8/430     0/433
52.K2bx3b    0/430     0/433
53.N1g-2e!   21/451    0/433

There comes the knight. After the knight exchange, the square 5e is great for
a knight drop.

54.B*5i      0/451     8/441
55.R4h-4i    11/462    0/441
56.B5ix3g+   0/462     1/442
57.N2ex3c+   12/474    0/442
58.K3bx3c    0/474     0/442
59.N*5e      1/475     0/442
60.+B3g-3h   0/475     5/447
61.R4i-6i    2/477     0/447
62.P9d-9e    0/477     16/463

63.B*6a      10/487    0/463

A big surprise for the professionals in the press room. They analysed 63.G*7b
as a quick win for black. This gold can not be taken: 64.Rx7b Nx4c+ Kx4c B*6a.

64.G4c-4b    0/487     18/481
65.G*4c      0/487     0/481
66.K3c-2d    0/487     1/482
67.G4cx4b    0/487     0/482
68.S3ex2f    0/487     0/482

And things are suddenly very tough for black as the white king escapes up
the board, or...

69.N5e-4c+!  18/505    0/482

Looks slow, but after 71.+Nx4d black's attack is decisive.

70.R8b-6b    0/505     24/506
71.B6a-5b+   2/507     0/506
72.R6bx5b    0/507     0/506
73.G4bx5b    0/507     0/506
74.+B3h-4g   0/507     3/509
75.R6i-4i    11/518    0/509
76.S*4h      0/518     3/512
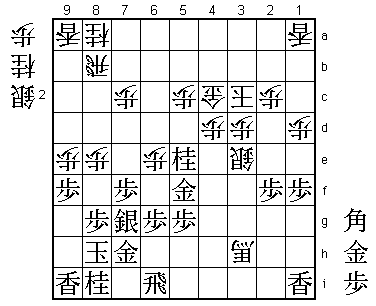
77.R*4f!     5/523     0/512

The decider. Maruyama usually plays his moves without making a sound, but
putting this rook down could clearly be heard in the press room. Very unusual
for Maruyama, showing that he is human after all. The gold on 5f is doing
a fine job on a bad square.

78.S4hx4i=   0/523     17/529

After 78.+Bx4f Gx4f Sx4i= P*2e black wins, showing how vital a single pawn can
be.

79.R4fx2f!   2/525     0/529

Taking the horse is also winning, but Maruyama takes the shortest route to
victory.

80.S*2e      0/525     0/529
81.R2f-4f    3/528     0/529

Coolly moving the rook back. White has no defence. Maruyama, back to his
modest self, said that only here he was certain of victory.

82.B*3f      0/528     10/539
83.R4fx3f    2/530     0/539
84.S2ex3f    0/530     0/539
85.G*2f      0/530     0/539
Resigns      0/530     0/539
Time:        08:50:00  08:59:00

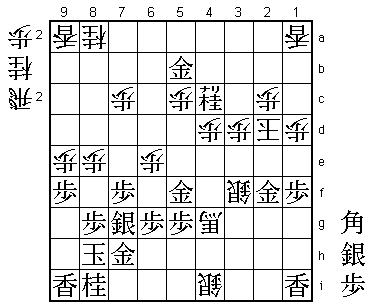
This threatens mate with 85.S*3c and even if white defends with 85.N*2a
then B*4b is winning.

A perfect game by Maruyama, who most be feeling very confident now. The win
in game 1 may have been a little lucky, this game can go straight into the
collection of his finest performances. Sato was beaten without making a single
mistake. Tough luck, and he now desperately needs a win in game 3 to have a
chance to keep his Meijin title.
